Star news


How many modules are needed for a vase? Modular origami vase master class
All women love beautiful and interesting things that fit harmoniously into the interior and give the house a special charm. To decorate your home with little things, you don’t have to buy them, but you can do it yourself, showing all your imagination and taste. A homemade vase for flowers or fruit will be unusual and at the same time stylish. The modular origami vase is very easy to make for beginners - a good way to spend an evening with the family.
Modules for creating figures can be made from various papers, you just need to choose high-quality and thick sheets. This can be white or colored paper intended for copier, which can be found in any office supply store.
You can also use leaves from writing sets for origami, but it is important to remember that the size of the finished product may vary, depending on the parameters of the modules. The smaller the modules are, the smaller the figure will be.
The modules are made very simply, you just need to divide the sheet correctly.
To make various vases, you may need a fairly large number of modules, so it is best to be patient and start making them.
Simple vase
A modular origami vase for beginners is done quite quickly and easily, and the master class will help with this. To make a vase like this, you don’t need a lot of modules and desire.

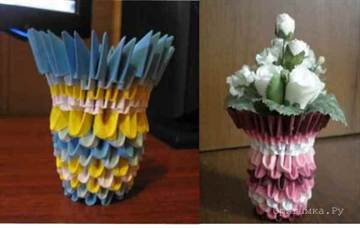
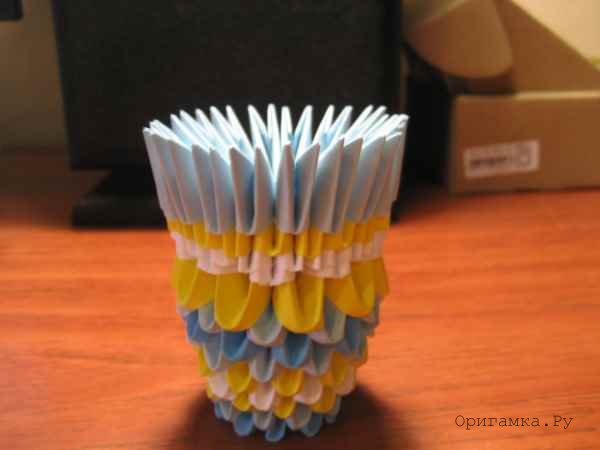
For such a vase you need to make 192 modules of different colors from paper. The colors can be very different, the main thing is that they are combined with each other.
For this model you will need:
- 42 dark blue modules;
- 54 yellow;
- light blue 54;
- white 42.
The manufacturing process is simple:
- The first row of the vase is made from 12 dark blue modules, and the second row is formed from 12 light blue ones.

- The third row is made from 12 yellow triangles, and the fourth from white ones.

- The fifth row is made again from yellow, the sixth from light blue, the seventh from dark blue, the eighth from light blue, the ninth from yellow.

- The tenth row is made of 12 white modules, which are placed with the short part outward.

- The 11th row contains white modules, but their number should increase to 18. The 12th row is made of 18 yellow modules, and 13 of light blue ones.

- Row 14 will be the final one and is made from 18 dark blue modules.

This simple vase will be a good home decoration.
If the vase doesn’t work out the first time, you can learn and additionally watch a video from the master classes:
After studying these videos, you can learn how to make vases using a variety of techniques and according to various patterns. Such products will become real home decorations and will add a special zest and charm to the interior.
Other options
A variety of vase assembly patterns will help every craftswoman find something of her own. Vases can be small or huge - floor vases. Vases filled with flowers and fruits made from modules are very popular.

To make a vase like this, you need a lot of patience and 1920 modules. What does it take to assemble the modules all together, not to mention cutting the blanks and bending the required amount.

Modular origami is a very exciting activity that will be appreciated not only by adults, but also by children. With the help of daily activities, children will be able to collect all kinds of figures, equipment, animals, plants and various useful products. Attention, perseverance, creative thinking, imagination - all this develops in a person during modular origami classes.
The design of a fruit bowl is not very complicated, but you need to think about what to fill it with. To do this, you will need to make fruits and vegetables from modules; you can watch the video to see how to do this.
Bananas, strawberries, cherries, oranges, grapes, pineapples, lemons and various vegetables are very easily made from modules. A good master class in origami techniques will help you create various vases for fruits and sweets. You will find some videos below.
Depending on the size of the future product, the number of modules that will be used to create the vase also depends. The larger the vase, the more complex the process of creating it. If you also make a beautiful, multi-colored thing, you will need a lot of bright modules. In addition to multi-colored stripes, such products can also have beautiful patterns.
Video on the topic of the article
It’s best to watch the video on how to make blanks for modules.
Hello dear masters and craftswomen. I present to your attention a master class on making such an origami swan, and I called it “Swan in Pink”. How to make an origami swan? We will make a pink drawing, highlight the swan with pink modules around the perimeter and place it on a round stand, and also glue small eyes. Please watch this video on making an origami swan. IN […]
Hello dear masters and craftswomen! Today I bring to your attention a master class on making a tricolor Swan from triangular modules. It would seem that what else can you come up with, what other options are there for making Swans using the modular origami technique. But it turns out there are still options and this is not the last thing in my arsenal. The tricolor swan is so simple […]
Hello dear masters and craftswomen! I bring to your attention a new master class on making a Swan in black from 3D modules. In the last lesson we made a Swan in red, but now I decided to change the style a little and make a Swan in black. The scheme is not complicated and will suit anyone, even a beginner in modular origami. Specially […]
Hello dear masters and craftswomen! I bring to your attention a new master class on making a Swan in red shades. On the Internet you can find a huge number of different schemes and master classes on making Swans using the modular origami technique. I'm sure you've never seen a swan like this before. This scheme is quite simple and even [...]
Swan in blue. Video tutorials and diagram. Part 3. In the third part of the master class, I offer you two video lessons and a detailed origami diagram of how to make a swan. The first video shows how to make a swan's neck and how to make a small stand. The second video talks about how to glue a swan better and faster. Lesson 6 (neck and […]
Swan in blue. Video tutorials and diagram. Part 2. In the second part of the “Swans in Blue” tutorial we finish making the body. I have prepared for you two video tutorials and a detailed diagram of an origami swan from modules. To assemble a swan you will need 1438 modules of 1/16 size, of which: 317 - purple modules 471 - blue modules 552 - blue […]
Swan in blue. Video tutorials and diagram. Part 1. I bring to your attention a new master class on making an origami swan from paper from 3D origami modules. The design is quite unusual and the appearance of the wing is not quite classic. In the photo you can see small through holes and a mesh pattern. I'll be honest - the scheme is quite complicated! Especially for this scheme I […]
“Rainbow Swan” diagram and video tutorials (part 3). The third part of the “Rainbow Swan” master class consists of three video tutorials on assembling the stand. And I also decided that a video tutorial on gluing the “Rainbow Swan” would be very useful for you. Lesson 5 (stand part 1) Lesson 6 (stand part 2) Lesson 7 (stand part 3) […]
All women love beautiful and interesting things that fit harmoniously into the interior and give the house a special charm. To decorate your home with little things, you don’t have to buy them, but you can do it yourself, showing all your imagination and taste. A homemade vase for flowers or fruit will be unusual and at the same time stylish. The modular origami vase is very easy to make for beginners - a good way to spend an evening with the family.
Modules for creating figures can be made from various papers, you just need to choose high-quality and thick sheets. This can be white or colored paper intended for copier, which can be found in any office supply store.
You can also use leaves from writing sets for origami, but it is important to remember that the size of the finished product may vary, depending on the parameters of the modules. The smaller the modules are, the smaller the figure will be.
The modules are made very simply, you just need to divide the sheet correctly.
To make various vases, you may need a fairly large number of modules, so it is best to be patient and start making them.
Simple vase
A modular origami vase for beginners is done quite quickly and easily, and the master class will help with this. To make a vase like this, you don’t need a lot of modules and desire.
For such a vase you need to make 192 modules of different colors from paper. The colors can be very different, the main thing is that they are combined with each other.
For this model you will need:
- 42 dark blue modules;
- 54 yellow;
- light blue 54;
- white 42.
The manufacturing process is simple:
- The first row of the vase is made from 12 dark blue modules, and the second row is formed from 12 light blue ones.

- The third row is made from 12 yellow triangles, and the fourth from white ones.

- The fifth row is made again from yellow, the sixth from light blue, the seventh from dark blue, the eighth from light blue, the ninth from yellow.

- The tenth row is made of 12 white modules, which are placed with the short part outward.

- The 11th row contains white modules, but their number should increase to 18. The 12th row is made of 18 yellow modules, and 13 of light blue ones.
- Row 14 will be the final one and is made from 18 dark blue modules.

This simple vase will be a good home decoration.
If the vase doesn’t work out the first time, you can learn and additionally watch a video from the master classes:
After studying these videos, you can learn how to make vases using a variety of techniques and according to various patterns. Such products will become real home decorations and will add a special zest and charm to the interior.
Other options
A variety of vase assembly patterns will help every craftswoman find something of her own. Vases can be small or huge - floor vases. Vases filled with flowers and fruits made from modules are very popular.

To make a vase like this, you need a lot of patience and 1920 modules. What does it take to assemble the modules all together, not to mention cutting the blanks and bending the required amount.

Modular origami is a very exciting activity that will be appreciated not only by adults, but also by children. With the help of daily activities, children will be able to collect all kinds of figures, equipment, animals, plants and various useful products. Attention, perseverance, creative thinking, imagination - all this develops in a person during modular origami classes.
The design of a fruit bowl is not very complicated, but you need to think about what to fill it with. To do this, you will need to make fruits and vegetables from modules; you can watch the video to see how to do this.
Bananas, strawberries, cherries, oranges, grapes, pineapples, lemons and various vegetables are very easily made from modules. A good master class in origami techniques will help you create various vases for fruits and sweets. You will find some videos below.
Depending on the size of the future product, the number of modules that will be used to create the vase also depends. The larger the vase, the more complex the process of creating it. If you also make a beautiful, multi-colored thing, you will need a lot of bright modules. In addition to multi-colored stripes, such products can also have beautiful patterns.
Video on the topic of the article
It’s best to watch the video on how to make blanks for modules.
Have you ever heard of modular origami? But in vain. It is very popular in such a direction as handmade. You can make various practical crafts from paper - vases, baskets, flowers, animals and much more. This very exciting activity is suitable even for those people who have absolutely no experience in composing compositions from modules. Today we will look at a few simple lessons on how to make modular origami (vase) - a master class, an assembly diagram from modules and practical tips will help you.
Modular origami. Definition
Modular origami is a technique for folding a paper sheet, which differs from the classical method in that a large number of paper parts - modules - are used in the process of folding the product. Complex geometric shapes and fakes are formed from identically folded paper elements.
Advantages of the modular origami technique:
- Using this method of creating various products, you can create not only small, but also very large products, up to a large floor vase.
- Unlike traditional origami, the modular design will not fall apart both during and after work. This design is quite durable due to the close arrangement of the models among themselves. The friction force is so high that it is very difficult to destroy a fake.
Important! If you are new to this business, then do not immediately take on complex designs, but start working, for example, with a small tabletop vase. It’s quite easy to do, the main thing is to prepare the required number of modules.

A list of what can be made from modular paper parts:
- Human.
- Animal.
- Plant (tree, flower).
- Fruits.
- Building.
- Panel.
- A spherical figure.
- Miniature vase on the table.
- Floor vase.
- Christmas tree decorations.
We have listed only the main fakes that are made from paper inserts. You can come up with your own version. Use your imagination to create a unique composition.
How to make a triangular module?
Before you make a vase from modules, you need to know how to make them. Now we will look at the most popular and widely used triangular module. When you learn how to make this simple paper element, you can easily take on creating a wide variety of crafts of varying degrees of complexity.
Important! The triangular module does not need to be glued or stitched with other structural elements. The entire product is held together thanks to the strong contact of the paper envelopes. This is very convenient when working in a non-work environment.
Step-by-step algorithm for assembling triangular origami:
- We take a thick A4 sheet of paper in our hands and bend it in half. Then we bend it again, but this time across. This is necessary in order to mark the center of the module, so after placing it, bend the sheet back. In the process of all work, we focus on this fold line.
- We bend the edges of the sheet to the previously marked middle at a right angle, creating a part similar to the wings of an ordinary paper airplane.
- We turn the sheet over, bend its lower part upward strictly along the edge of the resulting miniature triangle.
- We bend the corners beyond the boundaries of the resulting main triangle.
- We bend the bottom of the sheet in the opposite direction, leaving the same folded corners.
- We fold the corners of the triangle inward so that they are not visible, and the trapezoidal sections are bent upward.
- We bend the created triangle in half and get the module we need.
Important! When assembling figures and other various crafts from the triangular module, we will use the small pockets and corners it contains. It is with the help of such tricks that we will assemble our structure, which can not only be hung, but also placed on a table and even the floor.
Modular origami - flower vase, step-by-step assembly diagram
We prepare the necessary materials and tools:
- 28 sheets of white paper.
- 14 sheets of colored paper.
- Scissors or utility knife.
- Glue.
Step-by-step instruction:
- According to the previously discussed scheme, we add 433 white and 211 blue triangular modules. If you want to slightly change the design, then think carefully about the number of paper parts.
- We take 20 white elements for the very first row, and 20 blue elements for the next row, connecting them together.
- We make the fourth row of 30 blue parts. In order to add 10 modules, we make the first tier in the usual way, and leave the second and third with empty pockets.
- Next we add rows, starting work from the fifth to the sixteenth. We add 30 parts to these tiers to indicate the drawing of our future craft, using blue modules.
- After completing the sixteenth row, lay out the seventeenth with white elements (30 pieces).
- We take 30 white modules for the next eighteenth row and attach them backwards relative to the previous tier.
- We make the nineteenth row of 40 blue elements, evenly added around the circumference of our structure.
- We begin assembling the last row of 40 blue parts: insert the first corner into the first pocket of the second element, and the right one into the free space between the modules of the previous tier.
- We make the bottom of the vase from 30 blue elements inserted into each other. We glue the resulting paper ring to the bottom of our workpiece.
- We make handles for the vase from 12 blue modules inserted inside each other. To make two holders we needed 24 triangular modules.
Modular origami candy bowl - assembly diagram
To work we need the following:
- White, light green and bright green paper.
- Glue.
- Scissors.
Let's get started:
- For the first row we take white parts, and for the second and third – light green. Using the standard fastening method, we connect three tiers at once with a chain until we get a solid circle.
- Squeeze the circle slightly with your fingers to form a cylinder.
- We assemble the next row only from light green elements; for it and for all subsequent tiers we will take 24 modules.
- We begin to work on creating a drawing.
- In the fourth row, insert one white piece every three green pieces.
- In the fifth tier we alternate white and green modules through two parts.
- In the sixth row we use the following combination of parts: white, light green, white and bright green.
- In the seventh tier we alternate two light green elements and bright green modules every other.
- We decorate the ninth row only with light green inserts.
- From the tenth to the twelfth tiers we repeat the actions of the fourth, fifth and sixth rows.
- In the thirteenth row we alternate two white and bright green elements, and in the fourteenth row we insert one bright green one between three white modules.
- On the fifteenth and sixteenth tiers we make protrusions with sharp corners, decorating the top of the hill with a bright green module.
- Next, we continue to make the next six rows with white parts, installing them between the previously made protrusions. We attach bright green and then white paper inserts to the top of each of them.
- We begin to create the neck for our vase. For this, small triangular modules were prepared in advance. For each row extended upward, we fix two white parts, previously connected by green modules.
- We fasten eleven white parts so that we form a ladder, with which we will connect the sharp tops of our structure. We strengthen the white hills with green inserts, connecting all the existing tops with such elements.
- Between the main elements we insert four more white parts.
The modular origami vase is ready for a serving of candy!

