Star news


The coolest DIY nail designs. And no fuss with drawing! Manicure with a sponge or sponge: create a bright and unusual manicure Nails using tape
Not all modern girls know how to do a manicure using water. And in vain, since this is a great way to make your nails attractive and original without leaving a lot of money at the nail salon. The option presented in this article is quite simple and does not require special equipment. Although it will take a lot of time, the game is worth the candle.
So, let's try to create a manicure using water with a marble effect.
Ingredients needed:
- base varnish;
- a small but wide container filled to the brim with slightly warm water;
- several types of nail polishes or special ones for nail art (decide for yourself how many to take, but it is better to have at least 2-3 varnishes);
- nail polish remover.
- oily face or hand cream;
- paper towel or napkins;
- toothpicks;
- cotton pads.

First, apply the base polish to your nails. It’s good if it’s not too bright, for example, light pink or beige. You can also use clear varnish. It needs to be allowed to dry thoroughly. Now we take a few of our favorite polishes and match them to the color of the outfit. It is best to choose from 2 to 4 types of varnish. This manicure looks great and is not so pompous and colorful. True, everything depends only on you. Particular attention should be paid to the quality of varnishes, but you should not try to dilute them with acetone or other liquids, since the varnish may simply dissolve in water. We will need a container for water, for this it is better to take a small container, because then it will be more convenient to work with varnishes. Because of this, this manicure is also called the “glass technique.”
We continue to do manicure using water. Pour slightly warm water into the bowl; its temperature should not be more than 40 degrees, otherwise the varnish will simply curl, and when using cold water it will not stick to the nails. Next, generously lubricate the finger with greasy cream, approximately up to the second phalanx. This is necessary so that the varnish does not stick to the skin and is easily washed off. You need to be careful not to apply the cream on your nails, otherwise the polish may not stick to them. If the cream does get on your nails, remove it with a paper napkin.

The next step in creating a manicure using water is mixing the polishes. Select the dominant color in your future composition, then drop a few drops of this varnish into the water. When it has spread slightly, add a drop of the next varnish to the same base, and so on. Then we take a toothpick and begin to model our future pattern. After this, we confidently dip our nail into the place where the paints are mixed, hold it for a short time and pull it out. Using a napkin, remove the varnish from the skin, then fix the manicure with colorless varnish. This procedure now needs to be done with all fingers.

You can also create a French manicure using water. To do this, you need to do all the procedures listed above, additionally applying French manicure stencils to your nails. We dip the nail in the varnish mixture, additionally decorate it with sparkles or rhinestones, then fix it all with colorless varnish. This manicure has a very original look. Believe me, you will never achieve such an effect by manually applying patterns. For greater clarity and understanding of the process, we recommend watching a video on the topic.
In this material we will tell you in detail how to make a beautiful manicure at home using newspaper and white polish. This method of applying nail polish has recently gained great popularity both in our country and throughout the world. In order to get an elegant manicure with letters, symbols or notes on your nails, you don’t need to visit a beauty salon and spend money, which, as you know, is never superfluous. And the result of doing a manicure using newspaper at home will be unexpected and unique.
Manicure done correctly with newspaper It is distinguished by its originality and attracts the attention of others. Each nail will have its own ornament, because the text on it is individual and unique. There are a lot of options for font size and shape, take fresh newspapers and choose whatever your heart desires.
It doesn’t matter what kind of home manicure you want to do - first you need to remove the old polish with a special liquid and sharpen your nails to the desired shape. A newspaper manicure will look great on nails of any shape. Now you need to cut out 10 pieces of paper in the shape of a nail from the newspaper; they should be slightly larger than the nail plates, which will make the process of removing the paper easier. Prints from the new newspapers will be much clearer than prints from last year's publications. Notes or English letters will make the drawing more original.
Let's look at the 2 most popular methods of creating a manicure using newspaper.
Method one:
Cover one nail with clear varnish, drop a little nail polish remover onto the prepared piece of newspaper and press the paper onto the nail. The varnish should not be frozen at this moment. IN manicure process You cannot move the paper - actions can ruin and smear the prints.
You just need to press down and wait until the design transfers to the nail and dries.
The thicker the paper, the longer you will have to hold the newspaper, from a third of a minute to two to three minutes. Next, carefully remove the newspaper from your nails. Got a couple of pieces of paper left on your nail? Not scary. Cover everything with a clear sealer and wait until it dries completely. One nail is ready, you can move on to the next.
Method two:
In order to beautiful manicure on short nails , we will need transparent and some light varnishes, pre-cut newspaper particles, a glass a quarter filled with alcohol or vodka.
We cover the nails with colorless varnish to even out their surface. If necessary, you can use nail polish with medicinal properties . We are waiting for it to dry.
The level of alcohol in the glass should be such that you can put your nail in there without any problems. We dip the nail in alcohol for 5 seconds, then instantly take a piece of newspaper and apply it to the nail plate, slightly smoothing the paper, but without moving it along the surface. If you press down too hard, not only the design will be damaged, but also the background color. After a maximum of 3 seconds, remove the newspaper. Ready!
What kind of materials and accessories do modern fashionistas use to make their nails beautiful, elegant, and with an original design? All kinds of template stickers, rhinestones of one size or another, sparkles of various shapes have not surprised anyone for a long time. And more recently, the so-called newspaper nail manicure has come into fashion. Absolutely any girl can do a stylish manicure at home. And below we will look at a master class with photos of the stages of completing the work, and also get acquainted with several more ways to perform a manicure using newspaper. Printed symbols on nails look unique and very modern!
Now you know how to create a beautiful manicure on short nails using newspaper. Simple photo and video tutorials will help you create a modern and original newspaper manicure easily and quickly.
VIDEO MATERIALS:How to do a proper newspaper manicure at home. Video lesson.
How to make a beautiful manicure at home using newspaper. Video training for beginners.
In adolescence, probably every girl tried to do her own manicure using tape. Adhesive tape is inexpensive and is sure to be found around the house. But unfortunately, not everyone was successful with this nail design, so the device is not popular. Is this in vain? Maybe you just need to familiarize yourself with the techniques for performing such a manicure or choose a certain tape? Let's save time and find out together whether it is possible to create an original and beautiful design for the nail plate using an ordinary stationery item.


How to choose tape for manicure?
The most common mistake a novice craftsman makes is choosing the wrong tape. This reason explains the unsuccessful design of the nail plate, blurry varnishes and other problems.


So, what should you pay attention to when choosing tape for manicure?
- Stickiness
- Size
- Unilateralism. Double-sided tape sticks to your hands and leads to discomfort when performing a manicure.
- Track

Manicure technique with tape
A manicure using adhesive tape follows the same pattern. The only difference is in the chosen design, which may require two, three, four or even five instead of one straight line. But we will not go that far, but will learn only the basics. If you perfectly perform a simple manicure with tape, then soon you will be able to create complex geometric prints (and more!).


The main set of tools differs from the usual only in the presence of adhesive tape. That is, in your arsenal there should be several colored varnishes, a base for them and a fixative, and optional decorative elements.
Step-by-step instructions for a basic manicure with tape:
- Treat your hands. Bend the cuticle so that it is not too long, give the nails a shape (in our case, the contours of a soft square look better).
- Apply a clear base coat to your nail plates and wait until it dries completely.
- Apply one of your chosen colored polishes to all nails and wait until dry.

- Paint the part of the nail not covered with tape with a different colored polish. You can use a brush to go over the tape, carefully outlining an even strip. When each nail is processed, you need to wait for the varnish to dry.

- Cover the top with clear sealer and take a photo of your work.
In fact, the tape can be placed in any direction. Diagonal is the most common and simplest option. Using tape, you can create an amazing design for your nail plate if you give freedom to your imagination. Don't forget that you can use multiple adhesive tapes in one design.


On short nails, a simple but at the same time interesting manicure with a stripe looks harmonious. To do it, you need to first apply the background color to the nail. Wait for it to dry completely. Then glue pieces of tape on both sides so that there is a vertical stripe in the middle. It needs to be painted over with another color of your choice. After this step, also give the polish time to dry, and sharply tear off the tape from your nails. You will get a straight line of a different color. To secure the result, apply a fixative or regular clear varnish on top.


Advice! Before each decorative design of your nails, pay due attention to the condition of the skin of your hands, shape, length and cuticle. Marigolds should be identical and well-groomed - this is the key to success. If everything is completely wrong, even first-class design will not save the situation.
Life hack for creating a French manicure using tape
Classic French manicure involves drawing smooth, neat smiles that give the nails naturalness and sophistication. Special adhesive tapes are sold at every turn. But what if you suddenly don’t have them, and you need a manicure urgently? Scotch tape comes to the rescue.


Please note that French requires rounded edges, but they cannot be achieved with tape. Therefore, it is best to do a manicure on a short nail plate. A thin edging of the nail looks harmonious and appropriate, even if it is straight. The advantage of this edging is that the tape fits tightly to the plate, preventing the varnish from flowing under the sticky layer.


So let's get started:
- Choose polishes of two colors you like for a French manicure. Today, classic white and nude shades are not as popular as before. For everyday interesting looks, give preference to a combination of different shades. For example, beige with wine, silver with black, golden with red, cream with dark green look good. The color combination depends on your imagination and fashion catwalk trends.


- Apply the base coat and wait for it to dry. With its help, you will level the surface of the plate and hide minor imperfections.

- Paint your nails with the base color and also let it dry well.
- Wrap each finger with a pre-prepared narrow tape of tape so that a strip remains at the very edge. The second option involves taping the smile and painting the main part.

- Paint over the resulting stripes with varnish of a different color. Watch the layer thickness. If you cover it several times, the line will protrude above the main line, which looks sloppy.
- Dry your nails well and remove the tape.
- To even out the edges, coat the nail with clear polish. If unevenness is visible somewhere, use decorative elements in the form of rhinestones, stickers, stones.

Original manicure ideas with tape
If you've already gotten the hang of doing simple manicures using tape like a pro, you're ready to take it to the next level and create original designs. In 2018, geometric prints, combinations of several colors, triangular lines of smiles and holes are relevant. Let's awaken our imagination and look at interesting nail design ideas.
- Thin colored lines are obtained by painting the nail in three colors parallel to each other. Then narrow, pre-cut strips of tape must be secured to the plate so that there is no space left between the tape and the nail. Can be placed in a chaotic order: diagonally, horizontally, vertically. The main thing is that it is perpendicular to the three previous colors. The top of the structure is coated with a different color of varnish, for example, black. After it dries, the tape is carefully removed, leaving thin multi-colored stripes on the background.


- Original moon manicure. To create it, take tape and trim the edge with serrated scissors. You will get a kind of wave. Then proceed according to the standard scheme: paint the nail with the main color, wait until it dries, glue the prepared tape to the hole line and go over the top of the nail with a varnish of a different color. Once dry, remove the tape with a gentle movement and seal the colors with a clear coat.
 Once dry, remove the tape with a gentle movement and seal the colors with a clear coat.
  Geometric prints, combinations of several colors, triangular lines of smiles and holes are relevant.
 - Smooth geometric patterns easy to obtain with tape. Simply cover with adhesive tape those areas of the nail that will later be painted a different color. To create triangles, you can use three strips of tape at a time. To create squares you will need from two to four, depending on the location of the geometric figure.
 Simply cover with adhesive tape those areas of the nail that will be painted a different color in the future.
- Scotch It is very easy to use as a decorative element. You just need to paint it with varnish and cut out the desired shapes. These can be ready-made patterns, stripes, or individual decorative elements. They are glued on top of an already applied base and sealed with clear varnish on top for durability. In this case, there is no need to tear off the tape. It becomes an integral part of the design.
 As we can see, tape can be used as a stencil for any nail design
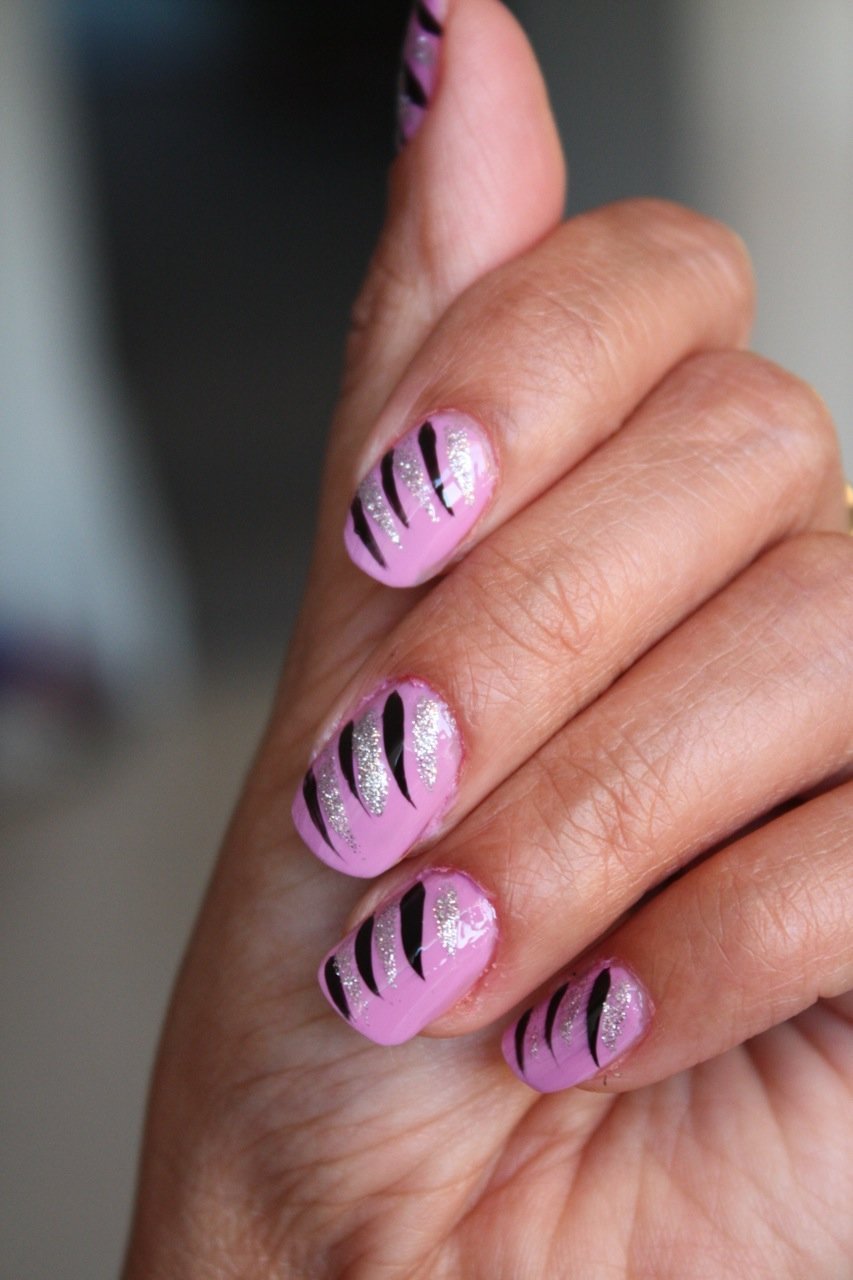
Water manicure is becoming fashionable again. Improve your technique with tape. To design, you need to dilute several multi-colored drops of varnish in water to create patterns. You need to wrap your fingers with tape so as to protect their skin from getting varnish. Only the required area of the nail plate remains open. Then each finger is lowered into the water one by one. The image turns out to be random, it is impossible to think it through. This is the peculiarity of the unique design.
As we can see, tape can be used as a stencil for any nail design. The main thing is to carefully cut out the desired shape and carefully attach the adhesive tape to the plate.
Have you ever wondered how easy it is to create nail art with perfect geometric shapes? The answer to this question is to use tape to raise your manicure. The photo lessons presented in this material will help you understand the basic techniques.
1. Thin colored lines
Apply three layers of colored varnish. When the polish is dry, apply sticky manicure strips to the nail. Then you need to apply a layer of another varnish to the nail, in our case black. When the varnish dries, remove the tapes and get a creative image.
2. Manicure with tape - rays
You can also use tape to decorate your nails. Apply the polish to the nail, when it dries, cut out a stencil in the shape of rays from a piece of tape. First, put some tape on your hand to get rid of excess stickiness, then on your nail. Apply black varnish, after it dries, remove the stencil. We glue the tape again and emphasize the pattern with silver varnish, remove the stencil.
Such a bright manicure, in addition to evening makeup and a beautiful outfit, will become a small highlight in a festive look. During the fun itself, do not forget to smile and radiate positive emotions. If you haven't yet figured out how to entertain your guests at the table, follow the link and find new table game ideas.
3. Original moon manicure using tape
Mysterious moon manicure. Especially for those who love experiments, this fall an eccentric moon manicure has come into fashion. The essence of this nail art is the contrast of the color of the nail plate and the nail hole. It is especially fashionable if the nails are covered with a dark matte varnish, and the hole is covered with a light matte varnish of a similar color shade.
To create an original moon manicure, you need to make a stencil from tape using serrated scissors. Paint your nails black. After drying, glue the tape, leaving the space of the hole free. Cover the hole with golden varnish and remove the tape.
4. Manicure with grass leaves
Professional stencils for applying images have been available in stores and beauty salons for a long time. They are used to obtain an accurate, clear pattern. The stencil should only be applied to a dry surface of the nail. After applying the varnish, you need to wait until it dries and then remove the stencil. Without doing this, you can ruin everything.
But if you don’t have a professional stencil at hand, you can make it yourself using tape. How to make a manicure with leaves, see the photo tutorial.
5. Nails with hearts
The stencil can also be cut from soft but dense fabric. For example, in the shape of a small heart. A layer of pink varnish is applied to the surface of the nail, then, when the enamel has dried, the fabric is applied to the nail and a layer of white varnish with glitter is applied to the heart.
And another great idea in French style.
Photo of manicure ideas with tape
Video tutorials on manicure with tape
Triangle shaped
3 nail art ideas with tape
http://sellzcutethings.blogspot.com
http://chloesnails.blogspot.com
http://nailside.blogspot.comWith the advent of the airbrush in the arsenal of nail designers, the finest lines and the most complex designs are no longer a problem. But how can you save money and make a beautiful design yourself? Thin manicure tape comes to the rescue.
What is a manicure with tape?
Nail designs have long imitated various structures: leather, velvet, knitwear, marble and the like. By using the layer-by-layer coating technique, masking areas with tape, you can achieve interesting patterns that imitate fabric.
When the artist sticks a piece of tape on the nail, it remains uncovered with varnish. This principle formed the basis of this technique. If you use this technique several times, the camouflage covers more and more new areas. This way you can achieve thin, even lines and identical patterns on all nails, which is impossible when drawing.
Manicure with tape: ideas
A detailed consideration of the given styles will help you choose the appropriate design option. All are united by one principle - the use of thin adhesive tape. You can buy it in a professional store or order it on Aliexpress.
Manicure with tape comes in the following styles:
- "Patchwork".
- "Fry Villa Style"
- "Nautical".
- "Plaid".
- "Raye."
- "Aragail."
- "Puzzles".
"Patchwork Quilt"
Patchwork is a design that resembles a patchwork quilt. Usually these are multi-colored squares or diamonds. First, the nail is covered with a light tone, for example, pastel mint. Then, after drying, thin strips are glued on. You will need 4 of them, glue them diagonally, as if dividing the nail into three parts. Two diagonally with a distance of approximately half a centimeter and the other two perpendicular to the first to make squares.
Then each square is carefully painted over with a semi-dry brush, using the color stamping method. When the coating has dried, remove the auxiliary tapes and cover the nail with top coat.
“Tarriage” is often red and green squares with thin green stripes running across a red background. This is done in the same way as the first option, but the backing is made white. After removing the auxiliary ribbons, some of the white stripes are painted over with green. This can be done with a brush that is very specially designed for drawing straight, thin lines.
“Fry Villa Style” is almost the same, but the squares are not so strictly arranged, and you don’t have to make a mint-colored backing. You can generally get by with two ribbons glued crosswise.
The colors can be any, but not dark. After removing the auxiliary ribbons, draw the color boundaries with a gold or silver gel pen. Dry well and cover with topcoat. Some people glue new ribbons instead of drawing. It's not for long. The foil comes off even through the top, revealing the coating. These tapes are auxiliary and are not suitable for this design.
Multicolored stripes
“Marine” is a style that features blue stripes on a white background. The nails are coated with white varnish. After drying, thin strips of tape are placed, covering half of the nail. Some pieces are glued at an angle. Blue stripes are painted over. One or two nails can be done in red stripes. You can draw a red semicircle on one nail and put an inscription with white dots. This will be a lifeline.
"Raye" - multi-colored stripes, may not be the same in width. The main thing is contrasting tones. It is performed similarly to marine stripes.
“Aragail” is a design of strict light and dark squares crossed out with a white dotted line. Blue and beige combinations look good.
“Puzzles” is a fun drawing that is easy to do on your own. The nail is divided into four parts, dark and light squares are located opposite each other. After drying, large dots of contrasting tones are placed. It turns out to be an imitation of puzzles. Yellow and red, pink and black, orange and green look good.
Everything ingenious is simple
A simple manicure with tape is obtained if part of the coating is shiny and part is matte. To do this, you will need two tops: regular and satin. First we cover the nails with a regular top coat, shiny. Then, after drying, we mask them with the usual one, which is located diagonally. Apply a matte top coat and remove the tape after drying.
The result is a simple and effective manicure. It is better not to use this technique on light shades; it appears juicy and bright only on deep dark ones.
Plum, eggplant, black, cherry, and burgundy tones are good for this design. A manicure with tape cannot be done on all nails; using a matte top will significantly increase the number of possible design options.
What you need for a manicure with tape
You can cut stencils from regular masking tape. Especially wavy or jagged lines. They mask a light substrate, which is then painted over with a dark contrasting varnish. This stencil is located along the side rollers. If you have absolutely no ability to draw stencils, it doesn’t matter.
A manicure with tape can be done without it. A simple masking of a vertical stripe in the middle of the nail is also very effective. You can put rhinestones on it and go to the party.
But it is best to master the technique using professional thin tape. It comes in different colors. This is used when masking layers in complex designs. Sequentially removing strips of the same color, apply the coating to all nails. Identical drawings are obtained.
So, a manicure at home with tape requires the following materials and tools:
- Thin professional colored adhesive tape.
- Masking tape.
- Scissors.
- Tweezers.
- Basic varnish coating.
- The top is shiny and matte (optional).
- Palette for brush pressing.
- Gel pens - gold, silver and black (optional).
A small master class on working with adhesive tape
How to do a manicure with tape? Our step-by-step instructions describe everything in detail:
- First you need to do a manicure, shape your nails and trim your cuticles.
- Then the nails are covered with a thin layer of base.
- After drying, apply a color that will serve as a base.
- After drying (some do this the next day), mask the nail with tape in accordance with the chosen design.
- Using a semi-dry (not dry, just well-wrung out!) brush, carefully paint over the areas using the padding method.
- If the design requires it, the color border is drawn with a gel pen (optional).
- After drying, remove the tape and cover with topcoat.
- If necessary, repeat masking and color application.
Whatever design option you choose, even the simplest one, you need to dry the varnish thoroughly and only then remove the tape. This guarantees straight lines and spectacular results. Nothing other than accuracy and caution is required. Try to give yourself a gift, and you will definitely succeed.

