Star news


Craft a paper lantern. DIY Chinese lanterns made of paper: diagrams with video
Children of any age make paper lanterns with their own hands with great pleasure. These simple crafts help create a truly festive atmosphere in every home and classroom.
To make a lantern with your own hands, you need to stock up on a lot of multi-colored paper pieces, the sizes of which should correspond to the size of future lanterns.
For small Christmas trees you can make miniature ones, for large rooms and Christmas trees - larger lanterns. Products made from thick paper will hold their shape better and last longer, but to decorate the hall for one festive event, you can make crafts from ordinary relatively thin colored paper sheets.
Before making a flashlight, we create a blank from paper. Firstly, we give the sheet a rectangular or square shape, and secondly, we draw two parallel longitudinal lines at the same distance from the edge.

We bend the edges of the sheet inward, guided by these lines.

Fold the resulting rectangle in half (lengthwise) and carefully use scissors to make parallel vertical cuts. This stage of work can be structured a little differently: connect the longitudinal lines with perpendicular strips, which are drawn at the same distance from each other, and then use a stationery knife to make cuts along them.

When the cuts are made, you can unfold the workpiece and connect its edges together.

You will get a thick tube. Fix the edges with glue and hold them until the glue hardens.

Our flashlight is almost ready.
All that remains is to give it volume, flattening it a little until the strips in the places of vertical cuts move apart.

Let's release the flashlight. It automatically takes its original shape, but at the same time becomes more voluminous.

Chinese paper lanterns came to our culture not so long ago, but quickly won our love - they can come in different shapes, sizes, colors, to suit almost every taste. Traditional Chinese New Year lantern - in the shape of a ball, red and gold colors.
Chinese paper lanterns are not difficult to make - after trying once, you can decorate your home and surprise your friends by delighting them with this gift. Children can and should be involved in the creation process - it’s interesting and educational.
So, let's try to make Chinese lanterns with our own hands, photos and detailed instructions will help us with this!
To work you need:
- Sheet of red paper
- A pair of sheets of gold paper
- Ruler and pencil
- Scissors are regular and have a curly edge (if not, that’s okay)
- Scotch
- Stapler
Now that we have prepared all the necessary materials, let's start creating a Chinese paper lantern!
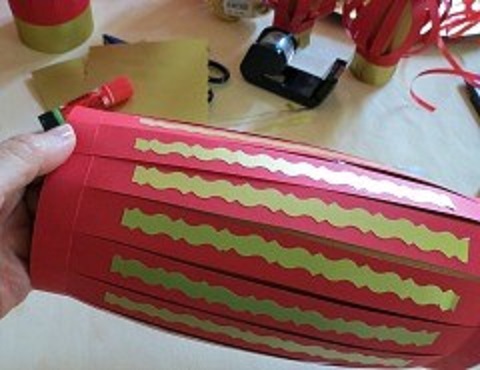
- Using a pencil and a ruler, mark a sheet of red paper crosswise, bend the edges one and a half centimeters, then use scissors along the marked lines to cut the paper, slightly short of the fold.

- Glue tape along the edge of the paper, across the cuts - this is necessary so that the edges do not tear. Using curly scissors, cut strips of gold-colored paper - they should be about twice as narrow as the strips into which we cut the red paper. Coat the gold strips with glue and carefully glue them onto the red sheet. It looks something like this:

- While the strips are drying, let's work on the second sheet of gold paper. The length of this sheet should be slightly less than the red one. Apply glue along the short edge and roll it into a tube - like this. You can use a paperclip to hold the edge in place until the glue dries.

- We do the same with the red piece of paper - making sure that the glue is dry and the gold stripes stick well. We connect the edges and get this blank:
- You need to be careful, since our workpiece is quite fragile, despite the tape that we prudently used to glue the edges. Now the fun begins - it's time to connect the parts of our future flashlight. We carefully place the red paper blank on the golden cylinder - very carefully so as not to accidentally tear the strips. Here's what the process looks like:
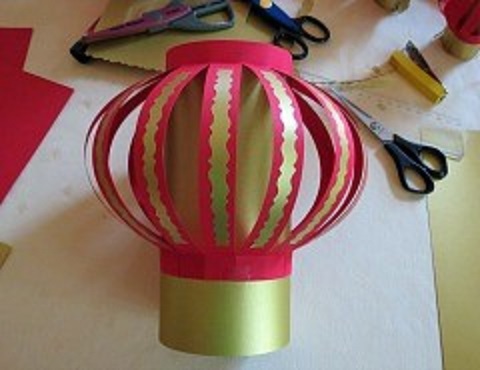
- The top edge of the red blank should be about half a centimeter below the gold edge. After this, we cut out two strips of gold paper, a couple of centimeters wide, and glue them to the joints of the blanks - the photo clearly shows how this happens:

- Our Chinese paper lantern is almost ready! The finishing touches remain. Using scissors, we cut the visible part of the golden cylinder into a fringe - literally a couple of millimeters wide, so the flashlight will look much more interesting. And, of course, you need a loop - after all, the lantern is hanging! We will cut the strip for the loop from the same gold paper with curly scissors, but we will attach it to the flashlight with a stapler - it will be more reliable.

As you can see, there is nothing difficult in making a Chinese paper lantern with your own hands - you just need a little time and colored paper. But the result exceeds all expectations - especially if a child is involved in the process.
It’s very easy to find all the necessary materials and photos on how to make Chinese New Year lanterns, and there are also a lot of videos on this topic.
Give free rein to your imagination, don’t be afraid to experiment - play with colors, invent together with your children! We hope that our tutorial on how to make a Chinese paper lantern for the New Year was useful to you!
 Floor-standing gas boilers made of cast iron
One of the simplest New Year's decorations that you can make with your own hands is paper lantern. Bright and colored paper lanterns will decorate not only the New Year tree, but will also serve as a good decoration for the room. Making such a craft will not be difficult. Even a child can handle it. I'll tell you how to make bright lanterns from colored paper with your children. Let's craft together!
What you need to make a paper lantern
- colored paper,
- scissors,
- glue,
- pencil and ruler.
Making a paper lantern with your own hands

Prepare several sheets of colored paper. Bright and two-color lanterns look much more impressive on the New Year tree than simple white crafts. If you are doing a craft with children, you can invite the children to choose the color of paper for the flashlight themselves.
Flashlights can be made contrasting - red-black, yellow-green, white-blue. The most interesting thing is that you can then collect all the lanterns into a large New Year's garland.
- Prepare two sheets of colored paper. Using scissors, cut out two rectangles from paper: one 7x13 cm, and the second 9.5x13 cm. One rectangle will be the inner cylinder of the flashlight (white), and the second will be the skirt (blue).
- Roll the white rectangle into a tube, coat the edge with glue and glue the cylinder together.
- Fold the blue paper in half along the long side and use a pencil to mark the paper with marks every 0.5 cm. Cut the paper with scissors (as shown in the photo) without cutting 1 cm to the edge.
- Carefully glue the colored skirt to the white cylinder.
- Cut out a thin strip of paper for the flashlight handle. Drop a drop of glue onto the ends of the strip and glue the paper pen to the flashlight. Your New Year's lantern is ready!
VIDEO TUTORIAL: How to make a paper lantern
You can vary the size of the flashlight, improvise with the color and width of the skirt, and then you will have your own individual New Year's craft.

I wish you pleasant creativity and many, many bright paper lanterns!
Paper lanterns are a wonderful decoration for a home holiday or party. How to make them quickly and at minimal cost - read on.
It is better to make a New Year's lantern from paper of two contrasting colors. Cut out a rectangle 10x18 cm in one color and a slightly wider one (12x18 cm) in another. Bend the wider rectangle in half lengthwise and, not reaching 1 cm from the edge, make cuts from the fold line to the edge at a distance of 0.5-1 cm from each other. Unbend this rectangle, as in diagram “c”. Roll the narrower rectangle into a cylinder and glue or staple the edges. Make a flashlight “handle” from a strip of paper and attach it to the base. Now wrap the “openwork” piece around this base and secure it with glue or staples along the top and bottom edges. The top of the lanterns can be decorated with sparkles, hearts, stars or circles. You can bring coziness to a gazebo, terrace or winter garden with the help of a paper street lamp. Print out the template and cut out the corresponding blank from cardboard or thick paper. Paint it the desired color. Instead of glass, you can glue parchment paper or plastic from toy packaging. And then give free rein to your taste and imagination; you can create an antique effect using foil or paint with a metallic sheen; you can decorate it with beads, artificial berries or flowers.
Cut colored paper or old postcards into strips of the same width (for example, 2 cm) but different lengths. You should get one central shortest strip, the remaining strips should be in pairs, each pair a few centimeters longer than the previous one.
Place the strips together in the correct order, aligning them at one end, and then secure them with a stapler or glue. After this, align the strips at the opposite end and also fasten them with a stapler or glue. The flashlight is ready!
Option 2.

One of the most popular Christmas decorations is New Year's lanterns. They are very easy to make, and thanks to their spectacular shape, the lanterns will become a real decoration for the New Year tree.
Fold a sheet of colored paper in half with the colored side facing out. From the fold line we make parallel cuts at an equal distance from each other (the cuts should end 2 centimeters short of the edges of the sheet). Unfold the sheet of paper and roll it into a tube, gluing the ends of the sheet together. Now, at the same time, we squeeze this tube a little from below and from above - we get a flashlight. But that is not all. You can make a core for a flashlight. To do this, we glue a tube from thicker paper, but with a smaller diameter. We connect the two parts together (we place the core inside the flashlight) using glue or a stapler. The flashlight is ready.

Paper lanterns can be used in a variety of ways. And just like a Christmas tree decoration. And as a design for a small vase or glass (only in this case there is no need to make a “core” for a flashlight). And several New Year's lanterns suspended on a ribbon or serpentine will turn into a multi-colored garland.

Option 3.

To make these wonderful New Year's lanterns, you will need to cut colored paper into strips of the same length and width. The length and width of the strips depends on the size of the lantern you want to make. To make one paper lantern you will need an average of 14-16 strips of paper.

Stack the paper strips together and use an awl to make a hole at one end and the other. Pass the thread through one of the holes, secure the end of the thread with tape, glue or a sticker.

Thread the thread through the second hole.

Pull the thread so that the strips of paper bend. Tie the thread in a knot. The knot should be large enough so that it cannot slip through the holes in the paper strips.

Flatten the strips to form a ball shape. The flashlight is ready. All that was left was to find a place to hang it.


Option 4.

We invite you and your child to make an original paper lantern in the shape of a bird in a cage. To make this Christmas tree toy you will need:
Colored paper and cardboard
- awl
- scissors
- double-sided tape or glue
- plastic cover

A. Cut colored paper into strips of the same length and width (for example, 1.5 cm - width, 30 cm - length). To make one lantern you will need 4 strips of paper.
B. Use an awl to make a small hole in the center of each strip.

c. Print out the bird on high-density paper (download). Cut it out. Use an awl to make a small hole in the center of the bird's back.
D. Thread a thread through it and tie the end of the thread in a knot. Make a second knot about 4 cm from the bird.
E. Now you need to thread the paper strips onto the thread. Slide the strips along the thread to the top knot.
F. Tie another knot on top of the paper strips, on which you can put a bead for beauty.

g. Now take the plastic cover and place double sided tape around it.
H,i,j. Spread the strips apart and symmetrically attach their ends to the lid.

k. Cut a strip of colored paper and glue it around the lid. The New Year's lantern is ready!


