Star news


Edging patchwork panels and blankets. Patchwork - quilt border How to sew a piping on a blanket
If you follow fashion, and especially fashion trends in the field of interior design, you have already noticed that gradually old trends are becoming relevant again.
The patchwork technique, which involves creating products from many textile scraps, is one example of handicraft that has become popular again. And one of the reasons for such interest in patchwork is the ease of sewing almost any product for the home. These can be items of clothing, tablecloths and curtains, bags, toys, warm blankets for children and adults and much more.
Since the patchwork technique has a long history, you will find many ways to sew such textiles. Moreover, having gained experience, you will be able to realize your interesting ideas, come up with new forms and ways of connecting elements.
But in order to learn this skill, you need to understand the simplest techniques and learn as much as possible about the features of patchwork sewing.
We suggest you learn how to sew a patchwork quilt correctly, and start with a master class on a patchwork quilt for beginners: it is very simple to do, although sewing takes a lot of time, but in return you will receive a charming and comfortable textile element for your home.
Patchwork quilt, photo
How to make a patchwork quilt
The traditional DIY quilt process for beginners involves three main steps:
- searching for suitable materials. To create a harmonious design, you will need fabric in at least two colors. You can take patterned textiles, but in this case it is better to stick to a single theme (for example, decorate a blanket in a floral style or choose fabric with a geometric print);
- sketch of a sewing pattern. It is important to decide what the blanket will look like in order to cut the component elements correctly;
- connecting fragments using threads.
 Patchwork quilts, photo
 At the stage of choosing materials, you need to look for fabrics that you have at home, but have not been used for their intended purpose for a long time.
If you are making a blanket for an adult, purchasing new textiles can be quite expensive. It is not at all necessary to use a long, solid fabric: you will still have to cut it, so you can use a huge variety of small scraps of bright or pastel colors as a source material.
Attention! If you find scraps of different shapes, it doesn’t matter: it will be easy to put them together to create a stylish blanket for your home.
Now let's start with the diagram. If you are sewing a patchwork blanket for the first time, it is better to use ready-made templates. You shouldn’t choose an overly complex technique: a product made from identical squares will look no worse than a blanket with many elegant patterns.
You need to start sewing small: sew several scraps together to create a separate block. After creating a certain number of blocks, start attaching them to each other.
Do not forget that the top of the blanket must be sewn onto the lining. It is possible to stitch the product either by hand or on a sewing machine - with a straight stitch or using a special foot.
Advice: If desired, the elements of the patchwork quilt can not be sewn, but connected with knitted threads using special hooks.
The time spent on creating such a blanket directly depends on the required dimensions and parameters of the constituent elements. Therefore, you should not make the fragments too small: if you want to create a more interesting design, take several fabric options in harmonious shades.
Master class for beginners
Even those who have never done professional sewing before can make a cute and comfortable quilt by hand. Let's find out how to make a children's patchwork quilt using a master class.
As the main material, it is better to take a pair of fabrics that are pleasant to the touch in compatible shades. You will also need an elongated sheet of padding polyester, which will be used to stuff the blanket, and a lining (for example, calico).
 DIY patchwork quilts, photo
 According to the master class on a patchwork quilt for beginners, you should start making a baby blanket by cutting about 50 textile squares 21 by 21 cm. If you plan to use fabrics of several shades or patterns, lay out all the blanks on a flat plane to properly design the future blanket.
After making sure that the design matches your idea and all the fragments have straight sides, you can start stitching.
First, sew the first strip of the blanket: to do this, sew the squares from the very bottom row together. Next, proceed to the second and subsequent stripes. Only when all the strips are sewn together can they be connected to each other.
Each time after sewing on a sewing machine, do not forget to smooth the formed part of the blanket with an iron. Then the workpiece will have the correct shape and will not distort the overall appearance of the product.
After the upper patchwork part is ready, cut out the lining and filling, focusing on the general parameters of the product.
Take a look at the side of the blanket: it is peeling at this point, so the edges need to be sealed securely. To do this, use tape with a width that can cover all edges of the product. The binding is sewn face down to the lining, after which the tape is straightened and folded over to fold the free edge inward. Finish this stage with a stitch on a sewing machine.
The blanket is ready! This is ideal for a child as it is soft, cozy and bright. If desired, the blankets can be complemented with a bedding set that matches the color scheme.
 Patchwork - blanket, photo
 For those who are ready to create a more complex product, we suggest that you familiarize yourself with another master class. It involves a combination of rectangular and square fragments. It is advisable to use a mock-up mat to correctly calculate the parameters of each element.
Cut a couple of long and a couple of short rectangles from the fabric. Take another fabric and prepare a small square. Rectangles are stitched around it to form a large square piece.
Now you need to cut out four ribbons, which will be an additional “edging” for the square. Try to calculate their parameters correctly. If desired, such a blanket can be supplemented with a large number of small squares on the outer border.
As in the previous case, lay out all elements on a plane to control the evenness of the product.
After sewing the components together, all that remains is to fill the blanket with padding polyester, add lining and decorate the edges.
Did you like the technique? Then watch another example of sewing in the video master class of a patchwork quilt for beginners:
Varieties of patchwork
You can make a baby patchwork quilt with your own hands for beginners using a pattern in different ways.
Let's take a look at the most interesting options for such work:


Techniques for stitching elements
Patchwork is famous for its unusual design, so it is extremely important to plan in advance how all the components will be placed relative to each other.
We have already noted that ready-made schemes are available to you, but new techniques implemented according to your own ideas are also appropriate.
The simplest options for sewing a patchwork quilt for beginners:


Any technique will be easier to implement if you cut out the component elements based on the beginner quilt pattern. You can use one of the following examples:

 DIY children's patchwork quilts, photo


 DIY patchwork quilt - diagrams, photos
Patchwork edging
Any quilt, whether hand- or machine-sewn, made from squares, triangles, polygons or free-form shapes, needs an edge finish called piping. After connecting the backing, insulation and patchwork top of the product, their quilting remains to close the cut to give the blanket a finished look. To do this, prepare the edging (edging) and sew it.
How to finish the edge of a quilt? For edging we will need:
- Fabric for piping.
- Scissors or cutter.
- Cutting mat.
The color of the edging can be any - contrasting, matching the blanket or any other. You can buy fabric for edging when the entire blanket has already been sewn: it is often difficult to decide on the color while the product is in the preparation stage.
The photo below shows a beautiful patchwork quilt with finished edging:

How to edge a quilt? Let's look at the step-by-step instructions for edging:
- Calculate the blanket's perimeter by measuring its sides and adding up the lengths of the sides.
- The edging should be longer than the perimeter - add 20-25 cm to the resulting amount.
- The width of the edging is chosen at will, on average it is 6-8 cm, taking into account the hems at the seams. Cut the fabric into strips using a cutter or scissors and join them into a single strip at a 45-degree angle to avoid excess thickness of the fabric. Steam with an iron. Fold the edging in half with the right side facing outwards, iron along the entire length - the edging is ready (you should get a long strip of fabric folded in half, 3-4 cm wide.
- We apply the strip to the back of the blanket, edge to edge, fold to the center.
- You can pin the edging with pins for convenience. At the beginning of work, leave a tail at least 10 cm long unsewn. When you reach the corner, bend the edging upward to create a 45-degree angle. Bend the edging down so that the fold of the edging is even with the edge of the product. Secure with a pin.
- Continue sewing the edging to the next corner, stopping about 20cm short of the beginning.
- We connect the edging into a single piece: fold it, mark with soap or a pencil the junction of the edging strip. Fasten it with pins and stitch, cut off the excess. Fold the piping in half lengthwise again and machine sew this section. Thus, we sewed the piping on the wrong side.
- Turn the blanket right side up and, folding the edge, pin the border to the front side directly to the sewing line of the border, covering it slightly. You can start from the corner. Sew - it is better to use a decorative stitch, because... it will hide the flaws of uneven stitching for beginners. At the corners, fasten the stitching twice.
Attention: do not start sewing the piping from the corner, it is better from the middle.
Almost any small baby blanket can be folded and used as a discharge envelope. Rectangular, square - it doesn’t matter: in the maternity hospital, the nurse will deftly roll up a bundle from any blanket.
Important: such a blanket will warm the baby not only with warmth, but also with your care and love.
 DIY patchwork quilt for a baby, photo
 Despite its simplicity, the patchwork technique is considered a true art in the field of home design.
The success of patchwork is associated with the ability to create amazing products for the home with rich colors, unusual shapes and patterned designs.
Show your imagination and please your loved ones with a new blanket that will not only be pleasing to the eye, but also keep you warm in cold times. With photos and videos of a quilt master class for beginners, you can quickly decide on the technique for such needlework.
Video
Watch another tutorial for beginners with another DIY sewing idea in the video tutorial about a patchwork quilt:
While I was writing material based on the diagrams, I wondered: why exactly clear geometric, ornamental forms emerged in the patchwork mosaic technique. Not only because they are easier to sew on. Why are things sewn according to geometric patterns more organic than unstructured compositions? But pay attention to the world around us - to the cobwebs, honeycombs, snow or salt crystals, a snail shell and annual rings on a cut tree. Surprisingly, the honeycomb, the atom, and the “Well” scheme are similar and the same in structure. It has now been proven that such a natural structure better accumulates the energy necessary for the existence of all living things. Whereas chaos destroys this energy. And a person subconsciously strives for harmony, for structure. From the point of view of bioenergy, sleeping under a blanket made of ornaments is very good for health, especially if this blanket is sewn with great love and pleasure.
Blanket using the Sampler technique
When you have accumulated a sufficient number of identical squares made according to the patterns above (or you sew them specially), you can collect them into a blanket. This blanket is traditionally called a “Sampler.” As a rule, each craftswoman has a special, “own” perception of color and a love for certain fabrics. Therefore, subjects made “with one hand”, even at different times, are often very organically combined with each other in a large product.
Sewing a blanket
The traditional Sampler blanket consists of three layers: a patchwork top, a lining, and an interlining.

For a patchwork top, it is extremely important to select as accurately as possible the background that unites all the elements and colors (sometimes called binding). The background should not stand out, not break out of the composition, but should set off and collect the color and shape of your square inserts.
The finished squares are first sewn together, connecting with short vertical sections of the background. Then the resulting stripes are stitched with the horizontal stripes of the background into a single rectangular fabric. As a rule, a border is made from the background fabric (but it can also be made from contrasting fabric), which is stitched around the perimeter.
The lining can be made from the same or any other fabric of your choice. Sometimes they make a double-sided blanket, and then the lining is also sewn from patchwork geometric squares, assembled into blocks on the background. In this option, you can “play” with color and make, for example, a mirror image of the front top: light blocks on a dark background, dark ones on a light one. If the fabrics are very thin, then a piece of fabric (not necessarily new) is inserted between the base and the interfacing and all three pieces of fabric are quilted by hand or by machine. You can sew braid on top of the seams or make an additional appliqué and quilt the blanket along with it. In order for the blanket to look good and look neat, it is very important to follow the direction of the pattern of the background fabric, especially if the pattern is a square or polka dot.
To give the blanket volume, it is first stitched along the contour (grabbing all three layers of the product), and then an incision is made on the back side of the lining and, carefully straightening it, a filling material (non-woven fabric, padding polyester) is placed. The incision is then sewn together by hand. If a volumetric technique is used, the lining should be made of durable fabric.
Assembling a large blanket
Assembly of large, bulky products presents certain difficulties. In a one-room apartment, sewing a two-meter-sized blanket is not easy - there is no room to turn around. Then the blanket is divided into blocks and sewn together in parts. Seams for strength are sewn with a stitch “in the seam”, and then from above – with a “zigzag” end-to-end.

Machine stitch "zigzag" butt
But first, each block is quilted separately along with the padding polyester and lining, leaving large seam allowances for all three components (lining, padding polyester, patchwork top). Moreover, the lining and padding polyester should be larger in size than the patchwork top. Then they begin to assemble the blanket.
The patchwork top is laid face down on the floor, the edges are taped to the floor to prevent the fabric from fidgeting. First, the patchwork top is sewn on the blocks, then the padding polyester is carefully straightened. To prevent unnecessary thickenings from forming on the gasket, the pieces of synthetic padding are not sewn together, but are placed with their edges one on top of the other and the edges at the seam are split by hand. Once the two top pieces are neatly joined, the lining is sewn together using a blind stitch.
This assembly makes it possible to apply a beautiful and neat stitch (it is more convenient to do it on blocks than on a large canvas) and significantly speeds up your work.
Stitching technique - quilting
It is customary to decorate patchwork products with various details, which not only complement and diversify the compositions, but also make them decorative. Sewn from many shreds, the products have a large number of seams, which are covered with a lining. In order for a patchwork quilt to be practical, and not just purely decorative, and to serve future generations, it must be quilted. A synonym for the Russian word “stitch” is the English “kilting”. Initially, the word “kilt” meant a blanket, primarily an American one, made from scraps and quilted with an insulated lining. Later, all products made using this technique began to be called a kilt.
Stitching, or quilting, is an integral part of the patchwork mosaic technique. The stitch can be regular or figured, but it must have a clear dimension: per 1 cm of fabric there are five frequent stitches of a “forward needle” hand stitch. The purpose of quilting is to firmly connect the three layers of the blanket—the patchwork top, the insulation pad, and the lining. Classically, the “stitch” is done with cotton threads that match the color of the fabric and on the hands. To do this, use short, strong and thin needles and, of course, a thimble.
From the outside, quilting work, such as a patchwork quilt, seems very difficult and painstaking. But as you work, when the composition you have planned begins to “come to life” under your hands, stitching turns from tedious work into pleasure. By stitching each pattern, you can get figures of different textures, and often the patchwork itself is transformed and acquires, as it were, an additional dimension: some details are brought to the fore, others are shaded and become the background. The stitching on empty spaces in the ornament or along the border also looks very beautiful - here you can make any design and even make an inscription with good wishes. Often, if the result is an outstanding piece, the author signs it by embroidering his name on the border or on one of the ornaments.
There are also national stitches that create a cobweb openwork: “Amishkilting”, the Japanese quilting technique “Sashiko” - a geometric pattern is applied to a plain fabric (blue, white, red), which is done with contrasting threads (white threads on a blue background). Very complex and elegantly refined sewing.
Of course, hand stitching looks much more beautiful and, so to speak, more authentic than machine stitching. But it requires peace of mind, tranquility, and most importantly, time. Who has it now! Therefore, many craftswomen prefer to quilt their products on a sewing machine - this saves time.
Before starting work, you need to decide on the future pattern on the product. Keep in mind that the more you fill the quilt with stitch, the denser the final fabric will be (and stronger and more durable it will be!).
Many things can be quilted immediately on a machine, for example, with a “stitch in the seam”, and then a preliminary drawing is not needed. But it is still better to draw complex geometric patterns first so that they are not distorted during stitching. The drawing is made on the front side of the patchwork with soap, colored chalk or pencil according to a template or by hand. You can transfer the drawing onto tracing paper and, basting it to the canvas, draw a line through it. After work, lightly moisten the tracing paper - this will make it easier to remove it from the seams. A drawing on tracing paper will be more accurate, and the product will look neater, since there will be no need to remove traces of a marker or pencil from the fabric.
Here are some general stitching rules.
When stitching on a machine, select the color of the upper thread so that it either stands out on the work, or, conversely, matches the color of the product. The bottom thread should be one number thicker than the top thread and match the color of the lining.
For machine stitching, it is better to pin the warp, interfacing and lining rather than thread it. And if you use threads, then take bright and contrasting ones, so that later it will be easier to remove them. Remember that it is more difficult to remove threads from a tight stitch, and in this case the product may look sloppy.

Blanket quilting pattern
Start quilting any product from the middle to the edges. First make all the most general and long lines and only then quilt the details.
Arrange your work area so that your blanket does not move or warp, otherwise the layers may shift, and then the entire design will be distorted. You can place a chair so that the blanket falls gently on it in folds. It is better to roll the blanket or fold it and secure it with special clips. If you are quilting by hand, you should do it on the floor or a large table.
Be sure to secure each line of stitching - both the beginning and the end, by doing several stitches back. After you have quilted the entire line, thread the tail of the thread through a regular needle and pull it into the center of the quilted product to hide it.
While working, do not pull the product so that the stitching does not stretch. Hold the fabric on both sides with your hands, smoothing the material near the foot.
Check the lining as often as possible for wrinkles, and if they appear, smooth them out carefully, especially before passing the machine needle. If you accidentally quilted a fold, then, sad as it may be, you will have to rip the seam open and stitch it again.
The continuity of stitching throughout the entire product, even a double blanket, gives it a special “chic”.
Let's look at the simplest types of stitches.
Most Popular stitch along the contour. This stitch is made on a machine at a distance of 0.75 cm from the main seam on both sides of it. This is approximately the size of half a machine foot, and once you get used to it, you don’t have to additionally mark the fabric for this type of stitch. It seems to outline the seam on both sides and makes the fragments less convex than when stitching “in the seam”.
In-seam stitch performed along the seam lines. When you pressed the seams, the seam allowances were placed to one side of the seam. This stitch is done on the side where there is no allowance, and you do not need to sew four layers of fabric. It is done both on a typewriter and by hand. After sewing with an in-seam stitch, small fragments become more convex.
Large pieces of fabric can be quilted using a variety of geometric patterns, connected into latticework of diamonds or squares. Instead of straight lines, you can use curly ones. For example, dotted stitch done on a machine using a darning foot. This technique is suitable for processing various figurative and abstract designs.

Curly stitch
It is important that the pattern made by the stitch is beautiful. To do this, the seams should not overlap each other, merge, and the distances between them should be equal if possible. The fabric must be moved very smoothly to ensure an even stitch.

Regular (left) and irregular (right) spiral stitch
When quilting by hand, the following seams are used: a “hand stitch” seam, a cross-shaped “goat” seam, a buttonhole seam, and rarely a chain stitch.
The seam "hand stitching"- a type of “back needle” seam, it produces a neat and durable stitch, similar to a machine stitch.
"Goat" thick, non-flowing fabrics are sheathed, and it is also used for outlining appliqués.

Goat seam

Loop stitch
Buttonhole stitch sew buttonholes, edges of blankets and appliqués.

Chain stitch
Beautiful chain stitch used as a decorative addition. They can also be used to cover appliques or make an independent design.
Edging
The neatness of your product will first of all be given by a beautifully selected and high-quality sewn edge - a border. The border is an important element of the patchwork technique, and the overall impression of the entire work often depends on its appearance and quality of execution. An artistically selected border will highlight the successful color scheme and highlight the patchwork pattern on the product. If you are creating a wall panel, then already at the initial stage of the sketch you should imagine what kind of border - “frame” for your work - you will make. A beautiful border can enhance the impression of the work, while a tasteless border or one that doesn’t match the style and color can completely ruin it.
The border can be overlapping, with corner squares and with beveled corners.
Here are some useful tips.
So that the bordered product does not warp or bulge, after the border is sewn onto it, all measurements of the future border are made not along the edges of the patchwork product, but through its middle. This is done because due to the large number of seams and stitches, the product may change dimensions (skew).
The hem should always be cut along the longitudinal or transverse thread so that it does not stretch out in the future.
If there is not enough length of fabric for the border, then it is added. In this case, the border is sewn only at an angle of 45 degrees. This will make the seam less noticeable.

Sewing the border
You can sew a border from several strips of fabric of different sizes. It is desirable that the stripes taper towards the center, which gives the effect of “collecting” the composition.
You can make an asymmetrical border, for example, different colors (on different sides) and different widths.
You can insert sewn-in strips, squares, triangles, letters and other shapes into the main border strip. But if you choose a patterned border, then it should not interfere with the main product.
Since the border is a kind of logical continuation of the work, you can use some pieces from the main fabric in it. But this must be done very carefully so as not to overdo it: after all, the main function of the border is to limit and collect the frame for the product.
Thin items can be edged with a strip of fabric. The strip is cut along the lobar and sewn along the edge of the product, seam to seam - front to front. 45 degree angles are sutured on the arms.
The border may be an extension of the lining folded over the patchwork top. To do this, the lining is cut wider than the top. For thin and multi-layered items, there are different ways to sew on the lining as a border.
Trimming lining of a three-layer blanket
The layers are initially cut out as follows: the padding (batting, interlining) is 1 cm larger than the patchwork top on each side, and the lining is 3 cm larger.
Processing corners with an “envelope”
The quilted blanket is stitched around the entire perimeter, retreating 6 mm from the edge. Then the edges of the padding are trimmed by 5 mm, and the lining fabric by 2.5 cm, counting from the cut of the padding.
The corners are treated with an “envelope”. Mark an angle on the lining and cut it off at a distance of 1 cm from the padding (at the seam). This 1 cm is folded over the patchwork top, and the cut of the lining is also folded 1 cm and pinned so that it coincides with the edge of the stuffing.
Finally, the lining is folded over the patchwork top so that the fold overlaps the machine stitching, and sewn by hand, preferably to the stitches. The resulting corner is also sewn with a hidden seam.
Lining edging for thin items
In this case, the lining must be cut wider than the product by the width of the border plus a seam allowance. For example, if the border of the finished product is 2 cm, then to make it you will need 4 cm of fabric and 5 mm for an allowance on each side.
On the lining, mark the sewing line for the border, then fold any of the corners in half with the right side inward and iron the fold. The fold corner is folded over itself, bent at the point of intersection with the border sewing line, the corner is ironed, turned back, stitched along the fold line and cut off. The seam is smoothed on both sides and excess fabric is trimmed.
The remaining corners of the lining are prepared in the same way, then it is turned right side out. The patchwork top is inserted into the resulting “frame”, the edges of the border are turned up by 5 mm, basted and stitched.
Ottomans: “Biscuit” technique
Products sewn using this technique will add coziness to your home and will definitely please your household (and cats will simply be fascinated by the soft, voluminous pillows).
Each ottoman consists of a square top (chintz, preferably in a small pattern, small checks and polka dots are especially suitable), a dense colored lining (satin, calico, thick chintz) and light padding material between them (scraps of synthetic padding, technical wool).
The top of the ottoman should be 3-4 cm larger than the lining (the larger the top, the more voluminous the pillow will be), plus 1 cm of seam allowance on each side. The size of the lining is equal to the size of the finished “ottoman” plus 1 cm of seam allowance on four sides.
The peculiarity of this technique is that the base (lining) of the ottoman should be flat, and the top should be voluminous.
For a light, voluminous blanket from ottomans, the required number of blanks are sewn, and then they are joined manually with a hidden seam.
Start sewing from the lining.
1. Fold each square of lining fabric in half.
2. An incision is made on the fold.
3. The front side of the lining is connected to the front side of the top and the corners are carefully aligned, pinning them together.

4. Then, on each of the four sides, place all the excess fabric of the top into the central fold and carefully sew together the resulting square. For strength, the edges of the allowance can be sewn with a zigzag.

5. Then, through the hole in the lining, turn the workpiece right side out.

6. In the same way, the required number of ottomans are made and joined manually with an over-the-edge seam. Sew in stripes.

7. Each ottoman of the stitched blanket is stuffed through a slit with padding polyester or other padded material. Do not stuff it too tightly so that the ottomans are light, carefully straightening out folds and lumps. Then the cuts on the lining are sewn up, also by hand.

8. Now all that remains is to sew on the overall lining (you can insert ruffles along the edge), stitch along the seams using a stitch along the contour - and the ottoman is ready.
Instead of ruffles, the blanket around the perimeter can be edged using one of the methods described in the “Edging” section.
Making kitchen utensils
Now that you are already involved in creating a patchwork mosaic, and most importantly, your hands can easily cut, baste and tuck fabric of any size and style, you can also sew kitchen gloves. Perhaps you have accumulated various stitched patterns that, with some effort, can decorate your kitchen. Any square or oval sample no larger than 20 x 20 cm made of cotton fabrics, made according to the “Mill”, “Square in a Square”, “Herringbone”, “Well” and others patterns, is suitable for gripping. You can also come up with an independent composition, for example with an applique on some kitchen theme. This is what concerns the top of the product. But the grip has three layers: the top, the gasket (thermal insulating layer) and the lining.
For laying, use batting, thick flannel, canvas - any infusible material (not synthetics!). The lining also requires a non-fusible material, dense and dark, so that marks from hot pans do not spoil the “appearance” of your grip.
The grip is made as follows. The patchwork top is folded with the lining and interlining connected (right to right). In the corner (if the grip is square) a loop of braid or material is basted, and this entire “sandwich” is sewn together, leaving 2 cm unsewn in order to turn the product right side out. The slit is sewn up manually with a hidden seam. All that remains is to quilt the product, and you can also sew decorative braid onto the patchwork top.
An oval grip is made in the same way, only the loop is attached to the top of the oval (but not to the side).
Hot water bottle for kettle
Another traditional item of Russian everyday life is a teapot warmer in the shape of a chicken, a “woman” or a decorated cap. Here you can use all your imagination and skill.

The principle of making a heating pad is the same in all cases. First you need to measure the teapot with a centimeter so as not to make a mistake with the size. The heating pad should cover it tightly to retain heat. Then they make a sketch of the product and a pattern. Any heating pad consists of a patchwork top (simple or figured - as desired), an insulating layer of batting or padding polyester and a lining of dark fabric so that it gets less dirty. The lining is cut out taking into account the allowance for shrinkage during stitching and the allowance for the edging of the lower edge of the heating pad.
For a patchwork top, it is better to choose fabrics in warm colors (yellow, red, brown, orange), corresponding to tea drinking.
An oven mitt can be both a decorative element in the kitchen and a completely practical thing. It will also be an excellent gift for a friend or relative. Moreover, patchwork sewing of potholders (this is the technique we will talk about) will not require large financial expenditures, because all kinds of leftover fabric and even the smallest scraps lying around idle can be used.
In addition, today it is patchwork (the international name for patchwork) that is the so-called “trend setter” in the manufacture of such things as potholders, blankets, bedspreads, pillows, home bags, etc.
Beginning needlewomen may have a question: how is patchwork different from quilting? Quilting is a broader concept than patchwork (quilting - stitching, quilting). He included several types of needlework techniques, including patchwork, appliqué, embroidery, and traditional quilting stitches and stitches. And patchwork most often only means working with scraps.
And now more about the process of making potholders.
Square potholder in patchwork style
Patchwork is ideal for creating square potholders. At the beginning of work, you need to decide what colors of fabric you will use. Ideally, they should not only fit well with each other, but also be in harmony with the overall image of the kitchen. As they say, the details make the whole look. If, for example, the predominant colors in the kitchen are beige, gray, white, caramel, you can make a potholder in pastel colors. But a brighter option is also acceptable, however, in the ensemble it should be accompanied by some other bright decorative item (painting, vase, curtains, flowerpots, etc.)

If you have already worked in the patchwork technique, you will probably use leftovers from already used fabrics. If this is your debut in patchwork, don’t be too lazy to do a revision in your closet. Often there is something lying there that you will no longer wear or use, but it will come in handy for such creative experiments. Pay attention to sales in fabric stores: small surpluses are often sold at a discount.
Materials for a pair of potholders:
- 2 pieces of linen fabric without a pattern - squares 24*24 cm each;
- 24 strips of linen fabric in several colors (24*2.5 cm);
- 2 pieces of wool blanket or cotton batting (also 24*24 cm);
- Border - 250 cm (the color should match the main fabric).

By the way, you can make the border yourself. To do this, cut strips of plain fabric 6 cm wide and then sew them together along the short side. Once you have the length you need, press the seams with a hot iron, then fold the border in half and iron again.
And now additional materials that will be useful when making patchwork potholders: iron, scissors, pins, sewing thread, sewing machine (ideally, you can sew by hand).
Sew on the stripes
Under the cotton batting you need to place a simple linen fabric, i.e. 2 squares with a side of 24 cm overlap each other. We put multi-colored stripes on top; they have to be sewn directly to the batting.

We take two strips and with their right sides facing each other, fold them in the center of the square batting. Sew on one side. We bend the top strip and iron the seam. In this case, the stripes should “look at you” with their faces.
Now we take another strip and place it right side down on the already sewn, just ironed, last strip. We sew the strips along the edge again, then bend the last strip and smooth the seam again. Using exactly the same principle, we sew the next strips until the piece of batting is completely covered. We do the same with the other potholder. If desired, each strip can be sewn with a finishing stitch. Upon completion, the square piece must be trimmed on all sides.
Sew on the border
We put the border on the wrong side of the potholder, which we just sewed from scraps. At the same time, make sure that the raw edge of the border is connected to the raw edge of the potholder.

Starting at one corner, sew the border to one side of the square first. Before each new corner, you need to bend the border at an angle of 45 degrees. In this way we sew the border around the entire perimeter of the potholder.

Final work
Returning to the corner from which we started sewing, we bend the border to the front side. This must be done before you sew the last piece of the border to the tack, i.e. slightly short of the corner. Cut off the excess border, leaving about 10 cm for the loop.
The border needs to be pressed onto the front side of the patchwork square. For convenience, pin the border with safety pins so that it does not move. Make a loop from the remaining tip of the border and carefully hide the cut inside the border.

Now all that remains is to sew the border to the front side of the potholder.

In practice, such patchwork pot holders are very easy to sew, you only need to try it once. And then you can quickly decorate any kitchen interior.
Heart shaped potholder

To make a heart-shaped potholder, we will need the following materials: padding polyester/batting, bias tape, cotton fabric of one or more colors.
First we make patterns. Part A is 21 cm in the middle, part B is 18 cm. A is the main part, it is cut out with a fold, B is the upper parts where the arm is directly inserted. If these dimensions seem large to you, then you can reduce them: say, part A - up to 18 cm, part B - up to 15 cm.

We cut out two parts according to pattern A from cotton fabric, 1 part A from batting/sintepon for lining. Place 3 hearts together (padded polyester in the middle) and align the edges. At the same stage, we cut out 4 parts according to pattern B (two side panels with lining).

We divide the 4 parts into pairs, finishing the inner edge with bias tape or lace.

We place the resulting sidewalls on a large heart, trim them and sew around the perimeter with bias tape. You can use a zigzag stitch, you can use a regular machine stitch, or you can do it by hand, it’s not that difficult. We start sheathing from the middle of the top and finish there. We turn the edges of the binding inwards. This way all the parts will be connected and processed in one step.

The potholder is ready!
Pot holder in quilting technique

To make a potholder using the quilting technique, you will need:
- small scraps of fabric in different colors
- gasket (sintepon or thermal gasket with a layer of foil)
- paper, ruler, pencil
- needle, thread, pins, scissors.
The process of patchwork sewing potholders in this technique begins with the preparation of templates.
On paper, draw and cut out 19 hexagons. Their size is equal to the size of those hexagons that you see on your future potholder. For example, a hexagon measuring 5 cm with a side of 2.5 cm. You also need to cut out one hexagon of a larger size (about 1 cm on each side).

Use the large hexagon as a pattern, and use it to cut out 19 hexagons from the fabrics.

Place a small template on the wrong side of the cut piece. It's better to secure it with a pin.

Fold the edges of the fabric over the template and sew with basting stitches. Proceed the same way with the rest of the parts.

Then the two parts need to be folded with their front sides facing each other. Sew over the edge using regular stitches.

From the front side you will get something like this:

Continue sewing the pieces together. You will see that the result will be a kind of “flower”.

Then you need to iron everything thoroughly, pull out the basting and remove all the templates from the paper.

Now we cut out two squares from the fabric for the front and back sides of the potholder, and cut the same square from the spacer.
Assembling the potholder proceeds as follows: we fold all the layers of the potholder in sequence: the back, the gasket, the front side, the “flower”. Pin all layers together for security.

Now the tack needs to be quilted. This means the stitch must go through all the layers, stitching the “flower” at the same time. The easiest way, of course, to carry out this process is with a sewing machine. You can also quilt the potholder by hand, making small forward stitches using contrasting threads. Hand quilting, of course, will take more time, but the item will not be damaged by it. Cute, original, bright. But if this is a very long option for you, then the line can only be made along the “flower”. However, if each hexagon is quilted, the volume and pattern will be better emphasized.


Now you need to edge the potholder. The strip of fabric must be sewn with the same seam “forward to the needle”.

As soon as you reach the corner, you need to carefully wrap the strip and continue making the stitch on the other side of the potholder itself. The edging should begin from the place where the loop will subsequently be located.

You can also edge the potholder using a sewing machine, if you know how to do it.
The final part of the work. After completing the edging, point the strip of fabric upward. Continuing to stitch, we form a loop. Wrap the strip onto the wrong side of the potholder and sew it on.
Well, the potholder using the quilting technique is ready!

Yes, beginners may be intimidated by the lengthy instructions and the seemingly lengthy process. But in fact, everything is done quite quickly, and once you get the hang of it, patchwork will no longer be a labor-intensive process for you. Rather, on the contrary, you will only be looking everywhere for scraps for future work. You'll start with a potholder, then sew a blanket for your daughter's favorite doll, and then an adult patchwork blanket will come out from under your hands.
Categories,TOTAL
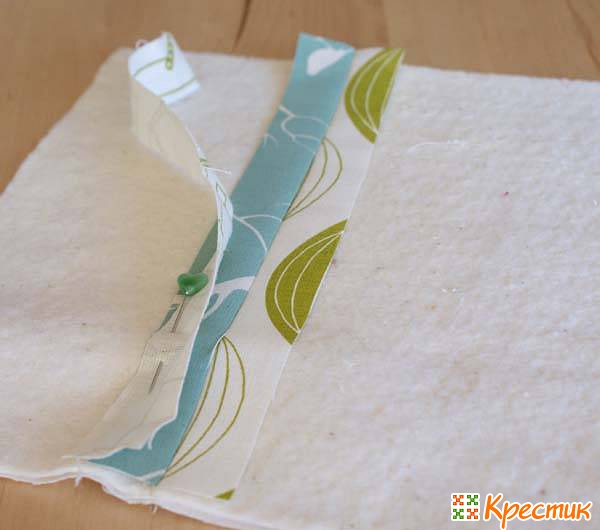
Today we will teach you how to edge a blanket with your own hands. In our article you will clearly see how to do this easily and correctly. In the example, we will be edging a quilt using patchwork. In fact, you can finish the edges of any blanket this way. Very often, the edges of a blanket become frayed during use; they can also be refreshed. And your favorite blanket will still serve you.
We really hope that this master class will be useful to you. To get started, you need to trim the edges of the new blanket and align its corners. If it is an old blanket, trim off the frayed edges and straighten them.
How to edge a blanket
From the fabric you have chosen for the edging, cut strips 10 cm wide. The length of the sewn strips should be equal to the length of the perimeter of the blanket.

Fold the ribbon in half (wrong side inside) and iron.

It will be convenient for you if you wrap the tape on a piece of cardboard.

Never start work from a corner. Leave a small “tail” of their tape at the beginning of work.
Using sewing pins, pin the ribbon to the front of the quilt. Step back about 1 cm from the edge. Sew until you reach the corner.

When you reach the corner, stop sewing 0.5 cm from the corner. The needle must be in the fabric. Raise the presser foot and turn the work 45 degrees. See photo.

We sew to the edge.


We bend the edging so that a 90 degree angle is formed.

The excess fabric forms a 45 degree angle.

Align the sides of the edging with the edges of the blanket

Sew the tape to the next corner.

The angle should look like this.

We continue to sew. When you have sewn all the corners and matched the joint, the ends of the tape need to be tucked inside. If the tape is too long, the ends must be cut off.

Sew the ribbon to the end.
Unscrew the sewn ribbon.
The angle should look like this.

We wrap the ribbon and sew it with a blind seam by hand.

Processing the corner from the inside out.

That's all the wisdom!
We hope you find this patchwork tutorial helpful.
Author Sandy wishes you inspiration!
This master class provides technology on how to edge the edge of a blanket with bias tape. Finishing the right corner of a quilt with binding.
How to sew double factory bias tape along the edge of a bedspread or quilt, including along the round shape.
How to cut strips of fabric for edging

The strips for edging the blanket should be between 4 and 5 cm wide. It is very convenient to use a long wooden or metal ruler (meter) to mark the stripes.

You can cut strips for bias tape from fabric scraps, and then join them together into one long strip.


To connect the strips of tape correctly, you will definitely need to cut the edges of the stitched strips at an angle of 45 degrees.

It is advisable to make an allowance of no more than 0.8 cm. The main thing is that the stitching line on both sides coincides with the edges of the bottom strip, as shown in this photo. If this condition is not met, the strips sewn together when unfolded will be offset relative to each other.

Make sure that the top strip does not move under the presser foot.


The seam of the bias tape is pressed on the wrong side.

This is what the bias tape should look like when joined together; all that remains is to cut off the corners and trim the strip.
Finishing a blanket with bias tape

Now you can start edging the blanket.

To make it easier to sew on the edging, you should first prepare the edges of the blanket. Pin or baste the top of the quilt with the lining.

After this, you need to lay a connecting stitch, departing from the edge of the blanket no more than 1 cm, so that this seam is subsequently hidden by the stitched binding.

Before sewing on the binding, it must be prepared and ironed.
First, fold the strip of fabric, aligning both sides together, but not tightly, leaving 2 - 3 mm between the inner edges.

After this, fold the binding in half as shown in the photo and iron it in this position. Please note that the edges are slightly offset from each other. This is not required, but is recommended. This way it will be easier to sew the binding along the edge of the blanket.
Laying a Right Angle of Bias Tape

Edging a right angle with bias tape is a rather complicated operation and not everyone can do this operation efficiently the first time. It is especially difficult to do this without a guide, as shown in my master class.

Make a mark like this with a pencil inside the unfolded tape so that the angle is exactly 90 degrees.

Stitch the inside corner as shown in the photo, without going beyond the hem line, on both sides of the binding.

Now you need to cut these parts of the binding, as shown in the photo, almost to the very corner, not reaching 2-3 mm.

In addition, you need to cut off these parts, retreating 0.6 - 0.8 cm from the seam.

Now you need to turn this section of the binding out with an awl or a pencil and you will get a right angle.

Pin the corner of the edging together as shown in the photo.

The angle of the edging should match the corner of the blanket.

In this photo you can see that the top line of the pressed binding should lie along the edge of the quilt.

You need to sew the binding along the side that turned out a little shorter when ironing the edging (see above).
You need to start processing the corner of the binding not from the corner, but stepping back a little, approximately 15 - 20 cm.

When you reach the corner, without lifting the needle from the fabric, turn the blanket and continue stitching the binding. Constantly “look” at the wrong side, checking how the needle grabs the other half of the binding.

Do not try to repeat my master class, be sure to baste the binding before sewing it on the sewing machine.

From this side, the stitching along the trim will look neater and more beautiful, since you could control how the stitching was laid.

On the back of a blanket, stitching without a basting will not always be perfect, even with an experienced seamstress.

This master class shows only one operation - how to process a right angle with trim. If you manage to edge a corner, stitching the binding along the flat areas of the blanket will not be very difficult.

