Star news


Decorating the hall with paper flowers with your own hands. Large paper flowers in the decoration of the halls
Paper flowers for decorating a room with your own hands: all the subtleties of making them
Organizing a festive celebration is always accompanied by many problems and unnecessary expenses. This can apply to both weddings and birthday celebrations. Regardless of the occasion, room decoration remains an important element in preparing for the event. Paper flowers for decorating a hall with your own hands are in first place in popularity compared to the long-used fresh flowers, fabrics and balloons. By making paper flowers with your own hands, you will show originality and unleash your imagination.
DIY crafts have been known since ancient times. Even then, flowers were made from scrap materials and paper was used. In the Middle Ages, paper flowers were used to decorate the walls of houses intended for worship and religious ceremonies. Nowadays, such crafts are made both at enterprises and independently by handmade lovers.
Paper flowers are used very widely, for compositional decoration, creating photo frames, postcards, gift boxes, caskets, but still most often they are used to decorate the hall and festive tables. Such fakes will create a festive mood and give joy on the special day.

To create flowers with your own hands, we will need various materials and tools. Often, plain paper is used, both in different colors and standard white. It all depends on what kind of flower will be made. Products made from crepe and corrugated paper have gained no less popularity. If you only have white paper, then the way out of the situation is to paint it with the required color using watercolor or gouache.
The following tools are necessary for decorating and fastening all flower details: glue, scissors, thread, wire, tape, stapler. All this is an integral part of creating this or that craft. But still, the most important elements remain paper and glue, as the main and necessary ones.

Decorative flowers have the advantage for which most people value them: even the simplest and cheapest paper can be used to make an original and beautiful flower. Any flower can be created with a minimum of effort. And the main advantage is the durability of the craft with careful use.
The main condition when designing and decorating paper flowers is to maintain the proportions and maximum similarity of the flower inflorescence with real flowers. In this case, you will achieve the desired effect.
Before creating the flowers you need, it is important to decide what you want to see. Will it be large flowers glued to the wall of the hall, or small bouquets on tables in vases, or original garlands decorating a table or other furniture. It’s also worth deciding what type of flower will dominate your composition, so you can perfectly combine it with other colors or decorative elements. Use only quality materials for the ultimate in strength and durability.

The simplest paper flower that even a small child can make is a snowdrop. For it you need to take a small piece of paper, preferably white, fold it diagonally and bend the corners. This simplest version of a flower can be glued to the surface, then the rest of its parts can be added or completed.
Paper roses can be made both small and huge. The size depends on the flight of your imagination and, of course, on the purpose and size of your formal hall. To create a rose, you need to do the following:
In this way, a beautiful and original rose is obtained, which can be presented in a composition either in a single form or in the form of a certain number of flowers in a bouquet. To do this, you need to apply a little glue to the wire that will serve as the stem for the rose. Then glue the petals onto the tip of the paper.
Next you need to start preparing the petals themselves. The paper is folded 12 times and the petals are cut out to the required sizes. Then they are glued to the stem and this creates another version of roses, which can already be combined into a beautiful bouquet.

The most beautiful flowers are made from corrugated paper. It is considered the most convenient material for creating various shapes and volumes of flowers. From this paper, flowers acquire lush sizes and have an impeccable appearance. Bouquets of peonies, sunflowers, dahlias, asters, crocuses or other flowers can be made from such paper to decorate the room.
Giant flowers are perfect for decorating a wedding venue. For such flowers, it is important to have a strong base or a rod on which the rest of the craft structure will be attached. This will contribute to the reliability and durability of the flower.
Making paper flowers with your own hands is a great art that requires effort and diligence. But the result is worth it; your guests will appreciate your original crafts.
Video on the topic of the article
How to decorate a hall: paper plus imagination

Today I have collected several simple, but quite effective ways to decorate a hall (assembly, music) for a children's party.
The downside of this idea is that creating paper decorations takes a lot of time, so if we are talking about decorating a school hall, I advise you to conduct several master classes with children of middle and high school age. This is the only way to get many of the same elements for your holiday decoration.
Large voluminous flowers and pompoms
Pompoms of different colors and sizes can be bought in online stores. They will be delivered folded, all you have to do is fluff them up.
If you have time and free hands, you can do it yourself.
I won’t repeat myself, I’ll just point you to my article, in which there are three examples fairly large paper products. Just be careful, some flowers are made from corrugated paper, and hanging balls And outdoor flowers- from a thin silence.
We follow the picture, there is a description:

How to decorate a hall with such flowers?
- can be hung from the ceiling
- attach to the edge of the stage (as a rule, there is always something to cover there :-))
- hang vertically on ribbons along the edges of the stage
- lay along the edges of the “carpet” path along which graduates solemnly walk
Corrugated paper flowers
There is no way to do this without collective creativity. But! If you make a sketch 2-3 months before the event, you can quite manage to do everything. Again I’m sending you to my article with 10 master classes on making flowers and bouquets that will decorate not only the stage, but also festive tables (follow the picture):

By the way, ideas can be taken from newlyweds, whose tables are decorated with living plants. What a difference, actually! These are charming examples of flower arrangements that will look very festive even on paper!

Here I will also mention the “trees of happiness”. They are also made from corrugated paper or colored table napkins. It turns out elegant, there are quite a lot of master classes on the Internet, look for it!
How to decorate a hall with voluminous garlands
The point is this: you need to make three-dimensional figures from paper, which are then strung at some distance from each other on threads, fishing lines or thin ribbons. Such garlands hanging from the ceiling will greatly decorate a music or assembly hall.
Here is my example - pigeons in the clouds: I print out a diagram of a paper dove (by the way, you can print 20 more diagrams of different animals from here). For one garland we need two such birds. Cut out and fold along the folds, looking at the picture in the right corner.
We will alternate pigeons with paper clouds like these. I don’t give you a diagram - we randomly cut out identical parts from 2 sheets of A4 format, bend them and fasten them in the center with a stapler. In a large figure, I cut out a small detail inside. This will also be a small cloud.

All! All that remains is to assemble our voluminous garland onto a string! I did this with a needle, securing the parts simply with a “step back” seam so that they would not roll down.

How do you like my pigeons in the clouds? By the way, these garlands spin very beautifully from any air movement. In the diagram the dove has legs, but we don't need it to stand on the table, I just made a curve at the bottom.
Cardboard letters
The inscriptions on the back of the stage are a weak point almost always and everywhere. The letters are poorly painted, the letter spacing is not maintained, and everything, as a rule, looks unprofessional.
If possible, it is better not to do this at all :-). But there are times when inscriptions or numbers are required. For example, a school anniversary.
I suggest decorating large cardboard letters with small flowers from colored napkins. The work is painstaking, but the effect is quite interesting.
The napkins are the most ordinary, small ones. One flower requires 2 napkins. Place them folded one on top of the other, draw a circle using a saucer, and cut them out. We fasten it in the center with a stapler. What to do next can be seen in the picture. We fix the resulting flowers with glue on a cardboard blank with numbers or letters.


Wall decorations
The picture on the left shows charming flowers with voluminous petals. Cut out the hearts, fold them in half, and glue one side. We made them quite large - one petal was made from half a landscape sheet. A noticeable decoration, no doubt about it! We attached them to strips of plain blue wallpaper and decorated the backdrop of the stage.
The right picture shows a “musical” wreath made from photocopies of music pages. The rolls are easy to roll and the results are amazing!

Ready-made three-dimensional paper decorations
Please appreciate my enormous work - articles with pictures that I have prepared for your convenience. She found the best examples of design, gave advice on installation and assembly :-). All these elements are quite LARGE, perfect for the hall, the price is quite reasonable.
I wish you pleasant viewing (click on the red words):
Thank you very much for the idea of decorating the letter with flowers from napkins! Before my daughter’s birthday, I only had a few hours to design the letter using the materials polystyrene foam, masking tape and corrugated paper + zero experience in crafting paper flowers. There were several ways, but yours turned out to be the fastest and most beautiful.
As a result, I cut out a letter from foam plastic, wrapped it with masking tape, and made a lot of small flowers from corrugated paper according to your sample, which I pasted onto the letter, it turned out well))))
Yes exactly! You can do it on foam plastic, it will also be voluminous. Thanks for the idea.
Paper crafts are the bomb
It turns out beautifully. And you can do it yourself if you try hard, and even if under your leadership. Thanks for the ideas.
Elvira Gabdulkhalikova
Master class “Paper flower for hall decoration”
PAPER FLOWER

For decorations central wall of the musical hall I try to use inexpensive means at hand. I often use it for this purpose printer paper. This year by March 8 decorated wall in the form of the number 8, made of paper flowers(of course I spotted the idea on the MAAM website). I've often heard question. “How did you make them so beautiful? flowers? I present to your attention a small Master Class.

1. Bend the sheet diagonally

2. Cut off the excess to make a square

3. Bend in half to find the middle

4. Bend the upper corner towards the middle of the base

5. And then we bend the same corner in half upward, as seen in the photo

6. You get two horizontal lines


7. Bend both edges of the workpiece from the middle of the base to the extreme points of the upper horizontal line


8. And fold the edges again - the left edge forward, and the right edge back

9. On the resulting blank we draw the outline of the future flower

11. Expand. It turned out 5 petal flower. We bend the inner petal inward along the fold line to add volume.


For decoration I used these flowers of different sizes. pre-glued to them colored center in the form of a circle

Thank you for your attention! I will be glad if it is useful to someone in their work.
Paper flowers can be used for interior decoration, decor, and even as a gift! Let's try to learn how to make voluminous paper flowers with our own hands, look at examples and photos of beautiful finished works, and also watch a master class for beginners.
The easiest way to make flowers is from colored paper - it can be corrugated or ordinary, and if you plan to make strictly decorative flowers, you can take paper with a mother-of-pearl or metallic effect. You shouldn’t make a tulip or a rose as your first experiment - try something very, very simple first.
Decorative crafts

In order to make simple and spectacular flowers you will need:
- double-sided colored paper (corrugated paper is also suitable);
- thin wire;
- sharp scissors and a pencil for marking.
It is better to take colored paper of several shades, so your flowers will look impressive and attractive - for example, it can be shades of yellow or several tones of red. Don't try to mix cool and warm colors if you doubt your taste.
For beginners, the easiest way to do this is to fold colored paper several times so that you get a stack of squares approximately 6*6. Then mark the shape of the future buds on the top square with a pencil - it can be a smooth rounded figure, regular circles, or whatever your imagination suggests.
Then, with scissors, you need to carefully cut the stack according to the shape of the marked sepal and disassemble it into components - for each flower you will need three to five blanks. The wire needs to be cut into pieces of approximately 15-25 centimeters, twisted on one side so that a decorative center is formed, then the previously obtained “petals” are put on each wire, after which a stand is made at the bottom of the wire (a stable ring is twisted).
With such crafts you can decorate a table for a holiday, or use them for a photo shoot or interior decor, or you can simply attach them to the wall in the nursery or in the hall near the mirror - a good mood is guaranteed.
Or this simple option:


From what is at hand
Old magazines or newspapers are used to make these products. This way you can make large flowers out of paper - the technique is simple, and paper crafts turn out to be quite impressive.

What you will need:
- unnecessary magazines (absolutely any);
- green adhesive tape;
- sharp scissors;
- large barbecue skewers;
- paper glue or regular hot melt glue.
How to make voluminous paper flowers easily and quickly? I'll tell you step by step.
- Disassemble the magazines into pages and choose the brightest and most colorful ones - these are the ones we will use to make decorative paper crafts.

- Each page must be folded four times along its length, cut with fringe from the fold side, not cutting to the edge about one centimeter.

- We begin directly making the buds - you need to take the resulting fringed ribbon and wrap it around the top of the skewer, securing it with glue or adhesive tape. This is how buds of voluminous flowers like asters and chrysanthemums are made.

- Then you need to make several turns around the skewer with a fringed ribbon so that the bud turns out lush and beautiful. When there are enough turns, you can glue the free edge of the fringe so that the bud holds on.

- Wrap a skewer with adhesive tape, cut out plant petals from magazines, shape them and glue them. Your beautiful and fluffy flowers are ready.

By the way, these recommendations can also be used for beginners - they are quite easy to do. If you want to make such flowers with children, then make sure that they have safety scissors, or cut the fringe yourself.


Decorative flower garlands
Want to make chic garlands? Use giant paper flowers for them. By the way, making paper flowers for garlands with your own hands is very simple - you only need beautiful, spectacular paper and a little skill. No flower templates for cutting out or diagrams are required; the main task of such large products is to look bright, unusual and attractive; large paper flowers do not have to be realistic.

- scissors;
- corrugated paper of two or three colors (it is better to take bright and light);
- thread or fishing line;
- stapler or glue.
You need to cut rectangles out of corrugated paper and put them in a stack of five. If you want to get flowers of the same color, then fold them by color. And if you want to make original flowers from paper, then put several shades in one pile - pink, white, light red and yellow will look chic.
You can choose the size of the rectangles yourself; you just need to remember that the flowers will be the same diameter as the rectangle on the narrow side.
Each pile is assembled into an accordion (look at the photo on how to make flowers from such accordions, if it is not too clear from the description).

Each accordion of five sheets of paper must be fastened in the center with a stapler or glued with a paper ring. It is best to round the edges of the accordion - cut out something like a petal.
Now each blank needs to be turned into a bud - straighten the buds from the accordions you made. The accordions need to be straightened in different directions, and you will see how you can create beautiful paper flowers in just a few seconds.
Then cut the required length of fishing line or thread and string the buds - your garland is ready.


Another garland option:

Bouquets for decoration
Do you want to make a bouquet of flowers from paper? See photo:
Do you want to learn how to make a tulip? Watch the video and step-by-step photos below on how to make tulips in different ways.
Useful information and several step-by-step master classes
At the very end of the article, download patterns and color templates for cutting. By the way, if you want to make origami out of paper, it is best to use special double-sided paper.
Watch a detailed master class on how to make flowers and plants out of paper using the origami technique - it’s not only interesting, but also quite difficult, so don’t expect perfectly made flowers right away, you’ll have to work a little to make paper flowers with your own hands.
Also, flower stencils will be useful to you if you make large paper flowers of complex shapes - the same tulip or rose is more convenient to assemble from a special shape of petals.

Try making large paper ones - just collect a huge rosebud according to this master class (see photo below on how to make flowers lush and beautiful).
Here are templates of large flowers for cutting out of paper:

And here are the step-by-step photos:
How to make flowers for children? Try to minimize any risks - for example, do not let children work with adult scissors, prepare the wire in advance and make sure that children are disciplined.
Learn how to make paper flowers with your own hands using coffee filters or napkins - a thin and fragile napkin looks almost like a real petal, you just need to give it a shape and collect the bud.
This video shows how to make a paper flower for beginners.
A few inspiring photos - see how beautifully you can decorate your holiday with camellias or roses.

Try making voluminous paper flowers with your own hands using cardboard or thick paper - even a child can handle this technique.

Another option for a simple flower:

Leaf templates:


Greetings, dear readers and visitors! I have already written several times that I really love decorating gifts in the most unexpected ways. And today I suggest you make paper flowers with your own hands. As many as twenty-odd methods, by the way.
Now, unfortunately, I rarely get around to mass gift wrapping. Moreover, every year there are more and more acquaintances and friends who need to be congratulated along with their relatives. This is very joyful! I love giving presents. But if I choose them very carefully, then lately I pack them in organza bags, since I only decide on detailed packaging for single holidays (like birthdays).
However, my passion for all kinds of packaging beauty is difficult to overcome, so today, together with you, I will practice making beautiful flowers using step-by-step schemes.
DIY paper flowers: simple and clever
There will be a lot of master classes, get ready. Good news for all rose lovers: there will be as many as 4 of them.
Aster
Guys, honestly, I'm not very good at naming colors. So if you see a discrepancy that is obvious to you, write in the comments.
So, first in line is the aster. For it, cut out five circles: two large, two medium and one very small. Fold each circle in half three times, then decorate the edge as in the 4th photo. After unfolding the structure, squeeze each petal to give it volume. Stack all the circles and decorate the middle.
Almost calendula
This flower looks much more like a packaging bow. Prepare a square of paper of the required length for it and cut the edges according to step 2. You will need several such blanks. Place them one on top of the other and squeeze them in the center, tightening them with wire or thread.
Now the most important thing is to straighten the petals so that you get a beautiful resemblance to a flower. Accordingly, the more layers, the more petals and the more magnificent the flower in the end.
Tip: make several of these flowers of different sizes and glue them on the packaging next to each other, then you will get a beautiful bouquet.
Calla
To create calla lilies, you can use either regular double-sided paper or foam rubber (I wrote about what it is in the section about the minion).
For calla lilies, take a stamen (you can crumple it out of paper or make it out of polymer clay) and a petal made in the shape of a heart. Place the stamen in the petal, fold the edges of the petal over the stamen, gluing them together. All that remains is to unscrew the edges to get maximum resemblance to a calla lily.
Such flowers are well suited for decorating postcards, packaging, and as an independent gift in the form of a bouquet.

Bell
The master class for the bell is very simple and straightforward. Cut the blank according to the first photo. Glue the edges together and carefully straighten the ends. To make everything look natural, make a center of several elongated stamens, which will need to be glued inside the flower.
By the way, these bells would be great to decorate packaging for March 8th or just a spring birthday.

Lilies of the valley
Well, or something similar. For one flower, take a long rectangle and bend its edge, as in the photo. Cut the wide part so that you get many small strips. Using scissors, twist the strips (to do this, you just need to run the sharp side of the scissors along these strips, lightly pressing the blade against them).
To prevent the flower from falling apart, take a rod and wrap a green stripe around it. Then start carefully twisting the “flower” part, previously coated with glue, on top. Apply the layers tightly so that the greenery does not show through.
But making green leaves is not at all difficult - for them, just fold a rectangle of green paper like an accordion and trim the edges into a triangle. When you unroll, you will get a lot of green leaves ready to be glued to the base.

Poppy
Now we use corrugated paper. Cut out about ten teardrop-shaped petals from it. Stretch the wide part so that the blanks resemble mushrooms.
Take a thin wire and wrap some paper around it - this will be the core. Wind the petals onto this core so that each one slightly overlaps the previous one. When everything is ready, the structure can be pulled together at the bottom so that it does not fall apart.
The master class shows how this flower can be attached to a holiday cap, but believe me, the poppy will look great on a gift box.

Red flower
What is its species? No associations came to mind. But that’s not the point - to create it you will need about ten petals (corrugated paper is used, by the way). Their shape is almost teardrop-shaped. but with a cut end.
Cut out a base circle from thick cardboard. Glue all the petals in layers to this circle, slightly crumpling (doubting? God, how right :_D) the bases, thus forming folds - then the flower will be more voluminous and “fluffy”. Decorate the center with some button or bead.
Such a flower, by the way, will look great made of soft felt - this way it will gain durability. And if you attach the base for the brooch at the back, you get two in one - a decoration for the gift and the gift itself.
Extravaganza of color
There are only two flowers, but the bright combinations create a very unusual effect. Take the crepe paper again, cut out a circle and fold it into a “doll” shape. Cut a “skirt” for it, which you wrap around the doll. Attach the petals on top, gluing them in a circle. Glue two wide leaves at the base.
The second flower is very simple - cut the fringe and twist it into several layers. The flowers are very simple, they can make a very interesting gift arrangement.
Unseen flower
To prepare the base for this flower, I advise you to look here - here the base for the second Christmas tree is created in exactly the same way. But then the differences begin - each of the corners needs to be wrapped using a thick wire or knitting needle so that it turns out to be a spiral.
You can leave this design alone, but I suggest you connect several (say, three) pieces using the existing spirals - the wow effect is guaranteed. Then you can also experiment - connecting elements with spirals into unprecedented designs.
Tip: Are you going to a Japanese-themed party? Then make such a very large flower and take it with you - it will serve as an excellent decoration for a chandelier.

Peony
“Pio-, pio-, peonies are given by a new acquaintance...” - words from the song of the underground group “My Michelle” (I’ve been listening to it often lately, inspired by it). We will make from corrugated paper. You will need five sizes of petals, approximately five copies of each (appearance as in the photo).
Stretch the petals so that you get something like a wave (for both large and small ones). Then form a stamen from the same corrugated paper by folding the paper and further compacting it. You can do this on a wire skewer, or you can do it without it.
Glue the petals onto the finished stamen, each one overlapping the previous one. Do not pull the petal too tightly. In the end, all that remains is to cut the green leaves and stick them around the peony.

4 in 1: dandelion, clove, aster, chamomile
All these wonderful creations of nature are made according to one principle - cutting the edge of a strip from which a flower will be made. The final shape of the flower depends on the cutting shape. Please note that some require a core and others do not.
Please note: despite the very simple design, the flowers turn out very realistic. If you have very little time to make, then this is an ideal option.
Experiment and discover your never-before-seen plants – be sure to tell us what happens.

Paper roses
Magic roses are one of my favorite flowers
Rose with twisted edge
The main difficulty here is to carefully twist the edge of the corrugated paper, straightening out the folds. Then make sure that the folds are even. Now twist the strip so that the layers fit tightly together. At the end, secure with thread, trim off the excess.

Simple rose
Need to make a plant in five minutes? Then this rose is definitely for you! Just cut out a circle and draw a spiral in it. Cut out a spiral as in the photo and twist the rose, starting from the longest link of the spiral (the central part will serve as the base).

Big rose
Even gigantic, if you follow these exact dimensions. The heart petals are stretched and placed on top of each other in a circle, secured with glue. Green petals are attached at the end. Of course, the flower doesn’t have to be as big as in the photo – go with your preferences.
Twisted paper rose
Once upon a time I already described this method of creating a rose (here is the second one). The principle is absolutely the same, but the sizes of the triangles resulting from twisting must be the same along the entire length of the ribbon, otherwise the flower will not be very neat.
Once I even made a Rosemary doll, which took part in a city exhibition. Her whole body was covered with roses, made exactly according to this method (the roses were made from ribbons, however).

Clover
I'll just show you how to make the base for the four leaf clover. To do this, take a square of paper and fold it in half lengthwise and in half again. Fold the ends towards the center. Cut out a heart from the resulting design. The result will be exactly what we wanted - a happy flower.

Nameless
No matter how I tried, I couldn’t give a clear name. As a result, the product remained just a beautiful flower, reminiscent of kanzashi motifs (the Japanese art of making jewelry from satin ribbons).
The beginning here is the same as in clover. But after bending the edges, you will need to bend the ends so that the length of the bent part is equal to the length of the visible side in the middle. Then these parts are straightened out and their edges are folded so that the sides are even. They are folded again and glued together to form three stamens. There should be three such petals.
This flower is most suitable for decorating a gift in Japanese style.

And again the aster
This time you need to glue the petals along the edge until you reach the desired volume. Decorate the center as you wish or simply fill it with as many petals as possible.

At this point, I declare the big flower review closed. I hope you have found exactly the option that will help you decorate your gift in the best possible way. See you soon, subscribe and share with your friends!
Sincerely, Anastasia Skoracheva
Sometimes, in order to “revive” the interior, you need little - just a couple of decorative details, and you can do them yourself. Things made from paper will help create a festive atmosphere indoors. Yes, they are short-lived, but they are capable of awakening the creative spirit in every person and transforming a room.
Birthday, March 8, summer holiday - you can find any number of reasons for a party. Simple paper decor will help you create a holiday in your home every day.


Paper decor
What you will need for work:
Children will enjoy making this kind of decor - they will be happy to decorate their room for their birthday. In the same way, you can decorate the candy bar area for a wedding or a summer country party at the dacha.

DIY paper decor

Paper garlands
The simplest thing is to decorate the room with paper garlands. All you need is thread and colored paper. You can make as many garland options as you like:
- from hearts - for Valentine's Day or the birthday of a loved one;
- Easter – chickens, rabbits, flowers;
- snowflakes and Christmas trees, openwork mittens - New Year's decor;
- a garland of triangles, circles with photographs - for a child’s birthday. It can be made in the form of a train, houses, and other figures.
Making a garland will not take much time. Figures are cut out and attached to a strong thread using glue. You can attach the garland elements using a sewing machine, stitching them in the center and leaving free areas between the decorative elements.
If you make double flags or hearts (cut them out by folding the paper in half), you can secure them by passing a thread or cord inside and sealing the edges of the flags.

Decor design with paper crafts

Interior decoration with paper

Paper decor
Fans and flowers made of paper
In childhood, everyone made fans out of paper, folding it like an accordion. Large fans that can be placed on the wall and flowers are made using the same principle. For them, colored paper is folded like an accordion; for a flower, the sides are connected into a circle. It is important that the sheet of paper has the shape of a long ribbon. A paper flower is glued to the center.
If you take paper with a pattern—you can buy it in craft supply stores or scrapbooking stores—the fan will look more impressive. You can apply glitter, and then under artificial light they will sparkle beautifully.
Huge flowers and pompoms are made from corrugated paper or thin tissue paper. The principle of creation is the same as that of a fan - the paper needs to be folded like an accordion. The width of the fold is approximately 3 cm. If you want to get a dense pompom, you will need at least 10-12 sheets.

DIY paper decor

Decor idea with paper products
Carefully tie the folded accordion in the middle with strong thread. The edges of the future flower need to be aligned; you can give them a rounded shape. Now carefully, layer by layer, straighten each petal of the future flower, giving it shape.
If you are making a flower to hang on a wall, straighten the petals in one direction; for a pompom, open half in one direction, half in the other. All that remains is to fasten the pompom to a thread, and for the flower, glue a small circle on the back side for mounting on the wall.

Decor design with paper crafts

Interior decoration with paper

Paper decor
"Heart" decor
For Valentine's Day, you can make your own paper decor for your home using the main symbol - hearts.
Garland of hearts
For a voluminous garland, you need to cut out a lot of hearts from colored paper (you can take bright scrapbook paper with a floral pattern). Fold them 2-3 together, sew them in the center with a strong thread, leaving 30-40 centimeters between the elements. Carefully bend the “petals”, giving the hearts volume. Having prepared several of these threads, attach them to the ceiling or doorway in the form of a curtain.
You can make the garland even more interesting if you take blanks of different sizes and fold them in this way: smallest - medium - large - medium - smallest. Further steps are the same: sew, bend, hang.

DIY paper decor

Decor idea with paper products
Using the quilling technique you can make a bright and unusual garland. You will need scrapbook paper with a floral pattern, bright buttons and glue. To work with scrap paper, it is better to take “Moment” or “Titan”. They will not turn yellow over time. Glue two strips on each side to a small strip of paper (10*2 cm). Bend them one by one and glue the edges. You will get a heart, which can be additionally decorated with bright buttons. All that remains is to attach the hearts to the thread and hang the garland.

Decor design with paper crafts

Interior decoration with paper

Paper decor
"Flower" heart
You will need regular paper napkins and cardboard.
From thick corrugated cardboard (unnecessary boxes), cut out two heart-shaped blanks. Connect them together using a strip of thick cardboard (its width should correspond to the desired thickness of the decorative element). It turns out to be a voluminous heart.
Fold napkins measuring 20*20 cm (without unfolding) in four to form a square with sides 5*5 cm. Staple the layers in the center and cut out a circle. Layer by layer, peel back the petals of the paper flower. The result is a delicate rose.

DIY paper decor

Decor idea with paper products
Having made many of these flowers, attach them to a cardboard “heart” blank. A spectacular result will be obtained if you take napkins of a delicate pink color or two colors - white and pink. The result will not leave your “other half” indifferent - a tender heart will decorate the room.
"Love tree"
It’s very simple to make – place several branches in a beautiful transparent vase. Cut out several hearts from red, pink, white paper (you can make them voluminous, like for a garland), hang them on the branches. You can add thin beads.

Decor design with paper crafts

Interior decoration with paper

Paper decor
New Year's compositions
Everyone knows how to make openwork snowflakes from a paper napkin. Window decor can be made even more diverse. Elements of the composition are cut out of white paper using stencils - forest, houses, deer and Santa Claus's sleigh. You can come up with many stories.
These elements are placed on the window (you can glue them using paste made from flour or starch). If you want to create a completely magical atmosphere on New Year’s Eve, you can place small light sources nearby. They will shine through paper and glass, creating an unusual effect.
To make the interior beautiful, make the composition three-dimensional by cutting out another one of the same type and placing the lighting between the layers of paper. Add glitter to the interior arrangement.

DIY paper decor

Decor idea with paper products
You can make voluminous Christmas tree cones from paper, decorating them to your liking, or Christmas wreaths. They will create a festive atmosphere in your home.
A wedding, birthday, New Year, and just a desire to do something unusual with your own hands are a good reason to pick up paper. With its help you can do the following things.
- Unusual curtains for the doorway - from long, triangular-shaped multi-colored ribbons, twisting them into a “tube”, starting from the wide side. The finished elements are strung on threads and attached to the opening. Such curtains can be made from colored pages of glossy magazines.
- Panel - laying out its elements from paper strips.
- Volumetric letters – having made a blank like a volumetric heart, you can cover them with scrap paper and decorate them with additional elements.
Show your imagination and come up with your own “paper” room. With such decorative items that keep the warmth of your hands, your home will become even more comfortable and filled with love.
Video: Room decor with paper
50 photos of interior decorating ideas using paper:


Paper plastics is the most popular creative direction today. And it is used not only for decorating children's parties and other celebrations. To decorate the living room, which is quite everyday, you can also use this direction. For example, you can make large paper flowers.
Paper flowers are mainly an attribute of celebration. But if your living room is decorated in a romantic style, then such a casual design will be appropriate. The main thing is that you can make such decor with your own hands.

How to make large paper flowers:
- First of all, you need to draw petals on suitable paper. You draw four very large petals, three medium ones and three more small ones. Just determine the size by eye. The petals should be slightly elongated, just a round shape will not work.
- Cut out these pieces. Make a cut on each element and glue the edges together, then the blanks will be more voluminous. It’s easier to do this with a heat gun, or, in extreme cases, with high-quality glue.
- Glue the large petals together, bend the edges a little - then the craft will be natural. Glue the second row to these petals, bending the edges too.
- Next you need to decorate the middle of the flower. Make a cut to the middle, on the smallest petal. The edges are glued together, and the core is placed inside, simply gluing it.
All is ready! We decorate the hall with these flowers in any order. The atmosphere at home will become more gentle, joyful, and original. Cozy flowers look like giant living ones.
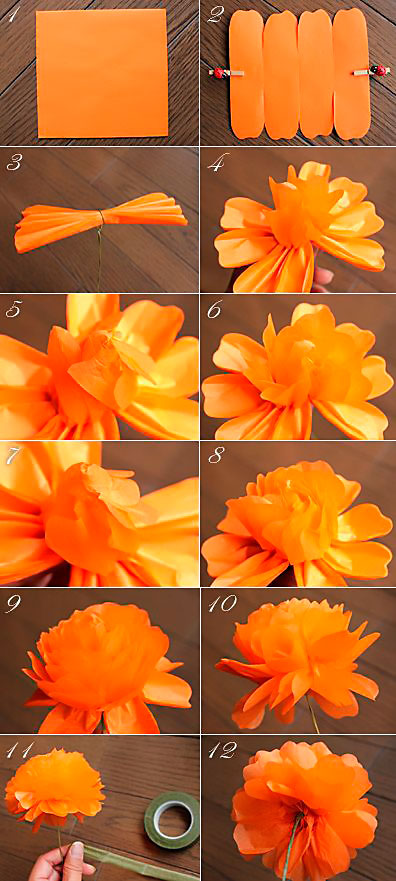
How to decorate a hall with artificial corrugated flowers
Corrugated paper decorations have become very popular over the past few years. There is no need to specially corrugate the paper; it is freely sold in stores and is inexpensive. And, indeed, the decorative possibilities of such paper tempt us to make more and more new decorations.

To make a large interior flower, you need:
- Cut the corrugated paper roll into three parts, but do this without unwinding the roll.
- The resulting ribbon must be folded like an accordion; the width of the petals varies. It all depends on what you want to get in the end.
- One end of the blank must be tied with a ribbon - if the flowers should be multi-colored, then several blanks of different colors are folded together.
- Using scissors, the petals are either rounded or, conversely, pointed. You can experiment with both shape and size. Now all layers of corrugated paper need to be very carefully straightened so that they do not wrinkle or tear.
This option is as simple as possible, even a child can handle it. For birthdays, March 8, other holidays and romantic dates, such flowers will come in handy. And this is not a one-time decor; you can use it for a long time.
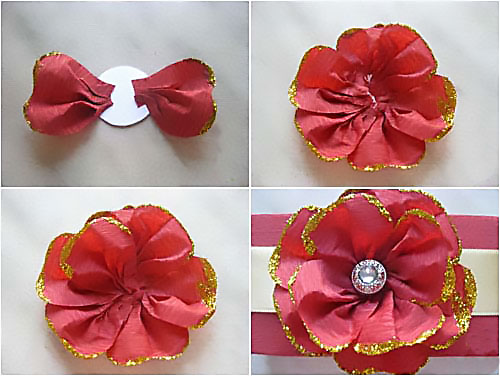
Beautiful decoration of the hall with fabric flowers
Fabric flowers are also an excellent option for floral decoration. You can decorate the room with them arbitrarily; as soon as you see what happened, ideas will appear by themselves. The main thing is to make the flowers themselves correctly and handle the fabric with care.

Making organza flowers:
- The following materials will be required - organza itself in the desired shades, candles, matches, sewing accessories, beads and beads, paper for sketches and patterns.
- So, at the beginning, patterns are prepared for future buds. Circles of different diameters are drawn on paper. Circle glasses and jars, lids, saucers so that the circles are even.
- Light a candle and hold each petal, slightly melting the petal. Small parts get singed when you hold them with tweezers.
- Now you can start assembling. Start correctly with the lower petals, those that are larger. Gradually add the rest. Decorate the middle with beads or beads. They can be strung on wire or sewn. The flower is ready!
You will get a delicate and lush peony. But you can also make roses. These flowers are made quite quickly, but they look impressive and impressive.
Do it right: how to decorate a room with flowers
Not only paintings and panels on the walls can decorate a room. Today, artificial flowers created with one’s own hands are increasingly used to decorate the living room. Most often, of course, we are talking about festive decor. But if we still talk about everyday life, what options are there?

Decorating the hall with paper flowers:
- Make a dynamic wall panel. Roll a lot of small white dense flowers out of paper, make bright dots-cores for the flowers. Draw a line on the wall with a pencil along which you should lay out the flowers. Secure them with suitable glue.
- Huge paper corrugated flowers can be planted on large paper stems of the same size and fixed along one of the walls. For example, along the dining area. Five large flowers are enough. The main thing is that they do not stand in height, and that they are not all the same.
- Beautiful paper roses can be made from sheet music pages or from pages with English text. They turn out a little beige, with a touch of age. They look good in a bouquet. A vase with such roses can be placed on a table, on a chest of drawers, on a shelf.
However, design options may come as you work with flowers. Sometimes they decorate a window, sometimes a wall, sometimes a table and other surfaces. The main thing is that they match the interior in color and style.
Master class: how to make large flowers to decorate the hall (video)
Beautiful flowers in the living room interior are not necessarily fresh flowers. Paper or fabric flowers look great and also show off your creativity. Try it, the result may surprise you.

