Star news


Volumetric autumn applique made of paper. DIY autumn applications made from colored paper for kindergarten with templates
Equipment: colored double-sided sheets (A-4), product template, PVA glue, scissors, pencil
.jpg)
The song from the film “Small Favor” performed by N. Karachentsev is played
It's time for the birds to go on their way,
Birds dream of the south,
Yellow maple leaf yesterday
He sat in my palm.
Let someone tell me in response:
"There's nothing like that here"
Yellow leaf like a bird yesterday
He sat in my palm.
Maple leaf, maple leaf,
I dream about you in the middle of winter,
Dream at that moment when there is a snowstorm
Snow swings outside the window,
At that moment when everything was covered
And my soul is white and white,
Dream about you
Red maple leaf.
Dream it up, dream it up
Red maple leaf.
Step-by-step process for completing the work:
1. Fold the sheet in half. Attach the template to the fold line and trace it with a pencil.

2. Cut the blank according to the template and open it like a book

3. Fold the workpiece into a strip - an accordion


4. Fold the strip in half with long leaves in the middle

5. Glue the middle together to make a maple leaf.

6. Similarly, we make two more leaves

7. We collect three leaves into one large sheet, glue them together

8. The final stage: select a cardboard background, glue on a maple leaf and spine, and use the cut-out remaining paper to design the work.

Lyudmila Sapronova
"Fall applique"
Target: Creation paper cut applique,development of children's artistic and creative abilities.
Tasks:
Teach to do break applique;
Learn to choose beautiful color combinations;
Develop imagination, fantasy;
Develop fine motor skills;
Cultivate accuracy and perseverance when working;
Cultivate a love for the natural environment.
For execution we will need autumn applique: colored paper, glue, pencils, album sheets.

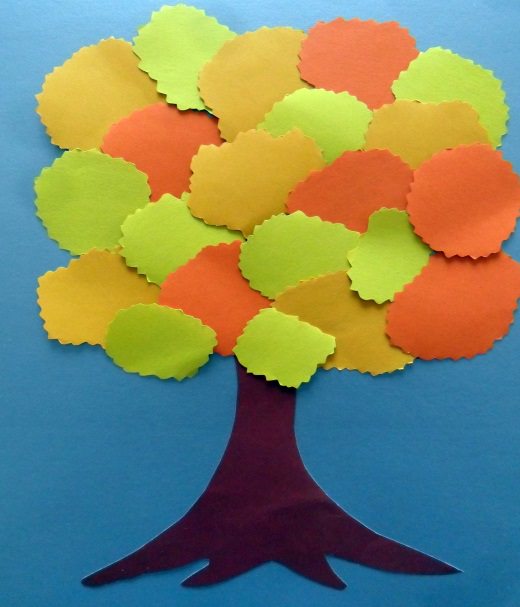
Application will consist of trees. First we need to draw a tree on a white sheet of paper (one or more, at the request of the child)

Before you start applique Let's remember with the children what color autumn leaves. After listening to the children's answers, we offer to take the paper (orange, yellow and green)
Let's pick the yellow pieces first. Apply glue to the tree crown and glue the yellow leaves.

Add light green, red and orange leaves.

Let's take felt-tip pens or pencils and color the tree trunk.

This is what we got autumn tree.
in autumn leaves also fall to the ground, so let's stick our leaves under the tree. Let's add a few leaves swirling in the air. OK it's all over Now Fall applique is ready!
Publications on the topic:
Flowers in a vase. Broken applique. Master Class. Such a beautiful bouquet in a vase can be made using the applique method. Only if you don't cut the paper.
Children's master class. Postcard “Dove – a symbol of the family” (torn applique). In our kindergarten, a number of events were planned for the International.
1. Organizational moment. The teacher offers the children a trip to the cinema. (At the entrance he hands out tickets from tree leaves. They are placed around the room.
The autumn time has come. The trees dressed up in bright colors: yellow, red, orange. In some places the leaves are still green.
Master class: application (using broken mosaic technique) “Bright Easter”. The Great holiday "Bright Easter" is approaching. Like bright.
Educational field "Artistic and aesthetic development". Goal: to introduce children of senior preschool age to history and traditions.
Master class: “Colorful autumn” (non-traditional technique - drawing with crumpled paper, applique) The most important advantage of this method.
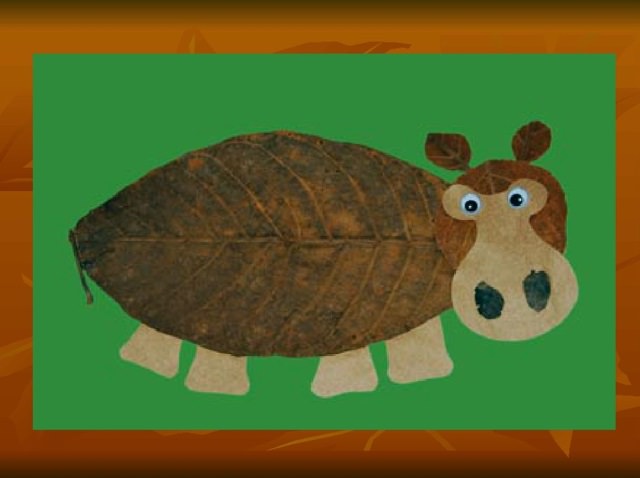
Autumn, fallen leaves crunch underfoot... What a pity for this yellow-red fading beauty, crumbling and trampled into the mud. Here is a birch leaf - gently yellow, jagged, here is an alder - ribbed, and here is a mountain ash - a family of long leaves on a thin stalk. Let's take them home and make beautiful autumn crafts and appliques. We will also need a piece of colored cardboard for the background and glue to glue the leaves.
How to make an applique of autumn leaves
Autumn leaves dried outside are not even and quite fragile, so first we’ll dry the leaves ourselves. We find freshly fallen, bright and beautiful, undamaged leaves, and put them between the sheets of some thick book. We put the book under a press (under something heavy). In a week or even earlier, the smooth autumn leaves for applique are ready; they can be easily glued to paper or cardboard with PVA glue.
Sequencing
A true artist sees living images in nature, so we can dream up our imaginations. Let’s lay out all our collected and dried wealth in front of us and see what it’s like. Take suitable leaves and place them on cardboard until you get a picture. There is no need to glue it yet, first just lay it out until you are happy with everything.
When the picture is perfect, you can glue it. We take one leaf at a time, remembering where it was, smear it on the back side, and glue it in place. If the application is multi-layered, first glue the lower leaves, then the top layer. The craft is ready! You can admire it!
But what if appliqué ideas just don’t come to mind, and the leaves only look like leaves, and not at all like bunnies and chanterelles? Then take advantage of our ideas.
Leaf craft ideas
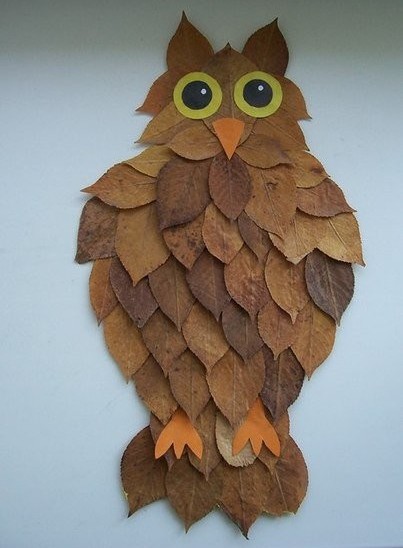
Applications with animals
Owl made of leaves:


Red cat


Bird with chicks:


And even an eagle:

Landscapes of leaves
For a landscape, the background can be painted with watercolors.


Still lifes

Portraits


The finished application (if it is not voluminous) can be placed under a press so that after drying it remains flat. Store in a dry place, perhaps in a frame under glass.
5 319 596
Evening is an amazing time when the whole family gets together and unsuspecting parents find out that they need to bring autumn crafts to the kindergarten for tomorrow. To prevent this situation from taking you by surprise, we recommend preparing in advance and familiarizing yourself with ideas for children's crafts.
We have prepared for you many step-by-step and colorful master classes of varying difficulty levels. We are sure that you will definitely find something worthwhile for yourself.
Hedgehogs are all different
Did you know that the Soviet cartoon “Hedgehog in the Fog” 15 years ago was recognized as the best animated film of all time? You see what a difficult animal this hedgehog is. It is definitely worthy of repeated embodiment using various natural materials.Volumetric hedgehog made of seeds and plasticine
A cheerful and thrifty hedgehog, cheerfully carrying mushrooms on its back, may come to visit your apartment in the fall. To do this, you will need to stock up on simple natural materials, an hour of free time and involve young assistants in the work. For joint creativity you will need:
- foil;
- leg-split;
- black and brown
- unpeeled seeds;
- PVA glue;
- acorns and leaves for decoration.

Cover the hedgehog's body with black plasticine and its face with brown plasticine. This important stage can be safely entrusted to the child; nothing will be spoiled, and all the flaws will then be hidden.

Lubricate the muzzle with a thin layer of PVA. Also moisten the twine a little with glue and wrap it tightly, row by row, around the face, starting from the nose. You'll have to stop there for now and let the glue dry. Remember that this should happen naturally. On a radiator or when drying with a hairdryer, the plasticine will melt.
The next stage is the design stage. You need to make needles for the hedgehog from the seeds. Start work from the head, arrange the rows of seeds in a checkerboard pattern. Stick the “needles” into the plasticine as tightly as possible to each other.

Decorate the face with plasticine eyes and nose.
Mushrooms can be easily made from acorns by simply covering their caps with brown plasticine. If you wish, you can attach real leaves to them. Using plasticine, attach the mushrooms to the back of the hedgehog.
Such a cutie will definitely please your child, and will also allow you to enjoy joint creativity.
Hedgehog applique made from dry leaves
While walking through the autumn park, did you pick up a beautiful bouquet of yellow leaves? Great, add glue and cardboard to them and we’ll make a cute hedgehog.All you need is to draw an outline. Your baby will be happy to glue the leaves on himself. Just show him how it's done.

You can download the hedgehog template, we offer you 4 options:


Hedgehog applique made from seeds
Did you like the idea of using seeds for hedgehog needles, but a voluminous craft seems too complicated to implement? We have prepared another simple MK, which features a funny hedgehog, seeds and plasticine.With a little perseverance, you can make a surprisingly cute and easy craft for kindergarten.

Paper hedgehog
We bring to your attention another idea that even children from the younger group can handle. An original and cute applique using autumn leaves will not take you much time. It also comes with a paper cutting template, making it even easier for parents.
Template:

Mushrooms
You've already got your head full, what else could you do to surprise the seasoned kindergarten teachers who are waiting again and again for crafts from your child? We offer to capture their imagination with surprisingly realistic mushrooms made from the simplest materials at hand.
To work you will need:
- cotton wool;
- water; starch;
- long nails or thick wire;
- cardboard;
- paints and brushes;
- PVA glue;
- dry tea leaves or poppy seeds.

Pierce each circle in the middle with a nail. It will serve as the base for the leg. Instead, you can use thick steel wire. But it’s better not to bother and buy a dozen or two potential “mushroom legs” at your nearest hardware store.

Now it’s time to cook the paste. Boil a liter of water. Stir 5 tbsp in a glass of cold water. with a heap of potato starch. While stirring boiling water, pour starch into it in a stream. Stirring, bring the paste to a boil. It is ready to use, all you have to do is wait for it to cool to room temperature.

Coat the mushroom preparation with paste. Roll a cotton wool ball for the hat, dip it in paste and glue it to the hat. Wrap the mushroom stem with moistened cotton wool. Repeat this procedure several times until you get the fungus of the desired size and shape.

Don't forget to squeeze out excess glue from the cotton wool! The resulting blanks must be completely dried on a radiator or in a warm oven. Already at this stage the mushrooms turn out very nice.

The time has come for creative work - painting. It is she who will turn faded preparations into real autumn mushrooms. You can paint crafts with any paint: acrylic, gouache or watercolor.
Color the caps according to the selected types of mushrooms.

Wait for the paint to dry completely. Cover the end of the leg with a thin layer of PVA and dip it in dry poppy seed or tea leaves - this will simulate the remains of earth.

For additional shine and chic, you can coat the mushroom caps with any colorless varnish.
You can decorate a beautiful basket with mushrooms - your craft will not go unnoticed. And the secret of making realistic mushrooms will long excite the imagination of everyone who is lucky enough to see them.
These hand made beauties are the result of the efforts made.

Don't have a suitable basket? No problem! A beautiful composition using moss, coniferous or dry twigs and real dry leaves can be arranged in an ordinary cardboard box or on a small stump, or on your own.

Imagine and think outside the box - in kindergarten, and any other creativity, this is only welcome.
Autumn trees
Has your child already wondered why in the fall the trees change their green attire to a bright yellow-orange decoration? So it’s time to satisfy his curiosity, and at the same time his craving for creativity.Plasticine tree
We offer you a beautiful and simple plasticine application that even the youngest naturalists can handle.
For work, prepare colored plasticine and cardboard.
Draw a tree trunk on thick cardboard. Now let your child roll a lot of thin and long plasticine sausages in 2-3 shades of brown.

Glue them along the tree trunk, alternating shades for realism. Fill in the entire contour of the trunk and don't forget about the branches.

Add some more branches for a lush crown.

Roll out many thin sausages in red, orange and yellow colors. Roll each sausage into a spiral shape. You will see that your child will really enjoy this exciting activity.

Glue the spirals in random order onto the crown of the tree. Shape the tree to the desired size.

Make blades of grass from green plasticine. “Plant” the grass near the tree.

Complete the applique with falling leaves.

This is the kind of man-made beauty we have. A bright frame will make the picture even more expressive.
Application “Confetti Tree”
An original idea for an autumn tree is to decorate it with paper confetti. Check out the step-by-step master class by watching our video. Confetti can be easily and simply cut out using a regular hole punch. Using this technique, you can quickly grow an entire fantasy forest.Pumpkin seed trees
Have you noticed how much a pumpkin seed looks like a leaf? And creative individuals not only noticed this, but also used the similarity to create an original application from this natural material.See our step-by-step MK photos and be inspired by your own masterpieces.


Unusual trees made from cereals
We continue to increase the level of creativity. Now, to create a craft, colored cereals will be used. Do you have rice, semolina or millet in stock? Then try to master this method of creating an application.Or this option:
"Macaroni" tree
The unusual shape and safe composition of various pasta products makes it possible to use them in preschool creativity. Find bow- or leaf-shaped pasta and “grow” your own unique tree.
Unusual "button" trees
And if you accidentally have a lot of unnecessary multi-colored buttons lying around at home, then we know how to use them for a good cause. Try to create a bright panel that will decorate your cottage or nursery. And armed with wire and pliers, you can master the art of button bonsai.


Pumpkin
Autumn is harvest time. And even if you didn’t plan to collect a real harvest, surprise everyone with a realistic nylon pumpkin. You can make it for a children's autumn crafts competition, or just for fun, and at the same time get acquainted with an interesting technique for making nylon vegetables and fruits.
To work you will need:
- painted nylon;
- filler (foam rubber or padding polyester, even ordinary cotton wool will do);
- needle and thread;
- thin wire;
- a small piece of wire;
- green tape;
- scissors;
- brush and paints.

Using a needle, make jumpers with thread. Do them at the same distance until you go around the entire workpiece in a circle.

Use small pieces of thin wire to make round blanks for the leaves.

Cover them with green nylon, secure its ends with thread and trim off the excess. Slightly deform the edges of the leaves, giving them a realistic look. Wrap the ends of the wire with tape.

Wrap a piece of wire with tape. Wind it around the handle and carefully remove the resulting spiral. The result is a branch-tendril, which we will attach to the pumpkin.

Collect a pumpkin branch, gradually connecting the leaves and tendrils with tape in a random order.

At the top of the pumpkin, fix a piece of wire and wrap it with tape. Attach a branch with leaves to the tail.

To achieve realism, tint the depressions orange. Blot excess moisture with a napkin.

As a result of the efforts made, a wonderful handmade autumn gift was obtained.
Ideas for inspiration
We have prepared for you a photo selection of unusual autumn crafts to motivate you to take action. Watch and be inspired to create together.Spectacular composition made from natural materials
Dry twigs and grass, a bunch of viburnum, a few smooth pebbles, a pine cone and sand, thanks to imagination, turn into a cozy rural courtyard with a wooden house under a thatched roof. This craft looks very unusual, and you can get it absolutely free. All you need to do is go for a walk in the nearest park.
Yellow leaf bird:
Printable bird:


Bouquet of maple leaves
In autumn, fallen golden leaves just beg to be picked up. Walking through the park, it’s so easy to pick up a whole bouquet of maples, but its natural beauty instantly disappears in the apartment. It can be fixed. We will teach you how to make beautiful roses from maple leaves. Such a bouquet will create an atmosphere of autumn comfort in the room and will delight you with its warmth for a long time.
Autumn crafts from twigs and threads
With a little imagination, dry twigs collected during a walk can be turned not only into crafts for the kindergarten, but also into spectacular souvenirs or bright interior decorations.
Simple paper crafts
You can create unusual autumn leaves with your own hands, and turn an empty paper bag into a picturesque tree with a spreading crown.A few more printable templates:


Just give free rein to your imagination and follow the step-by-step photo instructions.
Cute paper umbrella.
What lines come to mind first when we think about autumn? "It's a sad time! The charm of the eyes! The autumn season inspired not only poets and artists. This time of year has always been fertile ground for the development of a child’s sense of beauty. Volumetric modeling in autumn depicts the gifts of the forest - mushrooms and berries, juicy fruits, or a broken applique on the theme of Late Autumn is a clear confirmation of this. Kindergartens and schools have always used this topic in their work. The child is happy to make something beautiful with his own hands. This allows him to feel more mature, significant and listen to the praise of his parents. Applications of this kind are a competent pedagogical step to instill in a child a sense of the beauty of the world around him. And you cannot refuse such techniques.
The autumn season inspired not only poets and artists
Application on the theme “Golden Autumn” in the preparatory group: a master class for the delight of children
The main task of kindergarten teachers has always been the same - to keep the child busy so that he does not sit idle. There is no need to waste time. If it can be spent on educating the baby. Let the child make an applique with his own hands on the theme of golden autumn. Outside the window there are beautiful landscapes that are a natural visual aid for any kind of crafts. In 1st grade, children do the application “Birds Flight”, in 2nd - “Portrait of Autumn”, the older the children, the more interesting and rich the program becomes.
What the preparatory group children will need to accomplish their plans:
- colored cardboard;
- colored paper;
- scissors;
- glue.
The first step is to prepare the base. Then the tree trunks (trees) and leaves are cut out. After all the planned blanks are made, the process of gluing them to the base begins.
- Tree trunks are first glued to a sheet of cardboard. It’s better to figure out what kind of trees these will be in advance.
- Then comes the turn of the leaves. They need to be glued so that the tree crowns are rich, thick and large. In the preparatory group, you can cut out, for example, maple, oak and birch leaves.
- Glue should not be applied to the entire surface of the cut piece. It is enough to coat only the edges. This is done so that the glued parts do not become deformed after drying.
- You should not make more than two trees on one sheet of cardboard: it will be difficult for the child, he will simply get confused in this forest of blanks. One or two is enough.
Tell your children what can be improved, how to make it more beautiful: they are looking for advice from their elders, although they may not ask for it.

Dancing leaves: applique on an autumn theme (video)
Gallery: applique on the theme “Autumn” (25 photos)


Application on the theme “Autumn” in the younger group: teach a child the beauty
The simplest, but very interesting option for children in the younger group would be an applique made from real autumn foliage.
While walking, invite your child to keep the beauty of autumn as a souvenir. Let him collect different leaves. Help him select good, dry, not torn leaves. Try to collect leaves from different trees with your children.
- Necessary materials to continue work:
- glue, brush;
- paper that will be the background - the basis for the leaves;
From the total mass of collected autumn “gold” it is necessary to select the most beautiful ones, those that have not had time to rot. Place them in one row and dry them a little. There is no need to dry the leaves too much - they will break when you start gluing them. Then you need to select the required number of sheets of colored background paper.
Apply glue to each leaf with a brush and glue the foliage onto the paper. It is better to do this chaotically, without observing any symmetry - this way the application on the golden autumn theme will be more natural. You need to try to ensure that on a sheet of paper there are leaves of not one type of tree, but different ones. After the sheet is filled, you need to put it, for example, closer to the battery so that the glue dries faster.
As an option, on a sheet of paper that serves as the background for the future application, you need to draw a tree - just a bare trunk. And then glue the collected leaves onto it. Such a combined applique will look even more interesting than one made from single leaves.


Application on the theme “Trees” for children of the preparatory group: instructions and useful tips
Children of the preparatory group can make an applique on the theme “Trees” not only from paper, but also from plasticine.
But first things first.
- First, let's see how to make an applique from colored paper:
- To do this, you need to take a sheet of brown paper. If it is not monochromatic, but with small third-party inclusions, it’s okay. A tree is drawn on the selected sheet. You can use ready-made templates if available. But still, if a child draws a tree on his own, it is much more useful.
- Next, carefully cut out the drawn tree with scissors.
- When the blanks for the tree itself are ready, you need to make a small mound on which the tree grows. To do this, fold a green rectangle 9cm x 4cm in half. Use scissors to cut along an arc. Unfold - you get a regular semicircle. Now you need to complete the formation of foliage. Bend the accordion, which is made from colored squares, in half and glue it in the middle. Glue a cut-out mound to the center of the bottom edge of a sheet of blue cardboard. In the center of the mound, retreat 1.5 cm from the bottom of the cardboard sheet. Glue the wood blank. Stretch the accordion of grass along the entire length of the bottom edge of the cardboard. The grass should cover the “roots” of the tree.
- Now the formation of the tree crown begins. You need to glue the leaves, trying to ensure that the colors do not go in a row. More leaves mean a more luxuriant crown. You can stick a couple of leaves that are not attached to anything, creating the effect of leaves torn off by the wind and floating in the air. All that remains is to make the sky. In fact, the sky itself already exists - the cardboard is blue, there is no need to highlight the sky on it. But the clouds will need to be made. For this, take blue paper. You can cut out the clouds, or you can simply tear the paper into small pieces. All that remains is to glue them to the top of the cardboard without any order.
The tree against the background of the autumn sky is ready, mind you, without any effort. But, if you want to complicate the drawing, it all depends on who is doing the appliqué. There would be a desire. The figures below show several options, which are also quite simple to make.


Ideas for autumn applications for kids: let’s use imagination
The smaller the child, the more demanding he is. It is always more difficult with the youngest part of humanity than with the rest. Here imagination and all sorts of little tricks come to the aid of parents. For example, you can make a fun fall applique in just a few minutes. At the same time, the child will laugh with joy.
A simple option, which is already difficult to find simpler. Take just one yellow leaf from those that were blown onto the balcony by the wind (or, as a last resort, take yellow paper for applique).
The leaflet should look like in the picture:

Turn it over with the wide part facing down. Glue a sheet of cardboard. Draw legs and arms to it, one of which will have an umbrella. Glue a couple of larger buttons onto the leaf itself. And on them - a couple of smaller diameters. Draw drops of rain and a smile on the resulting cunning face. All. Cheerful yellow autumn man - the leaf is ready.
Time taken - 15 minutes. The child laughs with happiness. The parents breathe a sigh of relief.