Star news


DIY Christmas tree decorations: master class and photos. New Year's decorations: we make snowflakes, Christmas balls, garlands, wreaths with our own hands The most unusual New Year's toys
2016-11-25 519

Contents
The New Year is getting closer, and for those who know how to do DIY Christmas toys, the time for fruitful work is coming. Making toys is a tradition that arose at a time when mass production of Christmas tree decorations had not yet been established. Today, there are plenty of factory-made toys in stores, but the tradition of making them yourself has not disappeared. This is explained simply - handmade jewelry and toys give off a special warmth; they look homely and cozy. A nice bonus is that you can be proud that the toy you made yourself exists in a single copy.

How to make New Year's toys with your own hands?
New Year's outfits for the green beauty have undergone changes many times during the existence of the tradition of decorating the Christmas tree. In stores you can still buy standard decorations - glass balls of various colors and sizes, stars reminiscent of the Soviet past, glass cones, fruits and other traditional products. You can also add an element of creativity to the Christmas and New Year holidays and try to make New Year's toys for 2017 with your own hands.

DIY New Year's toys from scrap materials
The choice for work is almost limitless - any available material can be used. Christmas tree decorations are sometimes made from the most unexpected materials. New Year’s creativity also has its own “leaders” - materials that are used most often:
- Wood, plywood;
- Paper;
- Beads;
- Felt;
- Textile;
- Beads;
- Natural materials - branches, vines, cones, etc.

Christmas tree toys made from salt dough
You can even make DIY New Year's toys for the New Year 2017 from flour. One of the simplest and most inexpensive materials for making New Year's toys is salt dough. There is flour in every home, the process is interesting (especially for children), and the result is a completely worthy replacement for ceramic and glass toys.
To work you will need:
- Wheat flour;
- Water;
- Salt (fine);
- Paints;
- Varnish (optional);
- Leg-split;
- Oil;
- PVA glue.
Important! To make the dough more flexible, you can add a little baby oil (can be replaced with vegetable oil or olive oil).
Dissolve salt in warm water, add flour, knead the dough. To get a variety of figures, you can use dough molds. The lack of shapes is not a problem; figures from salt dough can be sculpted by hand. To add texture, you can use anything - pencils, plastic bottle caps, lace. While the dough is still wet, you need to make holes for the rope holder.

After drying (1-3 days, depending on the thickness of the product), the toy can be painted, a pattern applied, small photos pasted and coated with acrylic varnish.
Christmas decorations made from branches
DIY New Year's toys are often made from scrap materials. A simple but effective way to decorate a Christmas tree or home for the New Year is to make toys from natural materials - for example, from branches. To make a stylish toy “Ball in eco-style” you will need wire and branches.

Lifehack! It is better to collect branches in October or November, when they still contain a sufficient amount of moisture. The vines and branches collected later may be brittle and unsuitable for making toys.
Make several (5-6) circles from the wire. Form a ball “skeleton” from them, fasten the circles together with hot glue or wire. Carefully twist small diameter branches or vines over the base. To keep the branches tightly, they can also be secured with hot glue. It is easy to thread a ring of twine or ribbon into the finished ball. The stylish eco-ball is ready!
New Year toys made of beads
You can also make spectacular New Year's toys from beads. It will not be easy for beginners to make jewelry that is massive or has a complex shape. But without any problems you can make hearts, Christmas trees, and stars. To make such a toy you will need wire and beads. First you need to string the beads onto the wire, and then form the desired shape, tightly securing the ends of the wire. You can use ribbons for hanging.

New Year's toys made from light bulbs
For those who are still puzzling over the question “How to make New Year’s toys with your own hands?” An option using items that previously had a utilitarian function is perfect. New Year is coming soon, so don’t rush to throw away burnt out light bulbs. They make charming Christmas tree decorations. A little imagination, and you won’t have to settle for the usual glass balls.

Attention! For the first (background) layer, it is better to use spray paint. It is easier to apply, and this paint goes on evenly. It is much more difficult to create an even coating with a brush or sponge.
DIY New Year's toys: patterns and diagrams
DIY New Year's toys made of paper
Paper is a universal material, and Christmas tree toys and decorations made from it are cheap, practical and simple. To begin with, you can choose flat (not voluminous) jewelry. These can be snowflakes, Christmas trees, and other themed figures.


Important! You should not take too thick paper or high-density cardboard: when cutting, the edges of these materials become “shaggy” and the product does not look neat.

Another accessible method is to use paper to decorate ready-made toys - for example, balls. An ordinary glass ball will look much more original if you stick decorations cut out of paper on it. Or, for example, a small collage of photos.
A more complex way is to make toys using the origami technique. Using separate paper blocks, you can assemble a variety of decorations - for example, a Christmas tree.

Even children can make New Year's toys out of paper with their own hands. Most of the diagrams and patterns are simple; it will not be difficult for a child to cut out a snowflake, a Christmas tree or a silhouette of a bird. And from individual paper figures and silhouettes you can make a New Year's garland to decorate a Christmas tree or room. To do this, you can use a ready-made diagram from the Internet or come up with a design yourself. Christmas garlands can be decorated with snowmen, balls, patterns, Christmas trees, and animals.


From felt
Felt is a soft, fairly dense felt. This material is perfect for making New Year's toys. It’s easy to work with – you don’t need to process the edges; you can buy felt in almost any color and shade in the store. To make a stylish New Year's toy, only two or three colors of felt are enough. For example, a combination of red and white - classic New Year's colors - is perfect for creating simple decorations. It is not necessary to choose complex patterns; it is enough to cut out simplified silhouettes from paper. For example, these:

More ideas for New Year's toys for handicrafts -
You can transfer the pattern to felt using chalk or a bar of soap. Then each type of figurine must be cut out in duplicate. Large DIY New Year's toys can also be made from felt, as it is sold in sheets of different formats.

Attention! Felt lends itself well to cutting, but you need to choose sharp scissors for the job. It is better to secure the pattern on the fabric with pins to get a neat silhouette.
In the photo: DIY felt Christmas toys:


It is better to sew felt parts with contrasting threads - if the toy is red, then you can use white or beige threads. If the toy is white, the decoration with red, green, and brown threads will look harmonious.
Small felt toys can be used both to decorate the Christmas tree and to make interior garlands. Bright ribbons, regular white clothesline, and twine can be used as a base.

Christmas trees, hearts and houses are traditional details of New Year's design. Recently, toys in the form of animals with which the New Year is associated - deer and elk - have become increasingly popular.


DIY felt Christmas toys look bright and festive without any additional decor. If desired, you can give them additional flavor by decorating them with buttons, sequins, ribbons, or, for example, embroidery.


The advantage of a homemade garland is that it can be made taking into account the size and color scheme of the room that needs to be decorated. To make a garland you do not need a sewing machine - the felt parts are sewn by hand.

Thanks to the pliability and softness of the material, making toys takes very little time - about half an hour for each. If there is a need to make the toy voluminous, it is stuffed with cotton wool or holofiber.
Important! For stuffing, you can use either cotton wool or holofiber, but you need to take into account that when washed, the cotton wool inside the toy gets knocked down and the product loses its shape. If you are going to use toys in the future, it is advisable to use holofiber for stuffing - it tolerates moisture well and the product does not lose its shape.
From fabric
To make a New Year's toy from fabric with your own hands, it is not at all necessary to have sewing skills. For example, such a ball can be made using scraps of fabric. An ordinary Christmas ball or a foam blank is used as a base.
The New Year is getting closer, and for those who know how to do DIY Christmas toys, the time for fruitful work is coming. Making toys is a tradition that arose at a time when mass production of Christmas tree decorations had not yet been established. Today, there are plenty of factory-made toys in stores, but the tradition of making them yourself has not disappeared. This is explained simply - handmade jewelry and toys give off a special warmth; they look homely and cozy. A nice bonus is that you can be proud that the toy you made yourself exists in a single copy.

How to make New Year's toys with your own hands?
New Year's outfits for the green beauty have undergone changes many times during the existence of the tradition of decorating the Christmas tree. In stores you can still buy standard decorations - glass balls of various colors and sizes, stars reminiscent of the Soviet past, glass cones, fruits and other traditional products. You can also add an element of creativity to the Christmas and New Year holidays and try to make New Year's toys for 2017 with your own hands.

DIY New Year's toys from scrap materials
The choice for work is almost limitless - any available material can be used. Christmas tree decorations are sometimes made from the most unexpected materials. New Year’s creativity also has its own “leaders” - materials that are used most often:
- Wood, plywood;
- Paper;
- Beads;
- Felt;
- Textile;
- Beads;
- Natural materials - branches, vines, cones, etc.

Christmas tree toys made from salt dough
You can even make DIY New Year's toys for the New Year 2017 from flour. One of the simplest and most inexpensive materials for making New Year's toys is salt dough. There is flour in every home, the process is interesting (especially for children), and the result is a completely worthy replacement for ceramic and glass toys.
To work you will need:
- Wheat flour;
- Water;
- Salt (fine);
- Paints;
- Varnish (optional);
- Leg-split;
- Oil;
- PVA glue.
Important! To make the dough more flexible, you can add a little baby oil (can be replaced with vegetable oil or olive oil).
Dissolve salt in warm water, add flour, knead the dough. To get a variety of figures, you can use dough molds. The lack of shapes is not a problem; figures from salt dough can be sculpted by hand. To add texture, you can use anything - pencils, plastic bottle caps, lace. While the dough is still wet, you need to make holes for the rope holder.

After drying (1-3 days, depending on the thickness of the product), the toy can be painted, a pattern applied, small photos pasted and coated with acrylic varnish.
Christmas decorations made from branches
DIY New Year's toys are often made from scrap materials. A simple but effective way to decorate a Christmas tree or home for the New Year is to make toys from natural materials - for example, from branches. To make a stylish toy “Ball in eco-style” you will need wire and branches.

Lifehack! It is better to collect branches in October or November, when they still contain a sufficient amount of moisture. The vines and branches collected later may be brittle and unsuitable for making toys.
Make several (5-6) circles from the wire. Form a ball “skeleton” from them, fasten the circles together with hot glue or wire. Carefully twist small diameter branches or vines over the base. To keep the branches tightly, they can also be secured with hot glue. It is easy to thread a ring of twine or ribbon into the finished ball. The stylish eco-ball is ready!
New Year toys made of beads
You can also make spectacular New Year's toys from beads. It will not be easy for beginners to make jewelry that is massive or has a complex shape. But without any problems you can make hearts, Christmas trees, and stars. To make such a toy you will need wire and beads. First you need to string the beads onto the wire, and then form the desired shape, tightly securing the ends of the wire. You can use ribbons for hanging.

New Year's toys made from light bulbs
For those who are still puzzling over the question “How to make New Year’s toys with your own hands?” An option using items that previously had a utilitarian function is perfect. New Year is coming soon, so don’t rush to throw away burnt out light bulbs. They make charming Christmas tree decorations. A little imagination, and you won’t have to settle for the usual glass balls.

Attention! For the first (background) layer, it is better to use spray paint. It is easier to apply, and this paint goes on evenly. It is much more difficult to create an even coating with a brush or sponge.
DIY New Year's toys made of paper
Paper is a universal material, and Christmas tree toys and decorations made from it are cheap, practical and simple. To begin with, you can choose flat (not voluminous) jewelry. These can be snowflakes, Christmas trees, and other themed figures.


Important! You should not take too thick paper or high-density cardboard: when cutting, the edges of these materials become “shaggy” and the product does not look neat.

Another accessible method is to use paper to decorate ready-made toys - for example, balls. An ordinary glass ball will look much more original if you stick decorations cut out of paper on it. Or, for example, a small collage of photos.
A more complex way is to make toys using the origami technique. Using separate paper blocks, you can assemble a variety of decorations - for example, a Christmas tree.

Even children can make New Year's toys out of paper with their own hands. Most of the diagrams and patterns are simple; it will not be difficult for a child to cut out a snowflake, a Christmas tree or a silhouette of a bird. And from individual paper figures and silhouettes you can make a New Year's garland to decorate a Christmas tree or room. To do this, you can use a ready-made diagram from the Internet or come up with a design yourself. Christmas garlands can be decorated with snowmen, balls, patterns, Christmas trees, and animals.


From felt
Felt is a soft, fairly dense felt. This material is perfect for making New Year's toys. It’s easy to work with – you don’t need to process the edges; you can buy felt in almost any color and shade in the store. To make a stylish New Year's toy, only two or three colors of felt are enough. For example, a combination of red and white - classic New Year's colors - is perfect for creating simple decorations. It is not necessary to choose complex patterns; it is enough to cut out simplified silhouettes from paper. For example, these:

You can transfer the pattern to felt using chalk or a bar of soap. Then each type of figurine must be cut out in duplicate. Large DIY New Year's toys can also be made from felt, as it is sold in sheets of different formats.

Attention! Felt lends itself well to cutting, but you need to choose sharp scissors for the job. It is better to secure the pattern on the fabric with pins to get a neat silhouette.
In the photo: DIY felt Christmas toys:


It is better to sew felt parts with contrasting threads - if the toy is red, then you can use white or beige threads. If the toy is white, the decoration with red, green, and brown threads will look harmonious.
And don't forget the buttons!
Small felt toys can be used both to decorate the Christmas tree and to make interior garlands. Bright ribbons, regular white clothesline, and twine can be used as a base.

Christmas trees, hearts and houses are traditional details of New Year's design. Recently, toys in the form of animals with which the New Year is associated - deer and elk - have become increasingly popular.


DIY felt Christmas toys look bright and festive without any additional decor. If desired, you can give them additional flavor by decorating them with buttons, sequins, ribbons, or, for example, embroidery.


The advantage of a homemade garland is that it can be made taking into account the size and color scheme of the room that needs to be decorated. To make a garland you do not need a sewing machine - the felt parts are sewn by hand.

Thanks to the pliability and softness of the material, making toys takes very little time - about half an hour for each. If there is a need to make the toy voluminous, it is stuffed with cotton wool or holofiber.
Important! For stuffing, you can use either cotton wool or holofiber, but you need to take into account that when washed, the cotton wool inside the toy gets knocked down and the product loses its shape. If you are going to use toys in the future, it is advisable to use holofiber for stuffing - it tolerates moisture well and the product does not lose its shape.
From fabric
To make a New Year's toy from fabric with your own hands, it is not at all necessary to have sewing skills. For example, such a ball can be made using scraps of fabric. An ordinary Christmas ball or a foam blank is used as a base.

The fabric can be tightly wrapped around the base or glued. To work with fabric, you can use any glue available, but:
Important! When drying, PVA can leave a yellowish mark on light-colored fabric. The craft glue will hold the fabric to the backing, but since it is not designed to work with textiles, the product may not last long. Hot melt adhesive is a good option for working with fabric, but it must be applied in as thin a layer as possible.


DIY New Year's toy Cockerel
The coming 2017 is the year of the Fire Rooster, so toys in the shape of birds will be especially relevant. A DIY rooster Christmas tree toy is easy to make - just draw or copy your favorite sketch from the Internet.

The easiest way is to make a rooster out of felt or paper. To do this you will need a piece of felt, a pattern, threads, and scissors. The toy can be flat or three-dimensional. From thick felt you can make parts for a garland, or toys - pendants.

You can use beads for decoration, and suede or waxed cord or twine to make a pendant.
There are many manufacturing options, and the approach of the New Year is the best way to inspire creativity. It is advisable to start preparing for this holiday in a good mood - toys made with a positive attitude emit special warmth.


DIY outdoor Christmas toys
If the space of your home allows, you can make a variety of outdoor Christmas toys with your own hands. For example, make a snowman out of plastic glasses, as shown in the photo, and put an LED garland inside. If there are children in the house, they will be truly surprised by finding candy in the cavity of the cups.
You can also design cone-shaped floor Christmas toys with your own hands. You need to make a cone base from thick cardboard, and then decorate it in the form of a Christmas tree, a gnome, Santa Claus and other figures. Use colored paper. Cut out decorations from it and glue them to the base. You can also use foamiran, felt and other materials. You can make a cone-shaped frame from bendable strong wire, wrap it with green thread, and attach an LED garland in the middle - you will get a Christmas tree.


Making Christmas toys with your own hands in large and small sizes
Making New Year's toys with your own hands using the most ordinary materials allows you to create the most unusual products, which sometimes amaze not only with their originality, but also with their size.
DIY mini Christmas toys
To decorate a small Christmas tree or a bouquet of fir branches, we recommend making mini Christmas toys with your own hands. The easiest way to make such decorations is from salt dough. Take 250 g of water, a glass of salt and 2 glasses of flour, knead the dough and start modeling. You can form three-dimensional figures or flat ones by first rolling out the dough in a thin layer. Sculpt whatever you want.
These can be snowflakes, Christmas trees, balls, snowmen. It wouldn’t hurt to make a small puppy - a symbol of the coming year. All these “semi-finished products” must be dried in the oven (5 - 6 hours on low heat) or 2 - 3 days in the fresh air. You can decorate such New Year's toys with your own hands, sprinkle them with glitter, cover them with tinsel and other decorative elements.

Huge DIY New Year's toys
Spectacular decorations that differ in their scale are often used to decorate a private home. These can be large garlands and huge DIY New Year's toys: New Year's creatures, balls, bells. Such decorations can also be found at city festive events and fairs. A large DIY New Year's toy ball can be made from an ordinary gymnastic ball; you just need to decorate it and beautifully decorate the loop, disguising the handle with a satin ribbon with a bow.
A huge DIY New Year's toy “clock” can decorate not only the exterior of the house, but also the interior of a spacious room, if you install a flat structure against the wall. They can be an excellent element of a corner for a photo shoot, and the arrows will remind you of the upcoming holiday. Such a watch can be made from plywood, and the mechanism may be missing altogether, or you can get it along with an old watch at a flea market. Like all DIY New Year's toys, the clock should also be decorated. This can be done with multi-colored tinsel, an image of Santa Claus on the dial, or artificial snow.


How to make New Year's toys with your own hands in different stylistic directions
It has become quite fashionable to decorate the New Year's interior in compliance with one or another stylistic direction, on which the design of New Year's toys with your own hands largely depends. Let's look at some options.
DIY New Year's toys in Provence style
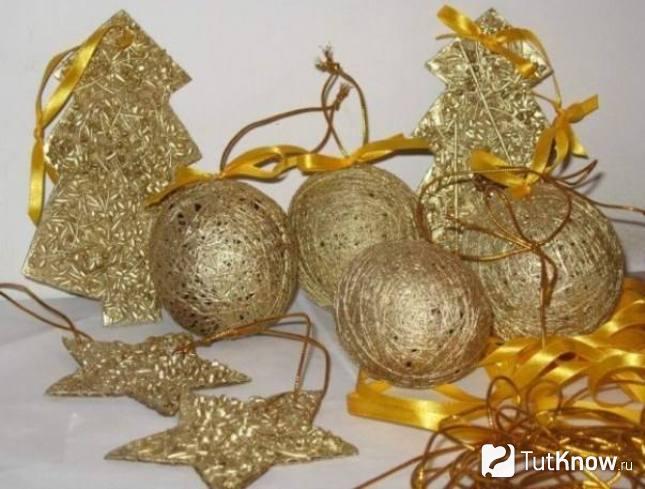
Provence is the style of an old French village, characterized by comfort, warmth, natural materials, textiles and floral prints. To make New Year's toys in Provence style with your own hands, take old ball toys, wrap them in a bag made of natural patterned fabric, make lace bows on top and decorate with beads. An excellent solution would also be a variety of toys made of felt or decorated using the decoupage technique with images of small flowers.


DIY New Year's eco toys
Eco style has become more and more popular over the years, as humanity has appreciated the priority of natural materials. You can make your own New Year's eco-friendly toys from wood, pine cones, branches and other natural materials. For example, having collected acorn caps in an oak grove, you can paste them over a simple New Year's ball. To make such a toy look impressive, treat each hat with varnish, dip it in gold glitter and glue it on. The addition will be a loop of gold braid.

Vintage DIY Christmas toys in retro style
You can make interesting New Year's toys with your own hands if you decorate them in an antique style. To decorate your Christmas toys with your own hands in an antique style, you can use the decoupage technique. Paint the ball initially not with white, but with light brown paint to create an antique effect. You can choose napkins with images of angels, since decorating a Christmas tree was previously considered a purely Christian tradition. Apply it with PVA glue and, after drying, open it with varnish. The toy can be decorated with a satin ribbon bow, beads or pebbles.
You can make antique New Year's toys with your own hands from salt dough according to the recipe that we discussed earlier in the article. When decorating them, you should not use bright unnatural colors, but rather choose muted ones. Scuff marks on toys would be an ideal complement.


DIY New Year's toys in modern minimalism
The minimalist trend in its purest form presupposes the absence of unnecessary non-functional decorations, but during the New Year holidays some exception can be made. When decorating your New Year's toys with your own hands in this style, you should choose one or two primary colors that will be present in the interior. It can be white with blue or yellow with red, etc.


The shapes of toys should also not be full of variety. Make neat bows from satin ribbons, paint the balls one color and hang it all on the tree in a checkerboard pattern. You will see that even such a seemingly modest design will have a rather impressive look.
There are a large number of different ways to make New Year’s toys with your own hands, and in our article we tried to outline some ideas for their design, and it’s up to you to decide which technique to use. In any case, you will get an exclusive and original decoration.
Do you want to decorate your Christmas tree with unusual decorations that you won’t find in stores this year? The only opportunity is to make making New Year's toys fun and interesting. And don't be afraid, it's not difficult at all.
Christmas handmade can be an excellent decoration for your Christmas tree and a nice gift for family and friends. Take your children as helpers and get to work!
DIY Christmas tree decorations will help create a New Year's mood
1. Decoration from cubes

You can write whatever you want on the cubes! Think about what phrase from a Christmas comedy or line from a New Year's song will cheer up your household?
2. Toys made from caps


3. All you need is glitter, spray, paint and tape

And take a stencil with the image of a rooster! Years later, you will remember with what pleasure you had making Christmas tree decorations with your own hands at the end of 2016!
4. Delicious cocoa toys

You probably won’t be able to eat them, but these balls whet your appetite right away!
5. Pencil balls

Does your child love to sharpen colored pencils? Let him do it profitably! Shavings - into a ball, and the decoration is ready!
6. Do you like rustic style? Then these wooden decorations are for you!

Don't forget to draw a rooster!
7. It's just a ball and thread, but how beautiful!
As easy as pie! Even a small child can handle this!
8. Ribbon decorations

Making these Christmas decorations will help your kids quickly learn how to tie their shoelaces.
9. Snowflake made from clothespins

These gorgeous snow flakes are actually 8 clothespins glued together and painted.
10. We don’t skimp on the glitter!

There's no such thing as too much glitter! Especially at Christmas!

A fairy-tale character will come to visit you, but not to steal the holiday, but to decorate it.
12. Another great idea for decorating a Christmas tree!

Spruce twig, wooden beads, letters, white confetti or paper. We place all this in a transparent ball. Ready!
13. Snowman
Do you like to draw? Then this idea is 100% suitable for you.
14. Yarn decoration

Styrofoam balls + sticky glue + yarn + thin wire. And voila!
15. Foam jewelry

Take paint for foam balls with red glitter and apply it to the base. And tie it with a ribbon.
16. Clay star

If you are not a sculptor, use special clay molds.
17. Glitter decoration

Remember the main rule of creating Christmas tree decorations with your own hands? Yes, you can never have too much glitter!
18. Snow crystals

Apply glue to the ball and roll it in salt to create beautiful crystals.
19. Great gift idea for a loved one
Use special stickers.
20. Paper tape + spool of thread. Very nice!
You can write anything! You can list holiday attributes, you can write the words of a Christmas song or fairy tale, or you can exchange wishes with loved ones in this way!
21. Glowing snowman

22. Decoration from cartridges

A great idea for a New Year's gift for a hunter.
23. Vision board

24. Decorate the pine cone with a bow - and the New Year’s craft is ready

Pine cones are an indispensable material for making Christmas tree decorations with your own hands. And versatile! Bows, sparkles, ribbons - everything suits them! As a last resort, pour them into a transparent jar, and it will be beautiful!
25. Beautiful owls


Charming, aren't they?
26. Would you like to eat this cake? Not worth it, it's made of polystyrene foam

No need to stand at the stove! Complete saving of holiday time.
27. Made from an old skirt

The fabric can be any - you can use either a skirt or pants. But try to stick to the holiday colors!
See how to make New Year's tree decorations from plastic bottles, yarn, felt and even toilet paper rolls, as well as the symbol of 2018 - a dog.
Christmas toys made from yarn

You can quickly create such openwork decorations from scrap materials. You will need:
- yarn;
- plastic tray;
- Bowl;
- pins;
- PVA glue;
- marker;
- paper.

Now lay the yarn so that you get symmetrical curls or use a pattern that you come up with yourself.

Set aside the work, let the product dry completely, after which it’s time to hang it on the Christmas tree. In the same way, you can make a smaller copy of this tree. Don't forget to make a loop for hanging it on the tree.
Yarn is a very pliable material, so it can be used to create toys of almost any shape.

To make such a ball for the Christmas tree, take:
- white threads;
- Balloon;
- glitter;
- PVA glue;
- a bowl.

Now take the ball out of the bowl and let the glue drip off. Then cover the piece with glitter and hang it up to dry. When a day has passed, pierce the ball with a needle and remove it through the hole. Such a product can not only become a decoration for the Christmas tree, but will also decorate the room after the New Year.

Not only white threads, but also colored yarn will quickly turn into Christmas tree decorations. You will start 2018 with your own hands by contemplating a decorated Christmas tree, the items for which you will make yourself or with the involvement of other family members.

Very soon you will have such sparkling balls. To make them, you need to take:
- yarn;
- air balloons;
- bowl;
- glue;
- scissors;
- a needle.

As in the previous case, saturate the ball with PVA glue diluted with water. Hang the workpiece to dry, then pierce the ball to remove it. If you want, don't pierce it, just untie it and let the air out. Then you can remove the whole ball and use it.

If you want, make a backlight for each product by attaching Christmas tree garlands or an LED inside the element.
For such creativity, you can use almost any thread, even jute cord. See how decorating such products with satin ribbons gives them additional charm.

If you wish, cover the finished balls with gold paint, it will turn out very beautiful.
The next DIY Christmas tree decoration can then be taken to school or kindergarten.

Similar decorations are also made from yarn. First, pompoms are created from it, then they turn into an animal or bird. To make such a Christmas tree toy, take:
- yarn of the desired color;
- PVA glue;
- colored cardboard.

By the way, you can use this base to create other Christmas tree decorations. It can be round, heart-shaped, drop-shaped or herringbone.

You will need to wrap the cut-out cardboard blank with threads, secure the ends with glue, then decorate the toys at your discretion.
How to make Christmas tree decorations from felt?
This material is very beneficial; even beginners can use it to create decorations for the New Year’s holiday. At the same time, you do not need to have a sewing machine, since the presented Christmas tree toys made of felt are sewn by hand.

If you want to create such a Christmas tree, then take:
- cookie cutter;
- green felt;
- scissors;
- light green threads;
- a needle;
- multi-colored beads.
Decorate the Christmas tree with beads; you can also use round buttons on the stem.
If you have red and white felt, combining these colors will create incredibly beautiful Christmas tree decorations.

If you don’t know what to give your friend, mother, or grandmother for the New Year, you can sew oven mitts from felt that match the mood of this holiday and give them to them.
To make the following felt Christmas tree decorations, you don't need any patterns. But if you are not sure that you can immediately cut out the star correctly, then first draw it on a cardboard template, cut it out, and then attach it to the felt. Draw with chalk and cut out two parts for each toy.
Such blanks are placed one above the other, a padding polyester is placed inside and swept along the edge with a basting. Sew on the beads, attach a loop on top and you can hang the decorations on the New Year’s tree.

Even small scraps of felt will be useful. Cut out snowflakes of various shapes from them, sew them to each loop so that you can hang these products on the Christmas tree.

To make the next decoration, you need to cut a strip of felt 5 cm wide, and if you need a Christmas tree decoration for a large Christmas tree, then make it 10-15 cm wide. Cut one of the long edges of this strip of fabric in a straight line, making cuts at the same distance.
Roll this cut ribbon into a tight log. Sew a braid on top to secure the workpiece in this position. Sew on the loop, after which the work can be considered finished.

Decorate the Christmas tree with felt pine cones. To do this, take light and dark colored material.
On cardboard, draw patterns of flowers of different sizes, consisting of 4-8 petals. Thread a strong thread into a needle, string these blanks onto it in the following sequence: first put on it a small brown circle with a tail made of the same fabric, then put on a small light flower, and on it a brown one of the same size. Next comes a pair of slightly larger blanks.
Using this technology, assemble the cone so that the largest pieces are in the center. String further smaller ones, the smallest flower last.

If you are crafting with your child, have him draw a Christmas tree on paper, cut it out and use this template to create a felt tree. It is decorated with white circles that represent snowflakes.

Under the strict guidance of adults, a child will be able to make a snowman out of felt.

For such a toy, you need to cut a blank out of white fabric, consisting of two circles of different sizes. You will need 2 parts for each character. They are not completely sewn along the edges, then the padding polyester is put inside, and only then the remaining slot is swept away. All that remains is to decorate the figurine with a scarf, a hat, and sew on facial features from leftover fabric.
If you want to make a New Year's wreath, you can also use felt or other thick fabric. For the base, you need to cut two rings from such a fabric and one from padding polyester or holofiber. This soft filler is placed inside, the edges are swept away.

Now you need to decorate the wreath with gingerbread characters. Look, they are given in the next pattern.

For each, you also need to cut out two parts, seal them with filler, and decorate the blanks, following the photo hint.
DIY Christmas tree toy in the shape of a dog
Since 2018 is the year of the dog, don’t forget to hang a toy made in the shape of this animal on your Christmas tree.

If you want the New Year’s dog toy for the Christmas tree to be as voluminous as in the photo, then you need to cut out two outer parts of the body from fabric, as well as two inner lower ones. Small blanks are sewn together and also ground together with large ones. The head will be more voluminous if an insert is sewn on top.
A dog Christmas tree toy can be made from almost any material. Even a toilet paper roll will do. See how this scrap material can be turned into a fun dog.

To do this, just press well on the top of the workpiece to mark the animal’s ears. Then you need to paint the sleeve and glue the parts of the dog’s muzzle, tail and paws to it.
Here's another idea for such a decoration. If you want the toy to hang on the Christmas tree, then fold the thread into a loop and glue it to it. The bushings are arranged horizontally, then to each you need to glue the muzzle and paws of an animal made of paper, paint it all in the appropriate colors.

You can make a lot of funny dogs out of these bushings. It will be enough to glue to each paw and a muzzle on which ears and facial features are drawn, and the dog’s New Year’s toy for the Christmas tree is ready.

If you need to quickly decorate trees or a room for this holiday, then inflate balloons and glue two ears to each. Using a marker, draw the features of the muzzle, you will get wonderful dogs.

Even old hats can be turned into original dogs. Cut out eyes and ears from felt, and make a nose from pompoms. Glue these elements onto the hat, after which you can admire the work done.

If you have popsicle sticks, glue them onto a cardboard base to create the animal's face and front legs. Attach eyes for toys, other facial features, as well as ears and tail.

You can also make a dog for the New Year from a plastic bottle. The following photo tip will help you create it.

By the way, you can make other decoration elements for this bright holiday from plastic containers.
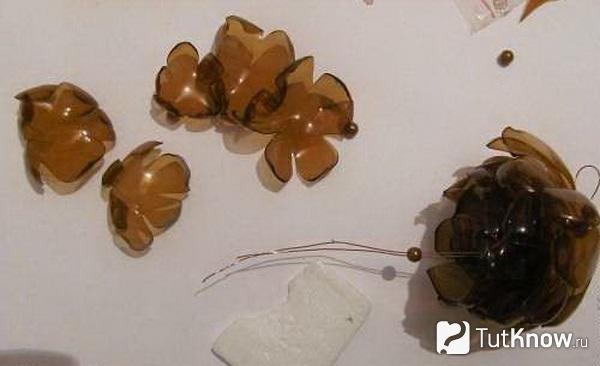
New Year's toys made from plastic bottles

To make such a pine cone, you need to take:
- brown plastic bottles;
- scissors;
- pliers;
- awl;
- wire;
- beads.
Make a hole in the center of each with an awl. Hold these flowers over the flame of the burner, holding them with pliers. When the pieces have cooled, string them onto the wire, starting with the largest one. Secure with beads so that the elements do not move out.
To make a ball from a plastic bottle, take this container and cut out rings of the same size from it.
Now connect them all together so that the blanks resemble a ball. Tie individual elements using rain.

Now you can decorate the balls with tinsel and sparkles by gluing these elements to the base.

What's a Christmas tree without a New Year's bell? To make such a toy, take:
- plastic bottles;
- scissors;
- glue gun;
- polystyrene foam ball;
- ribbons;
- organza;
- sandpaper;
- nylon thread;
- decorative elements;
- gold paint.
To prevent the cut from being sharp, go over it with sandpaper or burn it over a flame.
Paint the items with gold paint. Through the neck, lower the nylon thread down, to which you need to tie a polystyrene foam ball. The organza ribbon should be glued to the bottom of the bell. Attach wire to hang the bell on the tree. But first, don't forget to decorate it as you wish.

The wreath will become a decoration for the Christmas tree or room decor. To do this, you need to cut off the bottoms of plastic bottles, cut them to make these pointed flowers, and then connect them to form a wreath.

