Star news


Christmas tree made of champagne. DIY Christmas tree ideas made from candies
Description
Christmas tree made of champagne and sweets- This is an unusual and amazing gift for the New Year, which you can easily make with your own hands. Such a gift will not leave your friends indifferent, because they cannot imagine celebrating the New Year without champagne, and the kids will immediately take the candies from the New Year’s tree.
An unusual Christmas tree made of champagne and sweets will be an excellent gift for work colleagues. You can decorate your workplace with such a Christmas tree a week before the New Year, and on the eve of the holiday, open champagne and enjoy sweets.
Making such a New Year's miracle is not so difficult; you just need to acquire auxiliary accessories and elements.
- In order to make a gift tree from champagne and sweets at home, you need the following:
- felt, green satin ribbon and organza - for decoration;
- thick cardboard and corrugated paper - for the base of the tree;
- wire, stapler, glue gun - for attaching Christmas tree elements;
decorative beads, New Year's tinsel and mica - for decorating the Christmas tree and holiday packaging.
The step-by-step master class, which is presented below, describes each stage in detail. Therefore, you can easily create a fabulous Christmas tree from a bottle of champagne and sweets, which will decorate any New Year’s table and become a wonderful gift for friends, your beloved mother-in-law, and work colleagues.
Ingredients
Cooking steps
You will need all these accessories to create a Christmas tree from champagne and sweets.

Take thick cardboard and draw a circle with a diameter of 23-25 centimeters. Carefully cut out the circle.

Fully straighten the corrugated paper and cut out a rectangle measuring 60 by 30 centimeters.

This piece should completely cover the cardboard circle on both sides.

Cut the crepe paper in half and glue it to the cardboard circle.

Turn the circle over to the other side and press it a little so that the paper “seizes.”

Cut the paper in a circle, making a slight indent relative to the cardboard circle.

Pull the corrugated paper slightly and glue it along the edges of the cardboard base.

Cover the entire circumference with it and remove any remaining glue with a dry cloth.

Now apply hot glue evenly onto the cardboard.

Carefully place the second piece of corrugated paper on the circle and press slightly.

Trim the excess paper strictly along the circumference of the cardboard.

Now let's start creating a champagne bottle holder. To do this, we will use wire, winding it several times along the diameter of the bottle. Instead of wire, you can take a piece of foam plastic or a thick cord.

Wrap the wire, twisted several times, with green electrical tape or floral tape.

Glue the base for the future champagne tree in the center of the circle: this will greatly simplify the process of creating it.

Now let's start decorating our Christmas tree. We will use green felt and organza as needles. Instead of these materials, you can use transparent mica or mesh.

We need to form a lot of decorations that resemble bows. Cut the material you chose into squares measuring 10 by 10 centimeters. The larger these bows are, the more magnificent your Christmas tree made of champagne and sweets will be. However, you should not be too zealous in this regard. If the bows turn out uneven and asymmetrical, there is no need to be upset: after all, this is a DIY Christmas tree. To create a champagne Christmas tree you will need about two meters of felt and one and a half meters of organza 50 centimeters wide. It’s better to take a little extra material. In this master class we will make white-green and pure green bows.

Take two squares and place one on the second one diagonally.

After this, bend the squares in half.

Fold both sides inward.

Fix the squares with a stapler in the narrowest place, as shown in the photo.

As a result, you should end up with a lot of these green and white-green bows.

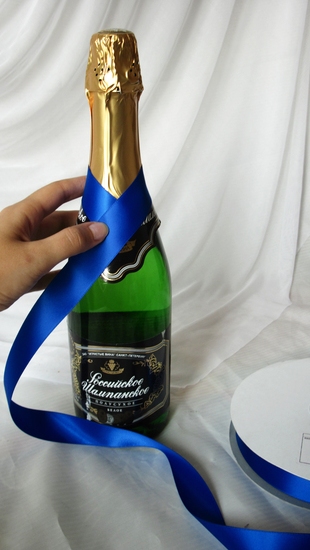
Wipe the champagne bottle with alcohol to degrease it a little. Attach a satin ribbon at the base of the bottle neck.

Let's start decorating our Christmas tree. Take a glue gun and apply glue directly to the bows, then start gluing them from the very bottom of the bottle, moving a few centimeters from the edge. But before you start working with a glue gun, remember that the glue is very hot and can burn you, so you need to work with it extremely carefully. You also need to work as quickly as possible, since the glue hardens in a matter of moments.

First glue the bows on the sides.

After that, at the same level, glue one bow on the front and back.

And glue one bow between them at the same level. You should have 8 glued bows in the bottom row. To ensure that all the bows hold tightly and do not suddenly fall off during the presentation of the New Year's tree, glue a thin ribbon over them, as shown in the photo.

Glue the next row of bows so that the top ones cover the gaps between the bottom bows. Before gluing, step back one and a half centimeters from the bottom row.

There is no need to skimp on glue: apply it liberally to the spout of the prepared bow.

After you have made several rows of green bows, secure the chocolates perpendicular to each other.

First glue the candies on the sides, then glue one on the front and back of the bottle.

In the same way, cover the entire bottle of champagne with bows and candies, alternating a row of bows with a row of candies. In the top rows, glue the bows with the nose up.

You need to paste over the bottle until you reach the satin ribbon. Secure the top bows together with thin green ribbon.

To keep the Christmas tree strong, glue the bows of the top row with the bows of the nearby bottom row.

Take a small piece of satin ribbon or any other one you like. Make a small bow out of it and glue it to the neck of a champagne bottle.

The most solemn moment has arrived: decorating the New Year tree! To do this, you can use any decorative elements: beads, Christmas tree tinsel or rain. Attach the ornaments to the Christmas tree using hot glue.

Place the champagne and candy tree on the previously prepared stand. If desired, you can pack it in transparent mica. Well, just like a real New Year's gift! This is the beauty you should get! A bottle of champagne decorated with chocolates - what could be New Year's? Happy New Year and Merry Christmas!

Bon appetit!
Try turning a bottle of champagne into a Christmas tree. Such an original thing can stand on an office desk or at home. If you are unexpectedly invited to visit on New Year's holidays, but there is no gift, quickly turn a full bottle of champagne into an original gift and present it.
It’s good if you have them on hand, wrapped in shiny paper in green shades. If there are others, you can take them. The number of sweets depends on the size and weight of the sweet products.
Start transforming glass containers with a drink from the lower tier of the forest beauty. Place the first candy on it. Take the tape, glue its edge to the bottle, pass it through the “tail” of the candy wrapper so that the top half of the adhesive tape is on the bottle, and the bottom is tightly wrapped around it.
Place the next candy next to it and glue it to the base as well. After you have decorated the bottom tier with sweets, move on to the next one, placing the candies above it. Cover the bottle to the top with delicious little ones. You can decorate the foil on the neck with a piece of tinsel or leave it as is.
Tinsel Christmas tree
You can turn a bottle into a Christmas tree even faster with the help of New Year's accessories. Take lush green tinsel; at the ends it can be silver or golden. Place the beginning of it on the top of the bottle and secure with tape. Start twisting the base in a spiral, periodically gluing the tinsel with tape. Wrap tightly so that the glass of the bottle does not show through.
The Christmas tree is ready. Decorate it if you like. You can use tape to attach some candies or bows. The latter can be made from shiny braid.
Organza Christmas tree
A New Year's beauty in an organza dress will look very elegant. Take a sheet of white cardboard and cut out a cone from it, the length from the neck to the bottom of the bottle. It should fit freely on it. Glue its 2 sides together. If the tree is going to travel, glue it to the bottle itself.
Prepare a piece of organza in white, green or another color by cutting out an 8x8 cm square from it. Place it in front of you in the shape of a diamond. The first corner is at the top, the second at the bottom, the third and fourth at the sides (right and left). Place a little glue in the middle of the diamond.
Take corner number 3, which is on the right, and move it one third to the left. Now take the left corner. Move it back to the right one third. Press lightly with your hand so that the glue secures the figure in this position. It turned out like a flat bag.
Attach this little bag, without turning it over, to the bottom of the cone and glue it. In the same way, decorate the entire bottom row of the Christmas tree that is being made. Proceed to the second row. Glue the diamond-shaped bags of this row folded in the same way (in three) in a checkerboard pattern, relative to the fragments of the first. Design the third row in the same way. Rising higher and higher, decorate the entire cone like this. Cut out an organza ribbon and tie it in the form of a bow to the neck of the bottle, where the foil shines. The gift is ready, you can present it.
Almost no holiday is complete without champagne. Sparkling wine is a must on the New Year's table.
It is often bought for weddings and March 8th. To prevent a bottle of champagne from getting lost on the festive table, it is enough to decorate it.

A beautiful bottle of sparkling wine can also be an original gift.

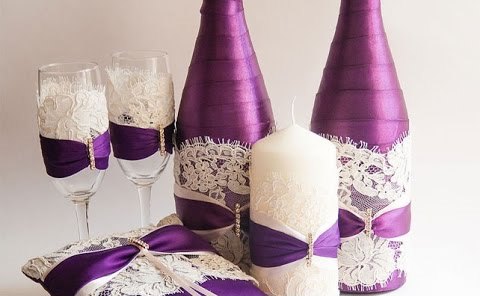
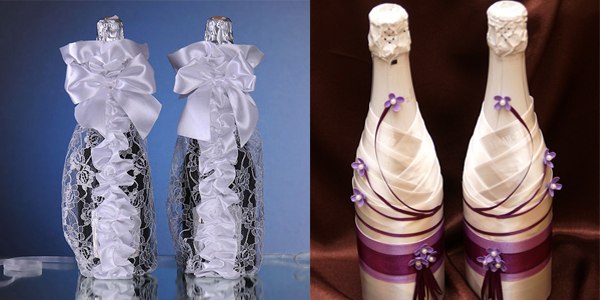
Champagne decoration for wedding
When preparing for a wedding, attention is paid to every detail. An unusual bottle of champagne can decorate the newlyweds' table or it can be used in the traditional sale of alcohol at a wedding.

The bottle can be decorated with flowers made of polymer clay. First you need to get rid of all the labels, then paint the champagne bottle with spray paint.


The flowers are glued to the bottle, and you can use other decorations with them - beads, rhinestones and other little things.

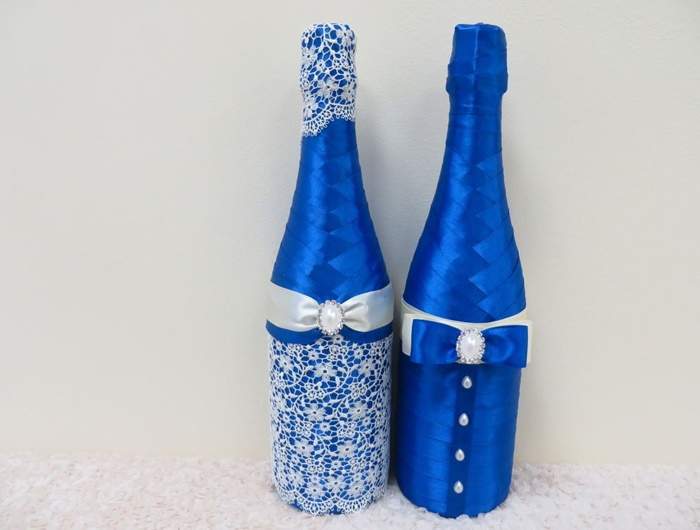
You can also decorate a couple of bottles of champagne in the style of the bride and groom. To do this, you can use specially tailored suits, or you can make a “groom” and a “bride” from bottles using ribbons yourself.

In order to make such a decoration yourself, you need to cut the ribbon into pieces.

Then glue each piece of tape to the bottle so that they all connect in one place. You can sew a skirt from gathered mesh onto the bride's bottle. And on top, so that the seam is not visible, glue a beautiful braid. You can glue beads symbolizing buttons to the “groom’s” bottle.

Original champagne for the New Year
The New Year is celebrated with a glass of champagne, so it is important that the bottle of this drink is festively decorated. Most often, for the New Year, champagne is decorated in the shape of a Christmas tree or pineapple. Candies are suitable for this decoration.

You can also use various ribbons and beads to give the tree a more elegant look. And for the pineapple you will need leaves that can be made from paper. You will also need glue or double-sided tape.

To make a tree made of candies and a bottle of champagne as a base look more magnificent, the candies must be glued to the bottle in a checkerboard pattern, so that each subsequent candy is at the junction of two candies of the previous tier.

For the “Christmas tree” it is better to take candies in a green wrapper, having a rectangular shape, and for a pineapple – semicircular candies in a yellow wrapper.

To make a pineapple, the candies are also glued in a checkerboard pattern, tightly adjacent to each other, so that the bottle itself is not visible. It is good to make leaves from thick paper. It is cut into the shape of a real pineapple leaf and glued to the neck of the bottle.

Also, a New Year's tree is made from champagne using green tinsel. It is wrapped around the bottle, glued at regular intervals to the base, and decorated with beads or candies on top.


A bottle of champagne for March 8
The best gift for any girl this holiday will be a romantic dinner. And what festive dinner would be complete without champagne? And if the bottle is also beautifully decorated, it will be an unforgettable evening.

On March 8, a bottle of sparkling wine can be decorated with flowers made from paper, fabric or polymer clay by simply gluing them to the bottle. Also in place would be a bottle decorated with ribbons similar to decorations at a wedding.

But for a holiday like March 8, it would be appropriate to decorate champagne using the decoupage technique. To decorate, you will need a primer or base, acrylic paints, acrylic varnish, PVA glue, brushes and a sponge, as well as a napkin with a beautiful pattern.

First you need to remove the label from the bottle and degrease it. Then the bottle is covered with a layer of primer, and after drying, a design from a napkin is glued to it using PVA.

After drying, paint is applied over the remaining free spaces using a sponge with blotting movements, and then varnish. This bottle will decorate any table.


Photo of champagne bottle decoration


Content
It’s not a shame to go to a New Year’s party with a beautifully decorated bottle of champagne, and you can put it on the New Year’s table, and it will be suitable as an apartment decor. We suggest stocking up on ribbons, beads, spruce branches, small cones, Christmas tree decorations, glue and let's try to create an original craft. We have collected several interesting options. In the article you will even find an option for decorating champagne for a wedding (in case it comes in handy) and a video master class.
Preparing ribbons for champagne
For a bottle with ribbons for the New Year, in addition to the ribbons themselves, you will also need glue (you can use a glue gun) and scissors.
First you need to measure the length of the first ribbon, which will serve as the starting strip and will be located in the place where the foil ends.
Cut the required part and glue it. Next, all the other parts need to be attached to the bottle in the same “herringbone” pattern. To make a unique scarf or tie, you need to use a ribbon of a different color. Each subsequent row should slightly cover the previous one.

And at the very end, apply the material not on top of each other, but in a circle around the bottles.

Such a bottle of champagne with ribbons for the New Year can be decorated with lace inserts, bows, feathers and beads.
Something like a female version can be done like this:

To decorate the bottom, use fabric for bows. The skirt must first be gathered with a thread and a needle and glued. By decorating champagne in this way, you save yourself from the need to remove the label.
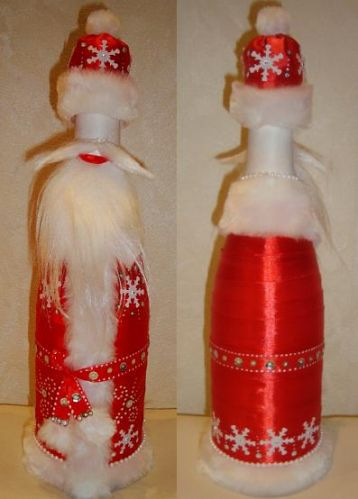
Champagne “Father Frost” and “Snow Maiden”
This decoration option is a little more complicated than the previous one. You just need additional materials - red and white felt, pearls, some kind of shiny ribbon or decorations in the form of shiny stars.
First you need to cut the red felt so that it can cover the champagne bottle, and you need to decorate the seam using red tape and glue.
It is on this base that we will stick the tapes, as in the previous master class.

This is how you need to stick all the tapes to the very end. Now all that remains is to decorate the bottle as Santa Claus - glue the white parts of felt to create the finishing of the sheepskin coat, and hang a hat on the neck of the bottle, or more precisely, on the cork. Also use lace fabric to make Frost’s fur coat look elegant.

In exactly the same way, only using blue braid, you can decorate champagne to resemble the Snow Maiden.
We invite you to look at a few more options - a bottle decorated with New Year ribbons like Santa Claus and his granddaughter.
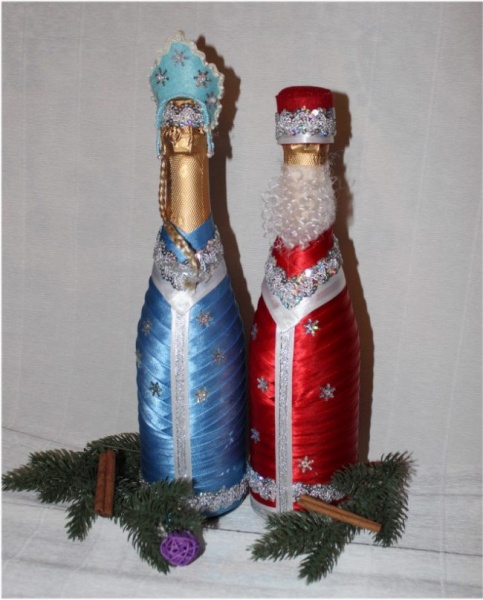
The face for Santa Claus can be made from felt. And please note that a beautiful bottle of champagne and glasses decorated to match can be an excellent gift set.

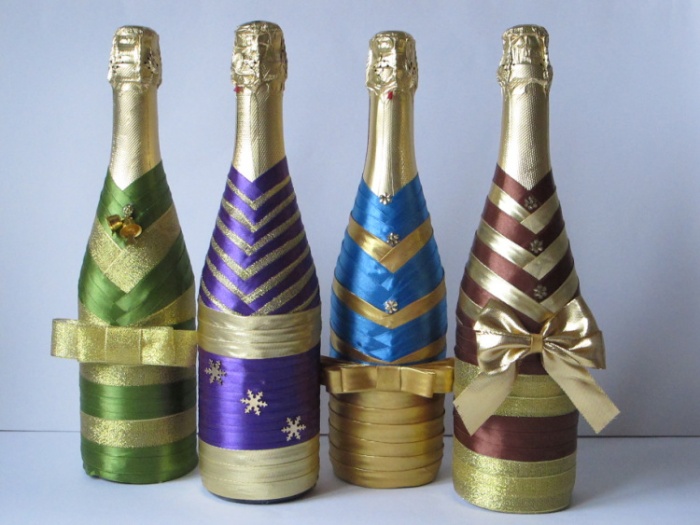
Using the same simple design technique, you can come up with different designs, choosing ribbons to match the interior decor or New Year's table. Decorating a bottle of champagne for the New Year with ribbons is quite an exciting event, and when you get the hang of it, involve those around you in this creativity. You can even organize a whole pre-New Year master class, but our articles will help you with this.
Please note that the braid can be laid not only in a herringbone pattern, but also simply carefully wrapped around the bottle using droplets of glue. The next option is more suitable for a wedding, but you will pay attention to the technique. In addition, in this case a wider ribbon was used.
Champagne with ribbons and tie
In this case, decorating bottles for the New Year with ribbons is complemented by a tie. By the way, this option is suitable as a gift for a pilot, military man, police officer, in general, now you will understand everything yourself:
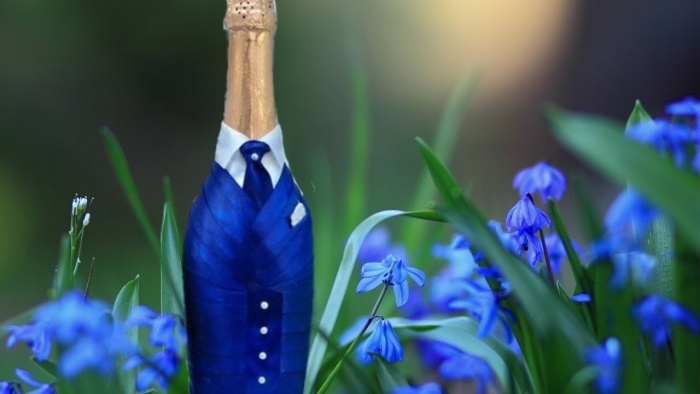
The easiest option is to make a small roller out of tape and attach it to the bottle with a pin. A more difficult one is to show the skill of knitting a tie and make a real tie only in a smaller version.

Full bottle decoration with ribbons

Before this option, we left the neck of the bottle undecorated, because it is already beautifully decorated with foil. But in fact, you can decorate the entire bottle with ribbons.
These are also wedding options! Well, what if you’re invited to a wedding on New Year’s Day—that’s a reason to spruce up your beauty.
Creative bottles for the New Year
And now, when you have already learned how to decorate champagne with ribbons, you can try and get creative. Use all available materials, natural materials, your imagination, the imagination of children, friends and go ahead and create! We will help you with this a little!
Please note that you can buy flowers ready-made, or you can also make them yourself. We have a lot of articles on the topic of creating flowers, be sure to read them!
Take a look at the first option. Lace and gathered wide ribbon are used here.

The combination of gold and red always looks luxurious. By the way, use yellow - this is the color of the coming year and it should bring good luck.
Champagne in the shape of a Christmas tree
For this craft we will need:
- green ribbon;
- green felt;
- beads;
- gold ribbon;
- glue gun;
- scissors.
You need to make a removable base from felt, in which you can later put champagne.

Now many of these blanks need to be attached to a felt base. You should end up with a Christmas tree like this:

We have prepared the TOP tips for decorating champagne, or any other drink, with ribbons that will be useful to you in your work:
Tip 1. Usually this type of work requires about 5 meters of satin braid, keep this in mind when you buy the material.
Tip 2. It is better to use a glue gun, but only in small quantities. Literally a pea for every few centimeters.
Tip 3. It’s better not to cut the entire binding into pieces at once, but measure it while working. Because the further you go down to the base of the bottle, the longer the tape will be required.
Tip 4. You can use stretch guipure as decoration; it is easier to work with.
Tip 5. It is not necessary to wrap the bottle tightly.

Tip 6. The bottle can only be partially decorated with ribbons. For example, champagne can be completely decoupaged (we talked about this technique), you can apply a drawing with an outline using acrylic paints. Well, attach several ribbons of different widths and colors on top.

Well, our favorite tradition. We invite you to watch how bottles are made for the New Year with ribbons in a master class on video:
By the way, in these cases, not felt, but ordinary cardboard is used as a base. But in fact, this is not necessary. In general, everything will come with experience! Try different options, twirl, play with materials, maybe you will come up with some interesting and original version of the design of champagne and not only that. Using the same technique you can decorate glasses or a vase. And we only wish you inspiration and creative success!
Post Views: 438

Necessary materials:
- a skein of satin ribbon;
- a skein of brocade ribbon;
- lace fabric;
- glue;
- scissors;
- decorative beads and feathers.
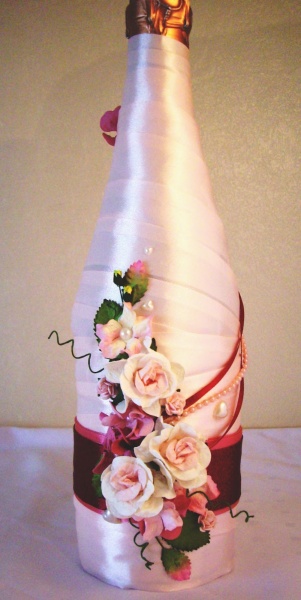
Manufacturing:
First we decorate the top tier of the bottle. To do this, wrap the base of the neck with a bright satin ribbon, measure the required length and cut the ribbon. Apply a few drops of glue to the tape and glue it to the bottle as shown in the photo.

Glue another 3-4 rows of ribbons in a similar way. Try to work carefully so that no folds form on the tapes and that the joints are at the same level. The next two layers are made of shiny brocade ribbon.

Now let's move on to the design of the bottom of the bottle. At the very base of the glass container we glue a brocade ribbon so that the seam is at the back. Next, cut the satin ribbon into 7-8 strips of equal length and glue them to the bottle with tension, placing one layer on top of the other. Cover the back seam with the same tape.

In the place where the upper part of the ribbon decor meets the lower part, glue a wide lace ribbon to match the composition to hide all the imperfections. We stick a beautiful feather into it. Glue a decorative bow with beads or a flower made of fabric or corrugated paper into the center of the bottle.
Christmas tree made from a bottle of champagne and sweets

Necessary materials:
- sweets in shiny packaging;
- thick tinsel;
- hot glue gun;
- decorative bow and beads to decorate the Christmas tree.
Manufacturing:
First, wrap the champagne bottle with green tinsel. The tinsel should be wound in a spiral, moving from the neck to the base of the bottle. We glue the tinsel with hot glue. Now let's start decorating the resulting New Year tree. To do this, grease each candy with glue, and then attach it to the bottle, slightly spreading the tinsel. The sweet present is ready, all that remains is to glue a decorative bow to the top and decorate the tree with beads.
Christmas tree from a champagne bottle

Materials needed:
- thick corrugated green paper;
- scotch;
- glue gun;
- golden ribbon;
- any decorative elements (artificial flowers, bells, beads, cones, etc.).
Manufacturing:
We cut two sheets of corrugated paper - one for the neck, the second for the rest of the bottle. Carefully wrap the container in paper, securing the wrapper with transparent tape. Next, we wrap the bottle with a thin golden ribbon, carefully winding it in a spiral.
The last step is making decorations for the resulting Christmas tree. To do this, we create a beautiful composition from any available materials: New Year’s toys, bells, painted pine cones, artificial flowers, beads, sweets in bright wrappers, etc. The main thing is that the elements used in the decor are combined with the overall color scheme of the craft. A bottle of champagne decorated in this way will be an excellent option for a New Year's gift to family and friends.
Champagne bottle decoration with sparkles

Necessary materials:
- glue;
- several packages of glitter;
- decorative elements.
Manufacturing:
Decorating with a scattering of sparkles is a truly festive and at the same time quite simple idea for decorating a bottle of champagne. First, soak the bottle in warm water to remove factory labels. Then generously grease the bottle with glue and roll the container in small sparkles until they cover the entire surface. As additional decor, you can use homemade labels and a decorative bow made from a beautiful ribbon.
Champagne bottle decor using decoupage technique

Necessary materials:
- napkins with New Year's patterns;
- PVA glue;
- acrylic paints;
- acrylic clear varnish;
- sandpaper;
- scissors;
- brush;
- sponge.
Manufacturing:
First, soak a bottle of champagne in warm water to remove all labels from the surface. We paint clean containers with white acrylic paint in several layers (the number of layers applied will depend on the covering power of the paint used). When the paint has dried, the surface of the bottle should be sanded so that it becomes perfectly smooth.

