Star news


DIY candy boxes. How to make a gift box? Examples and master class
Bonbonniere boxes are small, cute surprises that are customary to give to everyone invited to a wedding. They express gratitude and affection of the bride and groom, and are filled with a variety of souvenirs or sweets. Translated from French, bonbonniere means an elegant box for chocolates. The tradition of giving such a surprise to guests originated in France: five sweets were placed in bonbonnieres, which meant the most important wishes - wealth, fertility, health, longevity and happiness.


How to make a box bonbonniere: step-by-step instructions


In modern times, handmade items are highly valued. Therefore, it is better to make a bonbonniere showing gratitude for the fact that the guest shared the happiness of the wedding day with the newlyweds. The invitees will be pleased to know that the bride and groom made the gift with their own hands. This process does not take much time, and you can use different materials to make boxes: for example, corrugated paper, cardboard, transparent fabrics, beads, rhinestones, lace and others.
When the bonbonniere is ready, you need to decide what to fill it with. According to European tradition, chocolate covered almonds are placed inside. But you don't have to stop there. We offer you several other ideas that you can play with at your own discretion:
- small candles of different shapes would be an excellent gift for guests;
- all kinds of cookies are appropriate;
- You can add aromatic tea to a sweet gift in a bonbonniere box;
- in summer, please your guests with aromatic fruits;
- original idea - handmade soap, bath bombs, flavored salt;
- if the wedding is themed, then think about gifts that would fit well into the style of the celebration.
Necessary materials
To make it you will need the following:
- a thick sheet of double-sided scrap paper;
- ruler;
- paper cutting knife;
- folding stick;
- Double-sided tape;
- ribbon;
- accessories for box decoration.
Scheme and stages of creation
- We cut two strips from a sheet of scrap paper, one should be wider, since it requires the seam allowance to be included in it.

- Using a folding stick, you need to make 4 folds so that there are equal distances between them.
- We make slits on one strip so that the bonbonniere box folds. We cut out the wider strip as shown in the photo.

- We fold the two strips crosswise and glue them together using double-sided tape.
- We tie a ribbon on top and decorate to our liking.

Bonbonniere box with paper lid


Bonbonniere boxes with lids are also available for sale. You can save time and buy ready-made ones, but it’s better to make them yourself, because such gifts will not look like standard ones. You can place the boxes on the tables along with a name card, hand them to each guest at the end of the celebration, or put them in a basket, from where the guests themselves will take out their surprise. Using the master class below, you can easily make an original gift.
Necessary materials
For production you will need the following materials:
- beautiful paper;
- items for decoration;
- scissors.
Template and creation steps
- We take paper measuring 21.5x21.5 cm, draw two diagonals that intersect in the center.

- We bend one corner so that it faces the center, then make another bend so that its edge is flush with the strip in the center.

- We do the same with all corners. We cut on both sides, as shown in the photo.

- We fold it step by step.


- The lid is ready. In the same way, make a bottom out of paper measuring 21.2x21.2 cm. Next, decorate the base of the bonbonniere box.


Ready-made templates for bonbonniere boxes
The presented box templates are easy to use for making your own surprises. You need to transfer the diagram in compliance with the proportions onto paper or cardboard of the required size. Afterwards, the workpiece is cut out and bent along the indicated lines in the diagram. You may need additional glue to join the parts together. Once the box is assembled, you will need to decorate it with various elements. You can decorate it using decoupage technique. Place nuts, candies, chocolate-covered fruits or other sweets inside the bonbonniere.


Photos of bonbonniere boxes
There are many options for making bonbonniere boxes. Bags, chests, cylinders, tubes - these elegant, stylish options for surprises will make a positive impression on guests. On the bonbonnieres you can print your initials, the wedding date, and decorate them with artificial flowers, ribbons, lace, and braid.


A universal selection of gift ideas for any occasion and occasion. Surprise your friends and loved ones! ;)
Greetings to all of you, dear audience. Holidays never end for us all our lives - as soon as Someone’s Birthday has passed, the New Year has already arrived, and then there are other winter-spring holidays... And for each of them we give gifts that we want to present at least interestingly. And what if not a DIY gift box will help with this?
I myself really like to congratulate my relatives in an original way. It’s very nice to see the smiles of those you congratulate. And cute boxes always contribute to this! After all, they are the first thing that catches your eye when presenting a gift.
How to make a gift box with your own hands
Gift packaging can be very diverse. But there is one rule - the cardboard or paper from which you want to make a box must be of the required quality. In this sense, classic children's cardboard is far from suitable.
Where can I get such cardboard or paper? First of all, in specialized stores for creativity or even scrapbooking separately. It’s good if there is such a store in the city, you say, but what if you don’t have one at hand or the prices are sky-high?
These leaves will be enough for you to make small souvenir boxes (for jewelry, sweets, toys, etc.). Your family will appreciate it
And now I suggest you proceed to the actual detailed photo master classes, which will also include a diagram for creating each individual box.
Master classes on creating boxes from cardboard and paper
Small boxes
First of all, I want to give you 5 designs with very cute patterns that will make this wonderful packaging:

The first one has red roses. If you want to impress your lover, then she is definitely for you.
Principles of working with templates:
- Print the layout you like on thick paper.
- Cut out the future box along the contour and cut in those places where there are straight lines (focus on the light scans - the location of the lines is the same everywhere).
- Fold the box along the dotted lines and glue it so that the parts with semicircular ends lie between the other two and the round ends point up.
- That's it, all that remains is to bend the lid properly.


And again roses, but more delicate.

And now there are two options for Birthdays - candies with balls and lollipops.


Large rectangular
This is perfect for large gifts (for example, wall clocks). You will need specialized binding cardboard to make the box really convenient. By the way, binding cardboard can also be purchased in specialized stores or on Ali.
The incision sites are marked in orange. The lid can be made the same way, but with slightly larger dimensions (2-3 mm).

For a man
If the gift is intended for a man, then I suggest choosing one of the following options.
Simple shapes are on trend - this is proven by the following 4 templates for creating strict, classic boxes. For these you will again need thick cardboard.


If the gift is intended for a loved one, then there should be more than enough romance ^^ There are butterflies, hearts, and all kinds of declarations of love. They can be made from thick cardboard or thick paper.


Heart
Heart boxes are very popular because you can use them to express your feelings. Or admit them


Cake
Are you getting ready for a party where everyone will need to be given a little surprise? Or maybe a wedding is planned? In both cases, cardboard pieces of cake will come to the rescue.
A beautiful and clear diagram is suitable for both the bottom and the lid.

Paper boxes
Boxes don't always need to be dense - sometimes it's enough just to create a beautiful picture. Then I suggest you use this convenient scheme of 6 different packages:

If you are going to a child’s party (or maybe you want to please your child), then make him a cute box in the shape of an animal.

Give happy parents this boot. Follow the traditions: pink for girls, blue for boys.

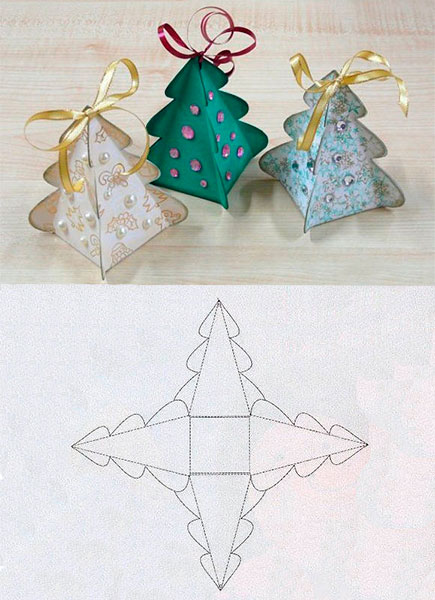
Boxes for the New Year
The mood can be created not only with the help of gifts) Just look at these 8 lovely boxes, each of which can also become an excellent New Year's decoration
This is especially necessary if for some reason there is no New Year's tree. The main thing in this packaging is to trim the edges beautifully and neatly.
Snowflake
Of course, this box itself is wonderful, but the silver paint on the tips of the snowflakes can add some zest.
Tip: Give something in this package to a girl who loves Frozen.

Bag
For giving a gift - one of the simplest options.

Box of sweets
For all lovers of beautiful New Year's favors and quick handmade items! Take a plastic cup with a smooth surface, cut the edge and cut the edge.
Fold the cut pieces inward so that they cling to each other. Place some goodies inside and cover the top with something cute.

Another option for candy packaging is a donut. It is a little more labor-intensive, but more effective.

And, of course, the candy itself.

A slightly more modest pyramid from which you can build a geometric Christmas tree. 
A few more boxes
Finally, there are 3 more boxes for you that did not fit into the previous groups.


How to decorate a box with your own hands
The design of the box can be very diverse - from simple shapes in the form of birds and hearts to intricate flowers and bows. I will write more about box decor in the future - don’t miss it.
In the meantime, subscribe and comment - see you soon!
Sincerely, Anastasia Skoracheva
Almost no holiday is complete without gifts. And one of the most popular options remains chocolate, candies and other sweets. You can present such a gift in original packaging or pack it directly in the store, but it is much more interesting to do the packaging yourself. A box for chocolates is an excellent solution for those who want to give something original and unusual. It’s not at all difficult to make it yourself, and in this material you will find some interesting ideas for decorating such a box.
How to make a square candy box with your own hands
This is a classic universal packaging option for which you will need square pieces of paper, a ruler and scissors. One of the two sheets should be slightly smaller than the other, for example, 30x30 and 29x29 cm.
The box layout is shown in this photo:

We bend the square diagonally, unfold it and bend it along the other diagonal. Let's unfold it again. The diagonal needs to be drawn. We bend the corners to the center, then we bend the same corners to the opposite and to the nearest fold lines. The resulting central square will become the bottom of the box.
On the sides of the drawn diagonal we cut the paper to the central square. We fold the cut edges for the walls of the box along the folds. Bend the sharp ends inward. We cover the curved ends with the remaining uncurved tongues and wrap them inward. The lid is ready.
We fold the second part in the same way as the first. It will be a little smaller in size for the lid. For this option, it is better not to use cardboard; thick paper will work best without glue. We tie the filled box with a ribbon or braid.
We make a version of a prism-shaped box with our own hands
This is a very simple and original version of the box that can be made in just a few minutes. To work, you will need a square sheet of thick paper of a suitable size, a ruler, scissors, a pencil, a ribbon and a hole punch.
We draw the sheet in half and diagonally, bending the corners into the center. Then we bend it from the center to the deflections of the central square, set it aside and draw arcs, focusing on the diagram:

We cut out the extra corners with scissors, and make holes on the rounded “petals” with a hole punch. We thread the ribbon through the holes, bend the edges and tie it with a bow. The box is ready!
Such original “appetizing” boxes are perfect for sweet gifts. If desired, you can make a whole paper cake from the pieces.
To work, you will need decorative paper of delicate colors, a stationery knife and scissors, moment glue, a pencil, a ruler, ribbons, small flowers or berries for decoration (you can make them yourself from polymer clay).
From thick paper with the selected pattern, you need to cut out a scan according to the template presented below.

Before folding the workpiece, lightly press the fold lines from the front side. You can do this with a non-writing pen or any thin, sharp object.
We roll up the box, apply glue and connect the surfaces. We glue a ribbon in the middle of the side surface, the ends of which are secured to the inside of the lid. We decorate the “cake” with flowers, berries and leaves of your choice.
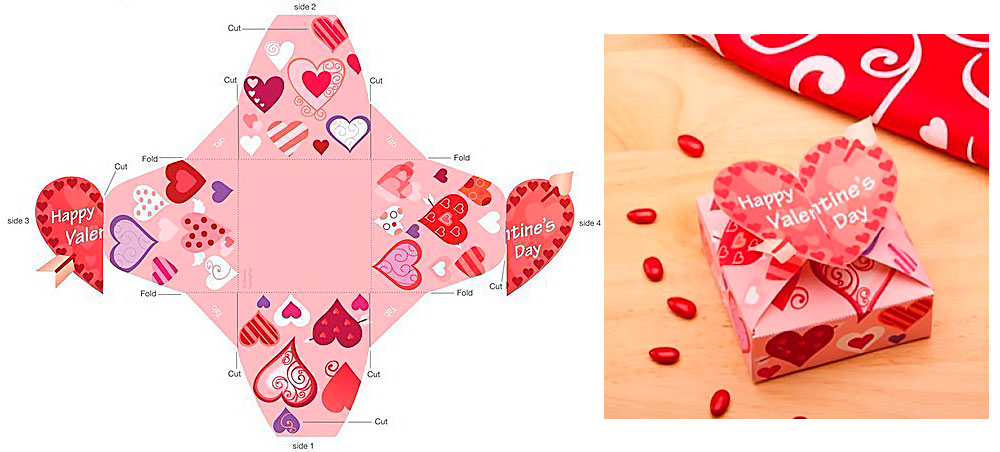
Making another model of a candy box in the form of a voluminous envelope
For this box, colored cardboard with an interesting pattern or thick paper is suitable. In addition, you will need PVA glue and “moment”, scissors, a hole punch, a pencil and ruler, rhinestones and a satin ribbon.
We draw the cardboard from the inside according to the diagram presented below. The numbers indicate the dimensions or aspect ratio of the box.

We cut out the blank from cardboard along the marked lines; the upper edge of the part that will lie on the “T-shirt” can be cut with curly scissors.
We fold the workpiece along the lines, punch holes for the ribbon with a hole punch. We glue the box together step by step using transparent instant glue. We carefully fold the side walls like an accordion, pull through the ribbon and tie a bow.
We apply small dots of glue to the front surface of the box (in our case, according to the picture, in the center of each star), and glue the rhinestones.

The original box for sweets is ready! You can fill the gift with candies.
Felt is one of the universal and affordable materials, which is also suitable for packaging candies if, for one reason or another, you do not want to make paper packaging. Their advantages are that the box can not be thrown away after the holiday, but can be used as an original box for storing small items.

To work you will need colored felt, a sewing needle and thread, glue, scissors and a ruler.
We draw a square sheet of felt into 9 small squares and cut out the corner ones. We fold and sew the box over the edge. Don't worry about the seams being visible. They look quite stylish, you can even choose contrasting threads. We decorate the finished box with appliqués to suit your taste.
Video on the topic of the article
For those who want to understand making boxes for sweet gifts more clearly and get new creative ideas, we have prepared a selection of video master classes:
What kind of paper is needed for the box?
Paper with a thickness of 230 g is ideal for the box. If you choose matte and glossy, I recommend choosing matte. Glossy paper, unfortunately, cracks at bends, this is especially noticeable on colored rather than white paper.
Creasing (working out bends) is best done with a knitting needle, a simple pen refill that no longer writes, or a special bone.

And here is the template for the box for 9 candies.


How to print a box template correctly
In the printer settings, check the box next to “Print with margins.”
There is no need to adjust it to the sheet size; the printer will display a message that part of the image will be cut off - this is normal.
That's all, now click “Print” and get the candy box template printed out.
Attention! These settings are for an inkjet printer.
The size of the box is 11.5x11.5 cm, thickness is about 2 cm. On the templates, dotted lines indicate fold lines.
And one moment. I recommend gluing the cover and side labels with double-sided transparent tape. If you use PVA glue or a glue stick, the paper may ripple, especially if you use regular office paper for labels.
And here are step-by-step instructions on how to glue a box for Bird's Milk candies. The master class was taken from craftswomen Irina.


Gift wrapping is a responsible matter, because even the most desirable thing, carelessly wrapped in newspaper or stuffed into a simple bag, will not make the impression that the giver expects.
Of course, buying gift wrapping is not a problem today. The stores will offer a wide variety of options: boxes, bags, etc. But all the same, standard packaging will not be able to convey the range of feelings that you want to invest in a gift.
Therefore, many are interested in how to make a gift box using scrap materials.
Decorating ready-made boxes
The easiest way is to decorate a finished box of a suitable size. This can be done in different ways. For decoration, colored paper, bows, decorative flowers, beads, sparkles, pieces of lace, elegant braid, etc. are used.


You will need to decide for yourself how best to decorate the box, depending on the reason for the gift and the personality of the recipient. It is clear that if a gift is being made for a girl, you can use more decorative elements. And if this is a gift for a man, it is better to show restraint. If desired, you can use a photo of the person for whom the gift is intended to decorate the box.

When decorating, it is advisable to emphasize for what reason the gift is being given. For example, if it is the New Year holidays, then use snowflakes, Christmas tree cones, tinsel, etc. in decoration.
Simple box
It is not always possible to find a ready-made box of the right size, so you can very easily fold a box from paper or cardboard.

Even a child can make the simplest version of the box; to make it you will need:
- cardboard (preferably colored);
- ruler;
- pencil;
- scissors;
- hole puncher;
- ribbon.
If you don’t have colored cardboard on hand, you can cover ordinary white cardboard with colored paper.

First of all, you need to draw a template on a sheet of cardboard:
- in the center of the sheet you need to draw a square, this will be the bottom of our box;
- now on each side of the square we draw four more squares of the same size as the first, we have a figure resembling a cross;
- Now we carefully round the upper corners of the four squares (except for the central one).


To get it straight, you should use a template or compass:
- the resulting template should be cut out and the side parts bent upward;
- in the upper part of each side part, holes should be punched with a hole punch;
- thread a ribbon through the holes and tie it with a bow.


You can decorate such a homemade box to your liking using rhinestones, beads, and ribbon bows. But using the technology described, it is worth making only a small box, since a large one will not hold its shape.
Square box
To make a rectangular, or rather square, box from colored paper with your own hands, you will have to tinker. Here is a description of the work sequence:

- take a square sheet of thin cardboard or colored paper;

- draw two lines diagonally with a pencil;

- bend one of the corners of the square so that the corner falls exactly at the point of intersection of the diagonal lines;

- a second time we bend the same edge of the cardboard square so that the edge of the fold falls on the diagonal line;

- We do the same with all the other corners of the square;

- as a result, we got a sheet divided into small squares by fold lines;

- draw a bottom contour in the center, consisting of four squares;

- Now make cuts from two opposite corners to the intended bottom.
Now we begin to fold the box, the assembly diagram is as follows:
- fold the square from the wide (uncut) sides with the corners towards the center;

- then raise the sides;

- fold the paper on the wide side, forming the two remaining sides of the box;

- Now we wrap the cut out parts of the square, finally forming a box.
If you need to make a lid for the resulting package, you need to make a slightly larger box in the same way. That is, at the first stage, make a square 3-5 mm larger than the first.

Having mastered this technique, you can learn how to make boxes of various shapes: in the form of a pyramid, cone, cylinder, etc.
Book-shaped box
Today, instead of a material gift, the hero of the occasion is often given money; a box made in the shape of a book is very suitable for a monetary gift. Let's look at how it can be done:


- first of all, you need to make a rectangular box of the required size from cardboard; it is important that the bills that you plan to give fit freely into it;


- Now you should start assembling the “binding”. To do this, cut out two rectangular sheets of cardboard in length and width 1 cm larger than the manufactured box. You also need to cut out another strip, its length should be equal to the length of the sheets, and the width should be 0.5 cm greater than the height of the box made;


- we take the material from which we will make the binding, it can be plain or colored paper, thick fabric (for example, denim) or artificial leather;


- We lay out the blanks on the material, placing a narrow strip between two cardboard sheets. The gaps between the parts are 2 mm, a three-centimeter allowance is left at the edges;


- glue the cardboard to the material and cut out the blank along the intended lines, cutting off the corners;


- now we need to wrap up the allowances and glue them to the cardboard, we have a semblance of a book binding;


- We glue the previously made box onto one of the inner surfaces of the binding;


- We glue ribbons in the center of the top and bottom “lids”, with the help of which our box will be closed.


Now all that remains is to decorate the top part of our book box. You can decorate it with flowers and bows, beads and sparkles. The exclusive box is ready.
Of course, you will have to tinker with making gift wrapping. Perhaps not everything will work out the first time, but with a little practice, you will be able to make unique packaging that will not be found anywhere else.

