Star news


Candy bouquet for March 8th. The most original candy gifts
If you want to present a beautiful, practical, and even delicious gift, then here is a 3-in-1 gift idea for you! Here is a functional item (a stylish ceramic mug), and candies inside it (for dessert), and a beautiful one on the lid (which, by the way, can decorate the interior after the holiday)!
To work you will need:
- Candies “Martian” and “Hazelnuts (almonds) in chocolate” for flowers and any in a mug (“Barry Art”)
- Green tea bags (“Tess”)
- Floral paper for flowers, thin - for the base
- Ceramic mug, preferably plain
- Universal glue “Russian titanium”
- Thermal gun
- Expanded polystyrene board (for ceilings or thick cardboard)
- Scissors
- Threads
- Artificial flowers, greenery, leaves - small forms
- Floral wire, toothpicks - for stems
- Taplenta
- Triangle of sisal fabric (optional)
- Green satin ribbon on a bow

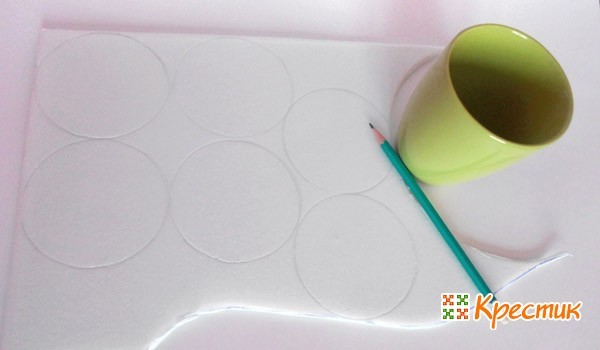
Let's start work from the foundation.
By the way, using the same principle, you can make a composition on any vessel - a vase, glass, bowl. And it doesn’t matter whether the vessel is made of ceramics or glass. In any case, it will be a great gift for your work colleagues on March 8th!
Using a pencil, trace the neck of the mug on a polystyrene foam tile. You will need 3 such circles for the base of the composition. We cut it out, reducing the diameter by 3-4 millimeters at once. This is done so that later the “lid” will fit inside the mug and hold it.
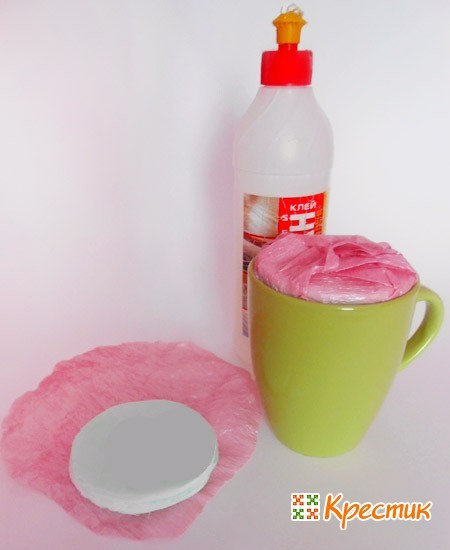
The circles must be glued together and wrapped in any soft floral paper. We cut out a circle from paper with a diameter larger than the polystyrene foam base, apply glue to it and carefully wrap it.
You can also take fabric, then the tail can simply be gathered onto a thread in the center of the circle.

Moreover, the “wrong side”, the place where the ends of the decorative wrapper meet, will go up under the flowers.
The composition will consist of 7 flowers. These are two large roses of a delicate pink color, 3 flowers a la lilac paper and 2 dark purple.
We make roses with “Martian” candies inside like this:


A la anemones of the open type (in the middle of the flower the Barry Art candy is not decorated) we collect it like this. You will need 4 petals. Cut out rectangles equal in height to the candy. We cut one of their narrow sides at an angle, and on the opposite side we round the corners and stretch the edge with a wave. We stretch the middle horizontally, making a small indentation. Then we wrap four petals around the tail of the candy and secure it with thread. Then we glue a toothpick inside with hot glue and wrap the leg with tape.

We make a purple primrose from a small candy like this. Cut out a narrow rectangle of paper, the length of which is 2.5 times longer than the candy. We bend it in half, turning the fold over. We put the candy inside, wrap it in paper and secure it with a thread on a wire. Then we cut out 4 rectangles and make petals a la anemone. We also sequentially wrap them around the purple center and tape them to the leg.

If you prefer to make flowers from satin ribbons, then you can replace paper flowers with flowers from ribbons, which can be made according to this master class:

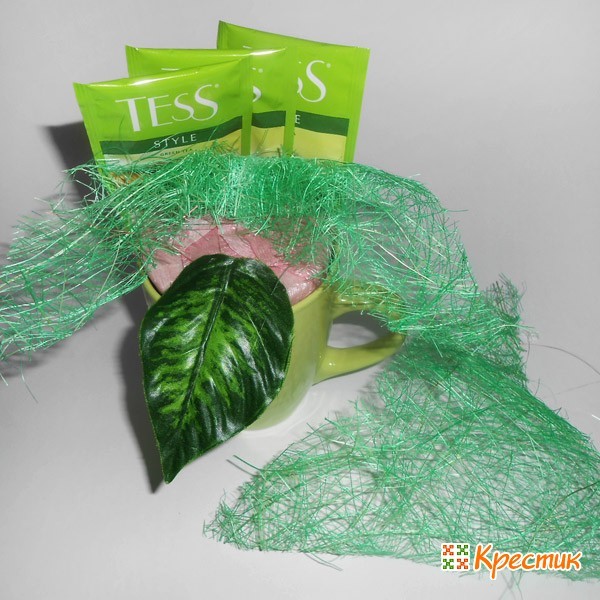
When we are ready, we begin to assemble the composition. First, let's arrange 3 tea bags. Since you decided to make it for your colleagues with your own hands, you are free to choose any tea (you can focus on the taste preferences of your colleagues). For this composition they act as a background, so the color chosen was green (they blend in with the leaves). So, we attach them with hot glue to the side of the base, one after the other, overlapping.

When choosing tea, be guided by the preferences of your colleagues!

Carefully attach to the base

It is best to choose green tea bags
Let's create volume in the composition using a green triangle. We fold it from the corner like an accordion, glue it with hot glue and attach it to the same glue closer to the tea bags. In the foreground we have a leaf, maybe two, hanging down.
We will complement the existing decor on the stand with various elements: blades of grass, small flowers and twigs, a bow, leaves.

The assembly sequence is as follows: 2 large roses in front, then behind them the rest of the flowers in accordance with your taste. We fill the space between them with decorative grass, flowers and twigs. A small bow is the final point in the work.
March 8 is approaching and it's time to take care of an original gift for our mothers, grandmothers, sisters, teachers, educators and beloved women. Today we will learn how to make gifts with our own hands, you will see a detailed master class from the country's master craftswomen, and you will learn how to make a sweet gift from candies. For those who are short on time, we have prepared photo instructions to quickly make a beautiful gift for March 8th.
DIY gift for March 8th - master class from the Country of Masters on how to assemble a bouquet of roses from satin ribbons
An excellent gift for a mother, friend or lover on March 8 will be a bouquet of roses from the Country of Masters.
Older schoolchildren can take note of the step-by-step instructions for their mothers and grandmothers, women to congratulate colleagues or relatives, as well as men who want to surprise their significant other.

What materials are needed to create a bouquet of roses from satin ribbons according to the master class from the Country of Masters
So, to make 1 rose with our own hands we will need:
- 3 satin ribbons of different colors and widths (as shown in the picture);

- glue "Moment";
- stationery scissors;
- thread and needle for sewing;
- matches or lighter;
- long skewers for canapés.
Step-by-step instructions for making a gift for March 8th with your own hands with photos
- The first step is to wrap a thin green ribbon around the skewer; the piece will act as a stem.

- Use a match to singe the ribbon at both ends so that the fringe does not come out.

- Pressing the ends of the tape tightly, use glue to attach them to the stick.
- We also lubricate the wide tape with glue and apply it to one of the ends of our stem.

It is important to know! The widest ribbon for a bud can be of any bright color. If you are making a lot of roses to put together in a bouquet, the wide ribbons can be of different shades, or they can be the same color (for example, white, yellow, soft pink or scarlet).
- After the glue has set, wrap the tape several times around the skewer.

- Next, we bend the upper edge of the satin ribbon and glue it so that it does not unravel during further work.

- Now you can start twisting the flower and creating a beautiful bud. You need to twist the corner of the ribbon away from yourself so that rose petals are formed step by step.

It is important to know! To prevent the bud from falling apart while twisting, you should hold its lower part with your fingers.

- It is better to sew each turn of the twist (i.e. each new petal) with thread.
As you twist, you get quite voluminous petals and a very beautiful realistic bud.

- At the final stage of twisting, all the petals are pierced through the perimeter at the bottom of the bud with a needle, and the ribbon is thoroughly stitched with thread.

After such manipulations, the rose will always keep its shape.
- Now all we have to do is make the base of the bud from a piece of wide green ribbon, which will cover all the seams and give the rose a complete look.

To do this, cut a small square piece of satin ribbon, apply glue to the inner surface, wrap the workpiece around the bud, as shown in the figure, then press it tightly to the surface.

To decorate one rose, a stem from a skewer can be tied with a bow from the remnants of a thin satin ribbon.

This element will ideally replace the leaves of a flower.

And if you have enough time and patience, and you want to get even more delight from a woman on March 8, make a large bouquet of satin roses.

Your mother, grandmother or wife will definitely put such a gift in a vase in the most prominent place in the house to always remember your love.

Another version of the original beautiful design of small rose buds as a gift on March 8 can be seen in the master class in the video below.
We make a gift for mom on March 8th with our own hands - a bouquet of gerberas made from paper strips using the Quilling technique
Such a gift will be original not only for mom on March 8, but also on Teacher’s Day. Following our instructions, any schoolchild can make a bouquet of gerberas using the Quilling technique. Translated from English, the word “quilling” literally means “bird feather”, and in Russia the technique is widely known as “paper rolling”. The master class will teach you the art of paper rolling and help you create a unique gift for World Women's Day. Long and narrow strips of paper twisted into spirals make interesting flat or three-dimensional compositions, and in our case it will be a cute bouquet of five gerberas.

What materials are needed to create a bouquet for mother on March 8 with her own hands?
For the original craft we will need:
- corrugated cardboard;
- colored paper (different shades of the same color, for example, pink, will look organic);
- small pieces of green corrugated paper;
- wire;
- scissors;
- glue.
For 1 flower as a gift to mom on March 8, you need to make 5 preparations:
- Roll a strip of corrugated cardboard 1 cm wide into a small roll.
- Finely cut two strips of colored paper measuring 30 × 0.5 cm along one side to form a fringe;
- Cut two strips of 15 × 0.7 cm into small petals with pointed tips;
- Cut one strip of 30 × 1 cm into medium-sized petals;
- Cut two strips of 30 × 3 cm into large petals with triangular ends.

Step-by-step instructions for making a bouquet of flowers for March 8 with your own hands from paper
After all the elements for the future gerbera using the Quilling technique are ready, you can begin assembling the paper flower.
- We take a cardboard roll and glue the first finely trimmed strip along the diameter to the side so that the fringe looks beyond the top edges. Smooth the petals towards the core of the flower.

- We take the second strip and glue it to the roll in the same way, but smooth the fringe in the opposite outer direction.

- In the next step, we glue 2 strips of bright pink and pale pink shades around the circumference of the roll’s diameter, which were also cut into fine fringes.
- We attach a medium-sized strip to the bud.

- We twist the last 2 strips with large petals at the ends with scissors and attach them to the lower surface of the bud.

- Next, take a piece of green corrugated paper and cut out a stalk from it, as shown in the figure below.
- Then we glue it to the bottom of our gerbera.
- We wrap the same green corrugated paper around a wire of the length we need, and pierce the middle of the bud with the stem.
After the first gerbera is ready, we make the remaining flowers, making stems of different lengths. To give a gift to your mother, teacher or grandmother, there should be an odd number of gerberas in the bouquet: 3, 5 or 7 pieces.

A cute bouquet can be placed in a narrow vase, and it will definitely fit into any cozy interior.
You can make a simpler version of gerberas from plasticine and paper with a child in the senior group of kindergarten, but in this case you need to actively help him so that the child can cope with the task. A step-by-step master class is presented in the following video:
DIY sweet gift for March 8th for mother, godmother, grandmother, sister, wife, teacher made from delicious sweets – Sweet basket design – step-by-step video master class
The next master class on Sweet design is intended for schoolchildren, as well as men and women who want to double surprise their loved ones. A sweet basket will not only please the female half on March 8, but will also bring a lot of pleasure, because it contains chocolates that the whole family can eat at the holiday table.

What materials are needed to create an original gift for March 8?
A sweet gift of candies for March 8th is made using the Paper-Plasty technique. It is worth preparing for the process in advance, since creating such a masterpiece takes a lot of time. So, for a basket in the style of Sweet decor, you will need:
- floral (corrugated) paper of different colors;
- thin brush for painting;
- watercolor paints;
- scissors;
- Double-sided tape;
- wire or floss threads;
- toothpicks;
- office glue;
- tablet-shaped biscuit tin (without lid);
- 10 meters of satin ribbon to match the color of the candies;
- a skein of openwork floral ribbon;
- stationery eraser;
- pieces of foam;
- small artificial flowers for needlework (daisies, roses) or beads;
- plastic rim around the diameter of the box;
- a large number of chocolates.
To fill the basket internally, stock up on round-shaped sweets with nuts inside:

And also small chocolates in the form of rectangular flat bars with filling for the outer sides:

Creating sweet flowers with children's hands - step-by-step instructions
- First of all, we make flowers. Depending on the size of the candy, we take 1.5 or 2 divisions of corrugated paper (there are always markings on the floral wrapper). We bend the strip, then paint the edges on both sides with small strokes.

- As soon as the corrugation dries, we begin to stretch the painted part in different directions (left and right) so that we get the effect as in the picture below.

- We take a round candy, attach a thin strip of double-sided tape along the diameter, and stick on a floral strip.

- We tighten the base of the flower with threads or a piece of wire to form a stem.

- Dip the tip of a toothpick into glue and insert it into a thick paper stem.
Video of creating a sweet basket for March 8 with your own hands from sweets
Now all that remains is to decorate the basket.
- Using glue or double-sided tape, glue the outer edge of the tin box with rectangular filled candies. We put a rubber band on top and cover the unaesthetic appearance with openwork floral tape.

- We wrap the plastic hoop with a satin ribbon; to do this, we divide the long ribbon in half and tie knots, as shown in the figure.

- We attach the finished rim to the box using wire so that it becomes a basket.
- We fill the box with polystyrene foam and glue the sides with petals made from green satin ribbon.

- We insert candies on toothpicks inside the basket and decorate the gaps with artificial daisies.

The bright basket for March 8th is ready; no sweet tooth will remain indifferent to this sweet gift.


Do-it-yourself original Origami photo frame as a gift for March 8th - a master class on paper crafts on video
The next gift is perhaps the simplest of all those presented and is suitable for small children, schoolchildren or men who want to congratulate a woman in an original way on March 8, but are not “friendly” with crafts.

How to quickly make a photo frame with your children’s hands as a gift for your mother?
To make your own photo frame using the modular Origami technique, you will only need 6 sheets of paper measuring 8 × 8 cm and a few minutes of positive mood. You can do the manufacturing steps yourself, as well as with your children, by repeating all the steps from our video instructions:
A photo frame created by yourself will allow you to preserve the most important moments from the life of your loved ones, so any woman, be it your mother, sister, or your bride, will remember such an unusual gift for March 8 for a long time.
A simple gift for March 8th - we draw a postcard with our own hands from paper for kindergarten - we cut out simple appliqués
An ideal option for little ones to make a gift for their mother, teacher, sister or grandmother is an applique card made of colored paper. All that is required is to help your child draw, cut and glue the parts, as in the pictures and video tutorials below.
What cards for March 8th can you quickly make for mom in kindergarten?


We make a gift for March 8th for grandmother from her grandchildren with our own hands - an original flower pot made of clothespins
Another unusual accessory can be made from items that can be found in every home. Any child in kindergarten, with the help of a teacher, or with tips from parents at home, will be able to make a stylish pot for your grandmother’s indoor plants on March 8th.

Materials and step-by-step instructions for a DIY gift for your grandmother on March 8th
To create a pot you will need a tin can without a lid, wooden clothespins and red paper.
- First of all, carefully separate the lid from the tin can for the child so that the edges are smooth and the baby cannot get hurt.

- Then you need to hook each clothespin onto the side along the entire diameter of the future pot.

- We cut out hearts from scarlet paper and thread them through the openings. An original gift for grandma’s indoor plants on March 8 is ready.

Thanks to wooden clothespins, the pot turns out to be very stylized, cozy and environmentally friendly.
In this master class you will find an idea for an original children's craft for March 8 - a bouquet of candies! The bright flowers of the holiday bouquet are made of corrugated paper, and in their center there is a surprise for mom or grandma.
Necessary materials for children's crafts:
- Round chocolate candies - 7 pieces.
- Polystyrene foam (I pre-cut a circle of the required shape to fit the size of the basket)
- Wicker basket (candy bowl).
- Corrugated paper in two colors (you can add other shades as you go)
- Glue gun.
- Double-sided tape.
- Toothpicks.
- Glue stick.
- Cotton threads.
- Scissors.
- Beads in the color of paper.
- Golden nylon braid.

Children's craft for March 8th “Bouquet of flowers made from candies”: master class with photos
1) Take polystyrene foam and glue several strips of double-sided tape onto it. This will be the bottom, it will be attached to the basket. Photo 2.

2) We cover the product with green corrugated paper, leaving the bottom untouched. Corrugated paper can also be glued to double-sided tape or glue - a pencil. Photo 3.

3) Glue it to the basket. Photo 4.

4) So, the base is ready. Let's get to the candy. We fasten the ends of the wrapper together. Use a toothpick to pierce the candy, somewhere to the middle. The toothpick should hold well and the candy should not fall out. Photo 5.

5) Do this for every piece of candy. Photo 6.

6) Let's start making the petals of the bud. We cut out strips of the required length from pink corrugated paper. The length and width of the petals depends on the size of the candy. Photo 7.

7) Twist the strips in the middle, connecting the ends. We stretch the paper across to give the shape of a bud. Photo 8.

8) Place the buds on the candy and wrap it with thread at the base. Photo 9.

9) And now we have the flowers ready. Photo 10.

10) Now you need to make an imitation of greenery. Cut out a square from green paper. Fold it in half. Photo 11.

11) Trim the ends. Photo 12.

12) Pass it through a toothpick. Photo 13.

13) Apply glue to the base of the flower. Photo 14.

14) Glue the leaves. Photo 15.

15) Carefully insert our flowers into the foam. Hold the toothpick, otherwise the pressure will pierce the candy right through. Photo 16, 17.
A bouquet of chocolates is a “double” gift, successfully replacing both a traditional bouquet of flowers and a box of chocolates. But much more important is the fact that a bouquet of sweets made with your own hands demonstrates your attention and care like no gift bought in a store.
In this article, we have collected some of the most interesting and at the same time simple master classes on making “candy” bouquets with step-by-step photographs - so that you can please your beloved mothers, grandmothers, wives and girlfriends with an original “sweet” homemade gift.
Festive bouquet of sweets and satin ribbons
A truly luxurious gift that will make an unforgettable impression on any woman on March 8 - a festive bouquet of sweets, satin ribbons and lace. Quite difficult to make, such a bouquet will become a real decoration and will be relevant for a very long time after the March 8 holiday itself. Any sweets are suitable for making such a bouquet - Chupa Chups lollipops, round candies and even miniature chocolate bars, the main thing is to get long plastic or wooden sticks in advance for attaching candies to the “stems” instead of ordinary flowers.
Step-by-step photo master class:
.jpg)
Bouquet of tulips made of corrugated paper
Perhaps one of the easiest bouquets to make and at the same time an unusually beautiful bouquet that will be an excellent gift for any occasion. For this homemade bouquet you need any candies in a wrapper with “tails” - caramel, chocolate, etc., as well as corrugated paper in two colors - green and yellow (red, orange - in general, any chosen color of tulips). As a base for attaching “flowers” made of corrugated paper, you can take either a special ball/cube for topiary (sold in specialized craft stores) or an ordinary large dish sponge.
Step-by-step photo master class:
.jpg)
Homemade bouquet for March 8th from marmalade
The simplest bouquet for March 8 can be made from marmalade candies in sugar - any color and taste, the main thing is that they are round or at least very small. To make such a bouquet, in addition to sweets, you only need cling film and a few wooden “skewers” for canapés. You can wrap the finished bouquet in special wrapping paper or colored corrugated paper.
Step-by-step photo master class:
.jpg)
Composition “ladybug” made from candies
.jpg)
A very interesting and truly unusual-looking composition of candies that will adequately decorate any holiday table on March 8 and will surprise the gathered guests. Despite the external originality, in fact, such a composition can easily be made at home. For this you will need:
- A piece of foam
- Corrugated paper 2 colors - red and black (brown)
- Toothpicks
- Brown or black gouache
- Chocolates (ideally round, but in a wrapper with “tails”)
We cut out the “body” of our “ladybug” from polystyrene foam with an ordinary knife, and paint the head with gouache brown (or black). Additionally, the ladybug’s head can be decorated with “eyes” and “antennae” drawn on paper from wire or other available materials. The main thing is to make “rosettes” from several layers of corrugated paper (as in the photo below), secure the candies in them on toothpicks and stick the second tip of the toothpick into the foam base.
Step-by-step photo master class on making a composition:
.jpg)
Corrugated paper callas with candies
Flowers with the unromantic name "calla lily" are also known as calla lilies - delicate, elegantly curved, snow-white, ideal for a holiday bouquet. At home, it’s easy to make calla lilies from white corrugated paper, the snowy whiteness of which will go wonderfully with the shine of the foil of chocolates. It is best to complement the bouquet with “greenery”, again made from corrugated paper. How to do this - look at the step-by-step photos below.
Traditional gift options for Women's Day are sweets and flowers. Of course, almost all women love candy, and flowers are always welcome, but still, receiving the same type of gifts from year to year is not interesting.
If you want to surprise, you can make your own gifts from sweets for March 8th. They can be very diverse. You can use sweets to make a bouquet of spring flowers, a greeting card, or a souvenir. Photos of various gift options will help you make a choice.
Let's look at how to make simple gifts from sweets for women on March 8, since you shouldn't take on making a complex gift right away.
Bouquet of spring crocuses
Flowers are a symbol of the spring holiday, so let's start learning how to make souvenirs from sweets by making a spring bouquet.

We will need:
- corrugated paper in purple (can be in different shades) and green;
- any sweets (preferably semicircular or truffle type);
- transparencies;
- wooden thin sticks (skewers);
- regular and double-sided tape;
- ribbon for tying a bouquet.

The step-by-step process of making a bouquet looks like this:
- Making the base. First, wrap one edge of the stick with double-sided tape, then apply it to the candy. Next, whiten the square piece with transparent film and wrap the candy, wrapping the ends of the film around the stick. We fix the film on the stick with tape. Such bases need to be made according to the number of future colors. Naturally, there should be a vague number of them.
- Bud formation. We cut out four petals from colored paper (size approximately 20 by 5 cm) and wrap them around a candy attached to a stick. At the bottom we secure the paper with tape or thread.
- Making the stem and leaves. Cut a strip of green paper and wrap it around the stick. Then we cut out the leaves and attach them to the stem.

All that remains is to collect the bouquet, pack it in transparent film and tie it with a ribbon.
Sweet eight as a gift
As a gift for a teacher, you can make a sweet souvenir in the shape of the number 8 with your own hands; even primary school students can cope with this work, even with a little help from their parents.
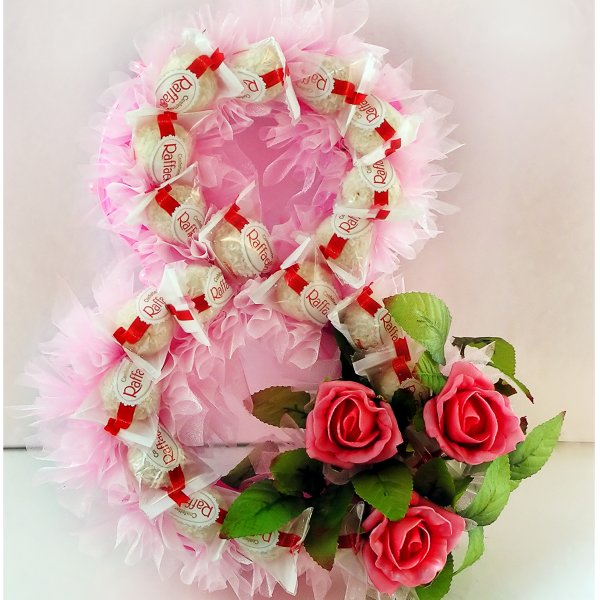
You need to take two cardboard cylinders of different sizes (you can use tape reels). Two circles, equal in diameter to the size of the reels, are cut out of cardboard and glued to the cylinders. The mugs can be wrapped in colored paper and decorated with drawings and congratulatory inscriptions.
Now you need to wrap the reels with two strips of double-sided tape, placing it closer to the edge. Candies are glued onto the tape (you should choose a form of candy that matches the height of the reel in length). Additionally, the mugs can be tied with a ribbon to help the candies stick better. All that remains is to fasten two circles together to form the number “eight”.
Cake
You can make a cute cake for your mom as a gift. To do this, you need to cut a blank from foam. If the cake is multi-tiered, then you should cut out 2-3 circles of different diameters. The foam blanks are wrapped in colored paper.

Now we need to select candies in wrappers of different colors to make our gift bright. It is best to glue the candies with double-sided tape. You can decorate the sweet souvenir according to your own taste.

For your beloved girl, a similar “cake” can be made in the shape of a heart. The principle of making a souvenir is the same, you will only need to cut the foam blanks into the desired shape.
Other options
Ideas for making a variety of souvenirs can be born if you remember the interests and hobbies of the person for whom the gift is being prepared. For example, you can please a fruit lover by making a pineapple out of candy. To do this, you will need a cylindrical foam blank, green paper for the “tail” and semicircular candies in a yellow-orange wrapper.
If a girl loves jewelry, then a giant “necklace” of candies can be made for her as a gift; a lady who is interested in floriculture may like a beautiful flower in a pot, and not only the flower itself can be made of candies, but the pot can also be covered with chocolates.
Thus, a wide variety of souvenirs can be made from sweets for an original gift for the Eighth of March.

