Star news


How to make a cardboard jewelry box. Quick and easy: an original do-it-yourself box
Despite the fact that store windows offer a large number of jewelry boxes made from all kinds of materials, the desire to make one with your own hands does not disappear. After all, this is not only a tribute to your talent and skill, but also the desire to have an original thing that no one else can find. In addition, it is of great importance that the box you make yourself will have exactly the size that is so necessary to accommodate all the jewelry.
The box is made with your own hands in two stages:
1) Creating the box itself from scrap materials;
The material for it can be tape rings, wooden blocks or baguette scraps, old newspapers, shoe boxes, and other improvised materials.
Box made from a reel of adhesive tape If a small jewelry box is enough for jewelry, you can make it from a paper spool of tape. The size of the finished product will correspond to its diameter and height. To work you will need: For the bottom and lid of the future box, you need to make blanks from cardboard. It is enough to attach the reel to a sheet of cardboard and trace it with a pencil. We outline the resulting circles with another circle, the diameter of which is 3-4 centimeters larger than the previous one. These are the future rays with which the circles will be glued to the reel. You shouldn't make them very wide. The narrower they are, the more accurately the bottom will stick. The end result looks like this: For the lid you will need to cut a strip slightly longer than the volume of the reel and half its height wide. To ensure that the lid fits well and is not too large, you need to wrap a strip around the future box and glue its edges. When the side of the lid is dry, you need to glue the top to it as you did with the bobbin. To increase the rigidity of the bottom and lid, you can glue another layer of cardboard inside, cut along the inner diameter of the reel. The finished box is decorated with your own hands using the decoupage technique; it can be painted with acrylic paints and opened with varnish, or a self-adhesive film with a pattern imitating natural materials: wood, stone can be glued over the entire surface. Making such a box is more labor-intensive than the previous version, but it will also last much longer than a paper one. To work you will need: pencil, ruler; Having decided on the size of the box, you need to cut two blanks from the board, equal to its length and width. At the end of each, you need to make a 45-degree bevel with a knife so that the walls fit together nicely. The depth of the bevel is equal to the width of the board. Before gluing the side parts, you need to make sure that the bevels match tightly, without gaps. Otherwise, they need to be adjusted using coarse sandpaper. The sides are glued together gradually. After each subsequent gluing, it is necessary to check the internal angle between them. It should be equal to 90. Otherwise, the result can be any shape, just not an even rectangle. There are two options for installing the bottom: if the finished product will be pasted over with paper or fabric, then the blank for the bottom is taken equal to the size of the box and glued so that its side parts are visible; Wooden box covered with paper If a DIY jewelry box is covered only with varnish or paint, then it will look more beautiful when the bottom is hidden inside it. To do this, take a blank that is shorter in length and width than the size of the box by two board thicknesses. For example: if the box dimensions are 10x10 cm and the wall thickness is 1 cm, the bottom needs to be 8x8 cm. Varnished wooden box The manufacture of the lid can also be made in two versions: cut the workpiece and install it on the hinges. The best option for attaching the lid is a piece of piano hinge, the length of which is a couple of centimeters shorter than the length of the box. All ends of the boards visible on the finished product must be carefully sanded; Glue the lid to the box and after drying, carefully cut it off with a jigsaw, moving down the body by one and a half to two centimeters. A wooden jewelry box is decorated using all known methods: varnishing, painting, decoupage, oracle, fabric, leather. Luxurious baguette box Boxes made from baguette, a material for picture frames, look chic and rich. It is made of wood or plastic. Plastic is soft and can be cut and processed no worse than wood. You can buy a baguette in art salons, having previously determined how long the blank is needed. The principle of making such boxes is identical to working with wooden blanks. Papier-mâché box We have known what papier-mâché is and how to work with it since school. The advantage of this material is the variety of shapes of the finished product. It is enough just to find the original blank of the required shape to create an original box. To work you will need: DIY papier-mâché box The base must be covered with Vaseline or cream so that the papier-mâché can be easily removed later. The first layer of thinly torn paper needs to be wetted and covered the entire surface of the base. The paper for the second and each subsequent layer is carefully lubricated with glue. It is necessary to ensure that there are no missing sections. It is convenient to alternate, for example, layers of newspaper and white paper. The better the paper is impregnated with glue, the stronger the papier-mâché will be. The number of layers is optional. After complete drying, the box blank must be removed from the mold and prepared for decoration. If this is a painting with paints, then it must be coated with an acrylic primer. In addition to painting, the box can be decorated with your own hands with beads, ribbons, buttons, figures made of plastic or salt dough. Chinese papier-mâché box If the basis for papier-mâché was a round object, the lid was created together with the box, then it must be removed carefully, after first drawing a cut line with a pencil. If the layout was created without a lid, then after removing it from the base, you need to straighten the edges with scissors. The lid is attached to the box before being primed. Holes for the connecting cord can be made with a paper hole punch. The decorated box is opened with your own hands using varnish. It is better to use acrylic-based varnish purchased at an art salon. Artists coat their canvases with this varnish to avoid contamination and fading of the paint. To work you will need: Cut out the sides of the future box of any shape from cardboard. Sew or glue decorative fabric to them on both sides, leaving small seam allowances. A bamboo napkin can also be decorated with fabric on the side that will be inside the box. The sides can be sewn or glued to the napkin, leaving some part free. The clasp can be made in the form of a loop and button, or you can purchase a magnetic one at a hardware store. To prevent the jewelry box from getting dirty and to have a neat appearance for a long time, it is better to open it with acrylic varnish. Below are photos of jewelry boxes made using different decorating techniques. For lovers of rigor and minimalism in everything, it is enough to make the box a single color, covering it with paint and protective varnish.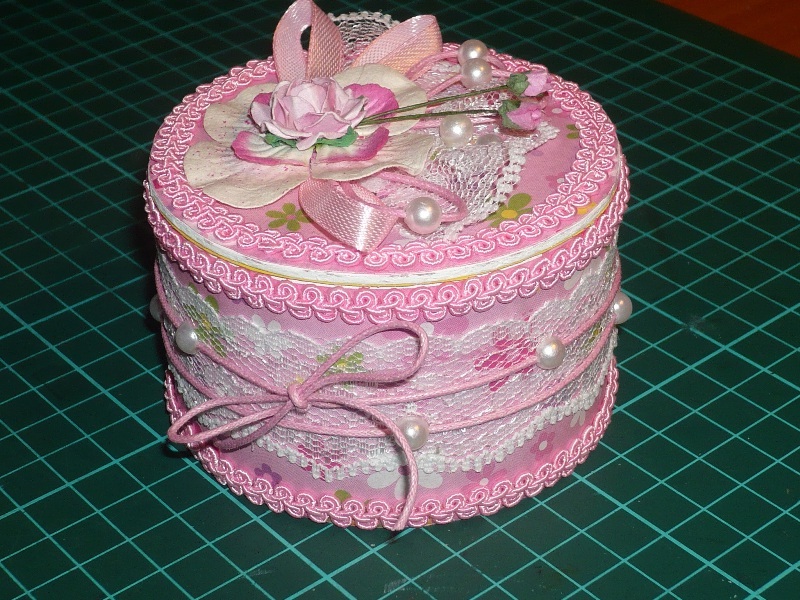
a reel freed from tape;
thick cardboard;
pencil;
scissors;
glue (preferably PVA).
Before gluing the bottom to the bobbin, it is necessary to draw along the fold line with a non-sharp object, perhaps the edge of tweezers or a metal ruler. This will help you bend them neatly. To hide the petals on the side, you need to stick a cardboard tape over them, the length and width corresponding to the side of the reel.DIY wooden jewelry box
a long board 10 millimeters thick, 10 centimeters wide, made of soft wood: pine, alder, linden;
a board for the bottom and lid, its width is equal to the width of the finished product;
hand saw with fine teeth or jigsaw;
knife;
sandpaper;
PVA glue (it’s better to use construction glue) or carpentry glue “Moment”.DIY box made from baguette
DIY papier-mâché jewelry box
newspapers or thin office paper;
Vaseline or any cream;
scissors, brushes;
PVA glue or wallpaper.DIY box made from bamboo napkin
bamboo napkin;
thread and needle, PVA glue;
scissors, cardboard, finishing fabric;
magnetic clasp.Several ways to decorate boxes
There are many ways to make boxes from scrap materials for storing small items, jewelry or gift wrapping. One of the most popular and affordable materials is cardboard. A cardboard box can be of any shape and with any decor. Any beginner can make this craft with his own hands; it won’t take much time.
Making a simple rectangular cardboard box with your own hands
We cut out a cardboard pattern according to the diagram, which can be seen below. Choose sizes depending on the purpose of the box. A small box is suitable for jewelry, and a larger one, for example, for needlework.
After the workpiece is cut, we proceed to assembly. Let's look at making the box step by step.
- Bend the cardboard along the lines.
- We glue all joints. It is better to choose high-quality instant glue or PVA. In addition, a good option would be to glue the parts with tape.
- The cardboard base should be decorated with wrapping or other decorative paper. You can use scraps of beautiful wallpaper.
- When cutting out paper, be sure to leave allowance for hems.
- We wrap the paper and glue it first to the inner sides of the box. We cover the inner walls and bottom with other paper.
- We decorate the box to your taste with any paper elements, flowers, lace, beads and seed beads, etc.
This beautiful and romantic little thing can also be made very quickly from scrap materials.

- Cut out two heart-shaped pieces from thick paper or cardboard.
- We also cut out 2 rectangles for the side walls. One of the sides will have “teeth” for gluing.
- For assembly we use instant glue, it is the most durable. Glue both rectangles.
- Glue the second heart from the bottom, covering the teeth.
- We decorate the box with decor. Imitation lace will look good.
- Using the same scheme, we make the lid of the box.
- We complement the work with decor in a romantic style - beads, flowers, butterflies, etc.

- Parts made of thick binding cardboard, 8 pieces: two each 16x4cm, 17x11.5cm and 10.8x4cm, one each 16x11cm, 17x3cm.
- A piece of fabric 30x60 cm.
- Details made of padding polyester with dimensions: 40x4cm, 17x11.5cm, 17x3cm.
- Decorative scrap paper 30x30 cm.
- Lace strip 30x2(3) cm.
- Decorative elements to suit your taste.
- Moment glue dries quickly.
- Ruler and pencil.
We begin our master class by making the base. We glue the parts for the walls to the bottom. Lubricate the lower ends of each part with glue, apply it, align it and press well for a few seconds. If the glue is good, it sets quickly. Small inconsistencies will be covered with cloth and paper.
While the craft is drying, prepare the base paper and fabric. If the scrap paper has a pattern, take into account its future location when cutting out the parts. We work according to these schemes:

Before gluing any parts, be sure to try them on; at this stage, errors can be corrected.
The most accurate way to cut is using a stationery knife and an iron ruler.
It is tedious to draw along the fold lines with a non-writing rod or stick, this makes bending easier.
The fabric should be slightly wetted and ironed, straightening out all possible wrinkles. We cut out the parts: 7x56 cm and 23x33 cm.
We glue padding polyester onto the side surface of the box on 3 sides (excluding one long one). You don't need a lot of glue here, just a few drops or double-sided tape is enough.
Glue a long narrow strip of fabric on top. We start from the middle of the back side. Here you will need more glue.
Without stretching the strip too much, we lay it along the entire perimeter, the ends should meet evenly at the back. You can apply a few drops of glue to the padding polyester. A slight overlap is more a plus than a minus. Glue the second half of the strip to the back.
We secure the edges of the fabric. First, turning the work over, glue the protruding parts onto the bottom. First glue the long sides, then the short sides. The bottom will be closed so you can apply a lot of glue.
Before folding the fabric at the top, we cut with scissors at all corners, not reaching 1-2 mm to the edge of the cardboard. We also glue the long parts first, then the short ones.
We cover the inner surface with scrap paper, after trying it on. First we glue the strips on the short walls, then on the long ones, and lastly on the bottom. The base of the box is ready.

We are working with the cover. Glue the padding polyester to the rear side and top (lid) walls. We lay out the workpiece on a piece of fabric.
Leave a gap of 6-7 mm between the parts. Turn it over, leaving the padding at the bottom. We secure the corners by gluing them to the base. After this, glue the long and short sides. The cover is ready. You can try it on.
Let's start decorating the box. We glue the lace ties, marking them directly on the cardboard, and a frame (or other chosen decoration) onto the lid.
We pull the threads inward and tie them, securing them with tape. Glue the last piece of scrap paper by running the handle of the scissors along the fold. We glue the edges especially carefully.

Glue the base of the box and the cover, applying glue to the bottom. Pay attention to how the back wall lies. After the bottom has dried, glue the side part.
Video on the topic of the article
For those who want to understand the making of boxes more clearly and get new ideas for creativity, we have prepared a selection of video master classes:
Every woman at least once in her life is faced with a situation when there is nowhere to store her favorite small trinkets. Someone solves the problem by inspecting the house. But you can get by with “little expense” without depriving yourself of your accumulated wealth - make a cardboard box with your own hands.
Cardboard crafts – original hobby with a distant history. In the modern world, few people master this art, however, twenty years ago it was the most popular way to have fun on a boring, rainy evening. The boxes were made not only from new cardboard, but also from old postcards or magazines.
The most interesting thing is that despite the incredibly beautiful appearance of the finished product, the manufacturing process is very simple. To create a paper box, you don’t need any special skills or knowledge; just collect all the necessary materials and you can get started.
Preparatory stage
 On the Internet you can find many ready-made blanks for creating a cardboard box. They just need to be printed and assembled. But it’s much more interesting to create a blank on one's own. You'll have to use your imagination and a little ingenuity, but the result is worth it.
Before you start creating a workpiece, you need to decide on the method of fastening the parts:
- Gluing;
- Assembly;
 The set of basic materials.
However, techniques can be combined, using both gluing and assembly for one product.
The finished box can be further decorated applique or flowers made of satin ribbons. It all depends on your taste and the purpose of making the box.
Gallery: cardboard box (25 photos)


Box using gluing method
 So, let's get down to the main question of the article: how to make a cardboard box? Let's consider the simplest one option– glued cardboard box. The capacity and purpose of such a product depends on your needs.
We will need:
- Thick cardboard;
- Two tetrapacks of milk (one tall, the other medium-sized);
- Clothespins;
- PVA glue;
- Super glue;
- Scotch;
- Kraft paper;
- Scissors;
- Two small magnets;
- Wood beads;
- Materials for decorating the product: beads, ribbons, fabric, flowers, fringe, etc.
Let's start the master class:

 In such a product you can store various women's small items or materials for needlework. The original way to use it is to keep it in a box. watch. For fashionistas who have a large number of these wrist accessories in their wardrobe, such a box will be a real salvation. The watch mechanisms will be protected from dust and accessories will no longer get lost, always being in one place.
The assembly method is the simplest possible. To complete it, you need to find it on the Internet and print the finished template on thick paper. Then, using scissors or a utility knife, cut out the shape and assemble. After assembly, the product can be decorated with any decorative elements. This option for creating a box is ideal as gift wrapping.
Original money box
 Many people use various types of money to store money. secret places, which can be easily purchased at any souvenir shop. But why, if you can make a money box with your own hands? An original piggy bank will reliably hide your savings and decorate your interior.
To create a storage box money we need:
- The book (it will serve as a hiding place);
- Stationery knife;
- PVA glue;
- Glue brush;
- Kraft paper;
- Pencil;
- Ruler.
Let's start the master class:

The product can be used as packaging for valuables gift, for example, luxury watches. By making several compartments in the box, it can be turned into storage for small items. Or make a shaped hole, then such a box is ideal for storage memorabilia.
Cardboard box
 Another simple way to create a cardboard box with your own hands is to use a ready-made box. For the master class we will need:
- A simple cardboard box;
- Magazine clippings;
- PVA glue;
- Pencil;
- Ruler;
- Thick cardboard;
- Lace or rope.
Let's get started:

 By the same principle you can do box with compartments or drawers. Only in this case should you braid the box after connecting all the parts. It's not difficult to do this kind of work. Print diagram box you like, cut out and assemble the parts.
When the product is assembled, begin attaching the tubes to the bottom side of the box, avoiding the front side. Hide the top and bottom sides of the product under sheets of thick cardboard. Treat the outside of the drawers in the same way, hiding the ends of the tubes inside the compartments. The finished box can be decorated kraft paper, ribbons, patches or applique.
There will always be beautiful paper crafts relevant. Such products can be used for your own needs or given as a gift. After all, handmade gifts have always been valued higher than purchased trinkets.
A jewelry box is the most versatile and necessary item for women's household items. It is very convenient to store all your jewelry in a box, especially if you can make it yourself. A jewelry box made of cardboard looks very beautiful; it is not difficult to make it yourself from simple and affordable materials. You can also give a jewelry box made by yourself, and this will be the most memorable and dear gift to a person. Handmade products are always more valuable because they are exclusive. You will see below how to make a jewelry box with your own hands.
Materials you will need: binding cardboard (preferably choose 2mm thick), PVA glue, masking tape (4 millimeters wide), Moment-Crystal glue, regular Whatman paper, fabric (preferably cotton), tapes - 2 pieces of 15 cm each
Tools: knife, scissors, self-healing cutting mat. or an unnecessary piece of linoleum, a ruler, a synthetic glue brush, a pencil, a stack for smoothing surfaces and corners, a jar of glue
Start by assembling the base. To do this you must make a drawing.

We glue the walls from above to the bottom, not from the sides. Glue must be applied to the parts along the entire length. We apply a large amount of glue, do not regret it, so that the box is durable.

When applying the part, always level it, the glue dries slowly, so you have the opportunity to place the part straight.
First we glue the long wall, then two short ones, it is better to apply the glue on both sides so that you get a neat corner

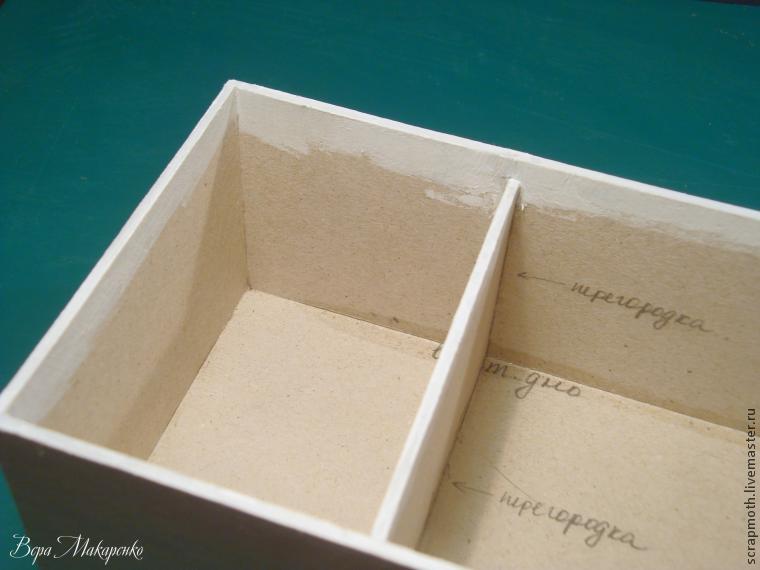
In order to glue a partition between two sections, mark in advance the place where it will stand.
Next, apply glue to the partition and insert it into the place where it will stand. Now you need to take white acrylic paints and paint all the upper sections of the parts so that the color of the fabric on the sides is not distorted.
 To reinforce all corners, take a piece of masking tape and apply it to all corners of your box and smooth it out well. It’s better to spread it out in a stack and then press it tightly.

 Next, you need to tape the inside of your box.
 Here again you need to use the stack, iron the tape from the glued edge towards the corner and along the depression.
 We strengthen all the joints inside.


Finally you have completed the cardboard base of your box. The next step is to decorate.
In order to decorate a box with fabric, you should know a few tips.
- The fabric completely covers the cardboard. There should be no gaps anywhere in the finished box.
- Avoid open cuts.
- Apply the glue in a thin, even layer so that it does not bleed through the fabric to the front side.
Glue the fabric to the cardboard with PVA glue.

Apply glue to the edge and the strip on the inside of the wall.
Apply a thin, even layer of glue to the paper part.
Glue the paper piece to the wrong side of the fabric.
 Before you are going to glue the seam allowances to the back wall, you must make cuts on them and form the corners.
 Fold the protruding seams and glue them.


Next we attach the allowances at the bottom.

After gluing, we get flat corners.


First, coat the bottom with glue and place our part there. Then we glue the allowances and corners. We smooth everything out with a stack.

Cover the cardboard cut with a fabric rectangle.


Now let's take on the cover for your box.
The cover should consist of three parts: bottom, cover and spine. The lid will have a layer of synthetic padding. The bottom and spine are lined with white paper. Here you need to first glue the paper to the cardboard, and only then the fabric. We coat the cover with glue and apply it to the padding polyester.

To decorate the lid with a pendant, make a small slit. Along the long side we mark the middle. On the short side - 1cm from the edge. We make a small slot, insert a ribbon there and glue the tails to the cover.

For the cover, cut out the fabric with 2 cm allowances on each side.

Place all three parts on the fabric, leaving a distance of 3-4 mm between them. We immediately glue the flat parts, and temporarily attach the part with padding polyester to the spine with pieces of masking tape to prevent it from fidgeting. And glue the allowances along the long edge.

We make a cut for the pendant.

We make corners with minimal thickening, trim the fabric along the cardboard, not reaching the corner 2mm. After all four corners have been formed, glue the seam allowances on the short sides.
Now is the time to glue the stopper tapes. Thanks to them, the hinge will last much longer. And it’s more convenient to use a lid with stoppers.
Cut two ribbons 14 cm long and glue them symmetrically at an angle to the cover. They should be free at a distance of 1 cm from the edge. The rest is glued.

Now let's make the endpaper. To do this, cut out a piece from paper that is 2 cm shorter in length than the cover and 1 cm narrower in width. On three sides the allowance is 1.5 cm, on the fourth - 3 cm. This long allowance will then be hidden between the spine and the back wall.

Form the corners on the paper parts as follows: on the long side, cut off the excess fabric flush with the edge of the paper part. On the short side we make a broken line, as in the photo below. We glue the long side first, then the short one.

Glue the resulting part onto the endpaper. It will turn out like this:

It's time to connect the main box of the box and the cover. To do this, coat the bottom with moment-crystal glue. We apply glue to the smaller part, i.e. on the bottom of the box, not on the lid. We do not reach the edge a little and carefully spread the glue so that it is distributed evenly.
Press the bottom of the box to the bottom of the lid. We align the back wall with the edge of the part; the three outer walls will have indentations of 7 mm. In general, cardboard sticks together quickly, the main delay is in the fabric allowances. You need to wait until it all sticks together and the bottom does not lag behind the box.
Then I glue the spine to the back wall. In the same way, you just won’t be able to crush it with books.
After this, you can glue the free ends of the stopper tapes to the box using PVA. This must be done symmetrically on both sides.

We will cover the inner walls of the box. To do this, cut out two long rectangles. For a deep compartment, this rectangle will be 5.2 cm in height, for a shallow one - 2.3 cm.
Glue the paper parts to the fabric, cut them out, and glue the seam allowances. Leave the seam allowance free on one narrow edge.

Carefully glue the part into place. We start from the end where we have a free allowance. We glue the part in stages onto each of the 4 walls. Carefully iron the corners with a stack. If you don't iron it, there will be rounded holes in the corners inside the box.

We make the joint near the front wall.

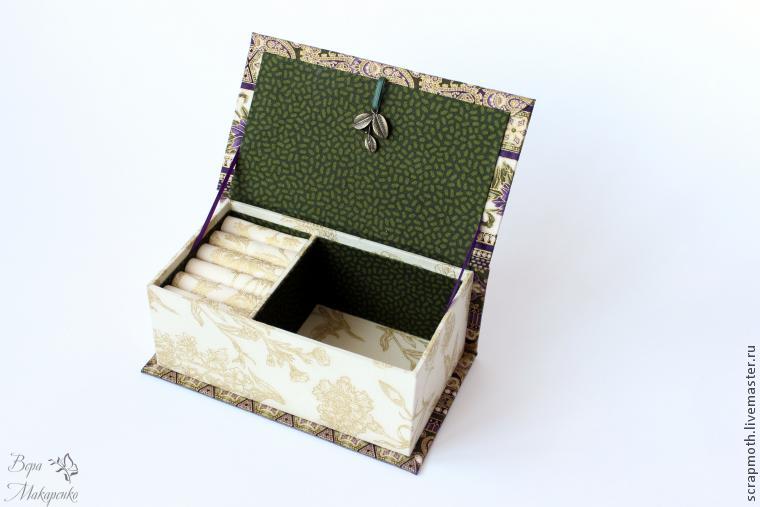
All that remains is to make rollers for the rings from rolls of white felt.
For your box you will need 6 pieces of felt, 20 cm long and 5.5 cm wide. Roll them into loose rolls and seal them with instant glue. Lay the rolls tightly together and glue them together.


So we have a magnificent handmade cardboard box. You can also show your imagination and design the box the way you want. Below is another DIY box idea in a video tutorial.
DIY box can be made of cardboard, woven from newspaper tubes or created using an old plastic bottle. Your main task is not only to choose a creative material that will be easy for you to work with, but also to come up with an original decoration for the finished product, especially if you want to present the made box for a holiday to a loved one. Sometimes the box can be hidden in a book cover or in the fluffy dress of a children's doll.
DIY box: master class
A unique gift idea for a close friend, how to make a box with your own hands, will not require you to work with special tools, because you can make an original and spacious box for various small things from ordinary cardboard. Special attention must be paid to materials to ensure that our product is durable and will serve you for many years. We can use 3 mm thick fiberboard or thick cardboard, we will also need a 2 mm thick sheet of cardboard and whatman paper. To fix the parts we will use instant fixation glue - “Moment”, and we will also need regular PVA during the decorating process.
To decorate the box we will use fabrics with a bright original print. During the work process, we will also need scissors, a sharp stationery knife, masking tape and a brush for applying glue.
3 mm fiberboard will make a durable DIY box, master class will describe in detail all the subtleties of its implementation. Fiberboard can be bought at construction stores, and to cut it we will use a sharp stationery knife.
For work we will need parts of this size:
10x15 cm - 2 pcs.
15x5 cm - 2 pcs.
10.6x6 cm - 2 pcs.
10.6x2.5 cm - 2 pcs.
15x2.5 cm - 2 pcs.

The base and lid of our craft have the same area, but they will have different heights. When all the parts are cut out, you can start assembling. When gluing parts using “Moment”, you need to hold the parts at an angle of 90 degrees (at a right angle), and carefully apply “Moment” to the edges of the base, then apply the side walls to them. First of all, you should glue the long walls - their length is 15 cm, and then proceed to the rest. For the strength of the structure, be sure to cover the outer and inner corners using masking tape.

How to make a box with your own hands
Beautiful textile DIY box, master class involves gluing the inner as well as the outer parts with fabric. For the walls you will need a piece of fabric 8 by 45 cm, for the lid - 25 by 20 cm. We will cover the outer part with this fabric, so choose bright prints. Before use, if necessary, the fabric should be ironed.
The sides must be coated with a thin layer of PVA, leaving one centimeter uncoated at the edges. Now this side needs to be attached to the fabric, which should be carefully spread on the table surface. Then the fabric must be carefully smoothed with a stack so that there are no folds or “bubbles” left. For the first craft, it is better to use cotton fabric for decoration, as it is easy to glue and smooth out.

The end of the piece of fabric must be folded, and then glued, if there is a large remainder left, then cut it off so that the allowance is only 1 cm, which must be folded. When you have folded all the edges, you need to cut off the corners with scissors so that the cut is under a sharp corner.
We would like to draw your attention to the photographs, which show in detail how to glue all sides of the box. Now we need to glue the top lid of the box: the top part must be glued in the center of the workpiece, carefully smoothing the surfaces so that there are no wrinkles left. You need to retreat one centimeter from the edges and cut out squares in the corners. And the resulting segment should be cut diagonally to the very corner.
The first step is to glue the sides 15 centimeters long, and glue the allowances to the adjacent walls. When gluing the 10 cm sides, you need to adjust the fabric in width, bending the allowances along the edges.

To decorate the bottom, you will need whatman paper: you need to cut out a piece from it that would correspond to the size of the bottom of our box. A piece of whatman paper needs to be glued to a piece of fabric so that there are allowances left, which then need to be tucked in and the corners cut off. The finished “bottom” must be glued, and in the same way a part for the inside of the bottom must be made.
For the further stage of implementation, we will need thick cardboard (2 mm thick). From it you should cut out parts for decorating the internal walls: two blanks measuring 5.5 by 15 cm and two blanks measuring 5.5 by 9.6 cm. As you can see, they will turn out higher than the walls of our box, and this is a necessary step to The lid was tightly closed and held so that all the folded jewelry in the box was safe. All cut-out pieces must be decorated with fabric, but you must remember that the allowances must completely cover the part of the “wrong” side that will protrude on the top bar of the box, as shown in the photographs.
All you have to do is wait for the glue to dry and you can enjoy the result. If desired, you can additionally decorate the lid of our box, for example, make flowers from ribbons, as for.

DIY cardboard box
A real needlewoman who loves to create jewelry and jewelry probably has a lot of necessary little things at home. The easiest way to bring order to a creative mess is to make a box with your own hands, where you can put all the little things that may be useful to you in the process of work. But for this you need to do a craft with compartments.
DIY cardboard box may have six separate sectors, so it will be convenient for storing various jewelry: rings and earrings, bracelets and brooches, as well as other stylish little things.
We can make a convenient box for storing 1000 small items using milk cartons as material. We will need tetra packs that have a square base. For this craft, you only need two bags. For the base and forming the lid, we need thick cardboard, and for the base, you can take a ready-made cardboard box without the top.

When working with cardboard, you will definitely need scissors and PVA glue. Before gluing, we will wrap all the parts in craft paper, we will also need some braid. And at the last stage - wrapping paper and beads for decoration, large wooden beads, with which we will make the legs, as well as two small magnets, thanks to which our box will close securely.
Two tetra packs should be cut, each into three parts, after cutting off the neck and bottom. As a result, we got six square parts, which must be placed inside the cardboard base, glued together. Pre-square parts must be covered with craft paper.
To form a bottom and a lid with one side, we need to cut two blanks from cardboard 15.5 by 22 cm and one 7.2 by 22 cm. 7.2 cm is exactly the height in our square parts that we used to form sections. Tips for you will help you decorate the finished craft.

DIY jewelry box
The most desired gift for any fashionista who has a lot of accessories is DIY wooden box, but to complete it you will need special tools for woodworking, so we will use more affordable materials, such as paper.
If you have already made from newspaper tubes, then you can also cope with the task of creating an original heart-shaped box without difficulty. As a result, you will get a unique souvenir, beautiful and original, to create which you will use unnecessary old newspapers.
To make it neat DIY jewelry box, you can use A3 sheets of white paper, in this case, after completing the craft, it can be painted in any color. If you use newspaper tubes, the printed text will be visible on them, so you need to paint the paper with several layers of acrylic paint.

We need to roll up tubes from white paper, how many of them are needed depends on the desired size of the future product. We will use cardboard for the bottom, and self-adhesive wallpaper for decoration (but you can use any paper you want).
For the base, cut out a heart of the desired size from cardboard. Small holes should be made in the base (a paper tube should go through them). There should be a distance of two centimeters between the holes, so make marks first to make all the holes the same distance from each other. You need to thread a tube into two adjacent holes, and coat them with glue on the bottom of the base.
When the base and axes are ready, you can weave with tubes until the desired height is achieved. The ends of the axles must be trimmed and tucked into the weave. The lid should be made in the same way. The finished craft can be painted and decorated to your taste.

Do-it-yourself doll box
Children will be happy to do it if you offer them an original idea, for example, together with them you can bring to life the most unique craft - a box book. To do this, you only need an old thick book (you can choose a textbook for the subject taught by the teacher, or make one from any other book, and then design the cover separately).

Do-it-yourself doll box- a unique craft, to complete it you will need a plastic Barbie, it is also advisable to immediately buy a dress for her. We will use the top of the dress in a craft, and you will make the fluffy skirt, which will hide the box, yourself.

So that you can master the master class on how to do it DIY box, photo we have prepared for you; they show in detail the entire process of creating a doll with a secret. To create the box itself, in which you can hide your most intimate things, we will use a plastic bottle, and to make the doll’s skirt fluffy, we will need lace and braid.