Star news


How to make different animals out of paper. How to make origami animals out of paper? We create a zoo with our own hands with step-by-step master classes
Colored paper is an excellent material for crafts. You can make appliqués, various figures and many other creative things from it. In this article we will look at how to make crafts from colored paper for elementary school children with your own hands.
You will need: thick colored paper, glue gun, ruler, scissors, tape, rubber band, pencil, pen spring.
Master Class


You will need: colored cardboard, scissors, glue stick, cotton wool, stapler.
Master Class

Rainbow in the clouds is ready!
Binoculars

You will need: yellow cellophane, scissors, tape, black paint, brush, green and black paper, glue, rubber band, wine cork, string or elastic band.
Master Class
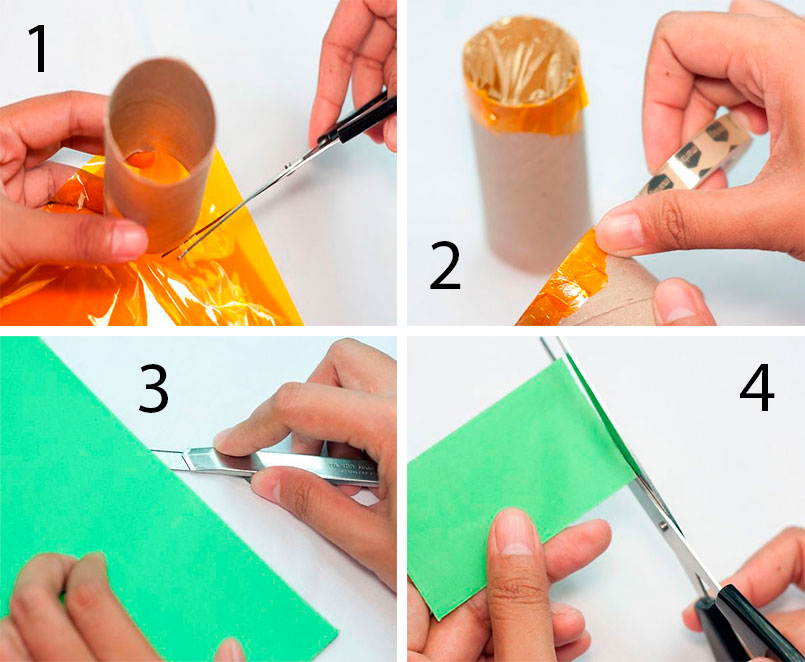
The binoculars are ready!
Origami rose

You will need: double-sided colored paper, scissors, a simple pencil.
Master Class

The origami rose is ready!
Moving 3D fish

You will need: colored paper, scissors, glue, pencil, black felt-tip pen.
Master Class


You will need: a sheet of colored paper, a felt-tip pen and scissors.
Master Class
- Fold a sheet of colored paper in half.
- Place your palm on the leaf so that your thumb and index finger touch the edge of the leaf, thereby forming half a heart.
- Circle your palm.
- Cut out the palm and unfold the craft.
A heart in hands made of colored paper is ready!

You will need: white and yellow colored paper, a simple pencil, ruler, glue, coin or compass.
Master Class
- Cut 9 strips of paper the same size.
- Make 2 circles on yellow paper.
- Cut them out.
- Glue the ends of the strips together to form petals.
- Glue the petals to the yellow circle, then glue the second circle on top.

You will need: red colored paper, a pencil, scissors, a round object.
Master Class
- Trace a round object on colored paper.
- Draw a spiral in a circle.
- Cut out the circle.
- Cut the spiral in such a way that you get a “spring”
- Twist the rosette and make the required number of rosettes in the same way.
The original colored paper roses are ready! I recommend watching the video master class!
You will need: double-sided colored paper, glue gun, stick or skewer as a stem, button.
Master Class

A creative flower made from colored paper is ready!

You will need: 4 sheets of colored paper, double-sided tape.
Master Class
- Fold each sheet into an accordion shape.
- Fold each accordion in half to form a fan.
- Glue 4 sheets together to form a circle.
The fan flower made from colored paper is ready!

You will need: colored paper, stapler, cut out butterfly (from a magazine, notebook, picture), felt-tip pen.
Master Class

The case for surprises made of colored paper is ready!

You will need: colored paper of black and yellow, a simple pencil, scissors, ruler, glue, compass, glitter.
Master Class

The colored paper owl is ready!
You can also make a cute bunny out of colored paper, and see how in this video!
Sisters made of colored paper

You will need: paper of two colors, 2 wooden sticks, buttons for eyes, elastic bands or strings for hands, pencil, glue.
Master Class

The paper girls are ready!
Fish made from colored paper

You will need: colored paper, scissors, glue, markers.
Master Class

Paper fish are ready!
Colored paper envelope

You will need: A4 sheet (can be colored), scissors.
Master Class

Bookmark “Nibbler” made of colored paper

You will need: cardboard template, scissors, glue, decorative elements - felt-tip pens, paints, buttons, beads, glitter...
Master Class

A great way to spend time with your children in a fun and useful way is to engage in creative activities together. Such games not only develop the child, but also bring you closer together. It is worth noting that creating various figures with your own hands is also useful for adults. Such original things can decorate your home and will also be a good gift for loved ones.
You can make a beautiful thing from almost any available materials. A master class with step-by-step production of animals will help you cope with a task of any complexity. Let's look at the most popular options.

Puff pastry
Everyone remembers very well how in childhood we loved to sculpt various figures from multi-colored plasticine. But there is an alternative to the chemical composition for modeling - this is salt dough. This material for needlework is more convenient and safe.

Products made from salt dough will last for many years, provided they are properly processed. It is also worth noting that the price of the material is very low. Let's take a closer look at what an animal can be made from.


To prepare the simplest version of the dough, you will need one glass of salt, one glass of water and three glasses of flour. It is better to purchase finely ground salt of the “Extra” category. Mix all ingredients and knead the dough thoroughly.

Finished crafts must be dried. To do this, place them in the oven, set the heating temperature to the minimum and leave for several hours with the door slightly open.

Repeat this procedure for three days. Using this method, you can make crafts on the theme of animals of any complexity. Add food coloring to the dough if necessary. You can also paint the finished product.

How to make animal figures
When making a three-dimensional figure from dough, it is worth considering that its size should not be significant. This way the dough can dry well.

If you need to make a larger figurine, you should initially make a frame from wire, foil or other materials. The prepared frame is covered with dough and the required animal is formed.

The algorithm for making products from salt dough is the same. If necessary, you can use detailed instructions on how to make an animal. Initially, it is necessary to manufacture individual parts. Fasten the parts of the animal's body one by one, starting with the largest part.

Let's sculpt a pig
In order to make a pig, you will need an oval body. On one side, attach a small “tablet” of dough that will serve as a patch. And on the opposite side is the tail.


At the last stage, you need to coat the finished product with pink paint. Using a black marker, draw eyes and two dots on the patch.


Making a teddy bear
A cute handmade teddy bear can be a wonderful gift. It’s quite simple to make, following the tips in the photo of animal-themed crafts.

Form the prepared dough into a round ball to use as the head. You need to sculpt a muzzle on it and attach the ears.

Make an elongated body, front and hind legs of the animal, connect them together. To securely fasten the top and bottom of the product, you will need a toothpick.


Insert a toothpick into the body so that it replaces the neck and protrudes slightly above the surface. Attach the bear's head to the protruding part of the toothpick.

To decorate the resulting figurine, you can make a heart from salt dough, which is placed in the front legs of the bear. By placing the hearts of a barrel of honey together, an ordinary bear will turn into the main character of the cartoon “Winnie the Pooh”.

We use toilet paper rolls
To create original little animals with your own hands, you can use any available means, as well as leftovers from household items. You can make various toys from ordinary rolls left over from a roll of toilet paper.

To make a cute bunny you will need a gray sleeve (can be painted), gray and pink cardboard, several bunches of straw, cotton wool.

A circle and two semicircles are cut out from a sheet of gray cardboard. They will serve as the head and paws for the product. Place the sleeve vertically, glue a circle to the bottom base, at the bottom of which the paws are glued with the cuts of the circles down.


Next, you need to cut and glue two ears and a round nose from a sheet of pink cardboard. Glue a few straws under the nose circle to make a mustache. Eyes for the bunny can be purchased at a craft store or drawn.

At the same level with the nose on the upper base, you need to glue a tail from a bunch of cotton wool. Such toy animals can be used as decorative stands.

Animals made from pompoms
The method of creating toys from pompoms is popular among needlewomen. To make a pompom you will need a sheet of cardboard, scissors and knitting threads (yarn).

From cardboard we cut out two identical circles with round holes, similar to a donut. Place the circles together and wrap the threads tightly around their base.

Cut the threads along the top line, spread the rings a little and tie them in the middle with thread. By pulling out the cardboard base, you will get a fluffy pompom.

From such blanks you can make different types of animals. The easiest way to make a caterpillar or snake this way. Use a thread to fasten a row of pompoms together to form a chain. Attach the caterpillar's eyes, tongue or horns to the first pompom and the toy is ready. Many interesting options for crafts made from pompoms with descriptions of the rules for their manufacture can be found on the Internet.

Photos of animal crafts


Volumetric crafts made from colored paper have been and remain the most popular type of children's creativity. Paper is one of the simplest and cheapest materials, often used in kindergartens and school groups. You can interest your child in paper crafts by choosing a theme that is interesting to a particular child. In addition, even from paper, crafts can be made using different techniques: scrapbooking, origami, three-dimensional appliqués, quilling.
Volumetric crafts - paper animals
If we talk about paper crafts for children 4, 5, 6 years old, then one of the popular topics for creativity is the animal world. Three-dimensional animals made of colored paper, birds, insects and fish seem to come to life, acquiring not only bright colors, but also a bizarre shape.
We have selected voluminous paper animal crafts, master classes, templates and step-by-step instructions especially for you.
In this article we will look at not just examples of finished works, but also templates for three-dimensional crafts, which can be printed directly from the site.
In addition to the paper and cardboard itself, we will also need scissors, a glue stick (or PVA), a simple pencil, some additional parts, for example, toilet paper rolls and doll eyes. By the way, you can make toy eyes yourself by cutting out a small circle from white paper and drawing a dot on it with a black marker.
Please note that some instructions contain not only colored paper, but also cardboard, paper cups or disposable paper plates and napkins, but voluminous paper crafts made with your own hands from these improvised materials look no less impressive.
An original solution would be a voluminous paper craft for a preschooler, made by hand, as a gift or small present to a close relative (grandparents/dad). This could be a themed figurine for one of the holidays or some memorable day. Thus, 3D animals, the diagrams and templates of which we will now consider, are a huge success among children.
This simple construction paper craft is not only easy to make, but also fun. Any child can cope with this task in 15 minutes. For a paper shark you need a sheet of double-sided blue or blue paper, white and red, scissors and a glue stick. We will work according to the following scheme:


Another interesting work is a voluminous giraffe made of yellow paper. To work you need a yellow sheet and a brown strip. Cut and glue as follows:

The following three works are performed using approximately the same technique - a paper caterpillar, a mouse and a bird. Blanks of the required size are cut out of the sheets, folded and then glued together.


A butterfly made from colored paper can be interesting in terms of making - this is where a child can show all his imagination and imagination. The wings of a butterfly can be completely different, and a colored sheet is taken as a basis, and different patterns can be glued onto it or simply painted.

A voluminous fish made of colored paper - such an interesting and simple craft will keep a child busy for 15-20 minutes:

Funny elephant made from black velvet paper - a simple craft that will require some participation from an adult. In order for a child to make an elephant, an adult must draw an outline on black paper, along which the outline of the animal must be cut out:

And we will make this elephant from a toilet roll (it’s also made of paper) and cover it with green paper (you can take any other color:

Another funny creature made from a paper roll is a chicken:

For voluminous animals, paper is not the only possible material. This original craft can also be made from paper cups:

Templates for three-dimensional paper crafts can be printed on white office paper, cut out and colored, but if we are talking about a specific living creature with a certain color (a frog, for example), then it is better to print the blank on paper of a specific color (in the case of a frog - green). Check out these paper animal templates for children aged 4 years and older:


Animal characters of Russian folk tales made of paper for a tabletop theater with your own hands
Do-it-yourself voluminous toys made of colored paper for children. Master class with step-by-step photos
Fairy-tale characters for tabletop theater. Master class with photos
Derkach Anastasia Sergeevna, Additional education teacher, MBOU DOD CDT "Commonwealth", Creative Association "Peacock", Novosibirsk
Description: This master class is intended for children from 7 years old, additional education teachers, educators and creative people who love to create beautiful and unique things with their own hands.
Purpose: Interior decoration, toy, gift, characters for tabletop theater
Target: Making fairy-tale characters from colored paper
Tasks:
- develop practical skills in working with paper;
- develop interest in artistic creativity;
- develop fine motor skills, eye, imagination, aesthetic taste, compositional skills and spatial thinking;
- consolidate skills in handling simple tools - scissors, paper
- improve design and application skills and abilities;
- cultivate independence, accuracy in work, patience, perseverance
Manufacturing technique:
- applique
- design
- paper plastic
Materials and tools:
- a simple pencil
- colored paper for copier
- ruler
- a set of colored paper
- scissors
- glue

Safety rules when working with scissors
1. Use well-adjusted and sharpened scissors
2. Scissors should have blunt, rounded ends
3. Place the scissors with the rings facing you
4. Watch the movement of the blades while cutting
5. Don't leave scissors open
6. Pass the scissors rings first
7. Don’t play with scissors, don’t bring them to your face
8. Use scissors as intended
Rules for working with PVA glue
1. When working with glue, use a brush if necessary.
2. Take the amount of glue that is required to complete the job at this stage
3. It is necessary to apply the glue in an even thin layer
4. Remove excess glue with a paper napkin
5. Try not to get the glue on your clothes, face, or especially your eyes.
6. After work, close the glue tightly and put it away
7. Wash your hands and work area with soap and water
Paper animal templates:


Animal characters in Russian folk tales represent a whole gallery of diverse characters. Of course, all these characters metaphorically reflect the world of people - their actions, the fears of the weak before the strong, resourcefulness and kindness. It is worth noting that the characterization of animals in a fairy tale is characterized by a tendency to typify the image, that is, the hero is clearly distinguished by one quality inherent in a person.
For example, the hare is always cowardly, and the cat personifies justice.

Often cat in fairy tales he openly demonstrates his playful disposition; in many stories he turns out to be a robber or even a thief. But at the same time, the cat is distinguished by justice and a lively resourceful mind. Thanks to his eloquence, he gets out of any difficult situations, helps the offended, and protects his friends. Moreover, the cat does not have any obvious power; its true power lies in its words. The wise words of a cat can strike fear into animals many times larger than him. For example, in the fairy tale “The Cat and the Fox,” the cat calls himself Voivode and makes even such strong animal characters as the bear and the wolf tremble. You can also remember the fairy tale “The Cat is a Gray Brow, a Goat and a Ram,” in which a cat and his friends cleverly deceive the wolves.

Hare– the hero is weak, but cunning. He often acts as the personification of cowardice, however, thanks to his dexterity and resourcefulness, he easily gets out of difficult situations. For example, in the fairy tale “The Boasting Hare,” the hero helps save a crow. The obvious evolution of the image of the hare in fairy tales: at first it appears to us as a symbol of cowardice and timidity (“The Fox and the Hare”), but as the story progresses we see how this cowardly hero is transformed. He can outsmart even a wolf and save his friends.

Mouse in fairy tales, she is hardworking and kind, although it is often emphasized that “a mouse’s brain is smaller than a pea.” She often acts as a savior, and the reward for this is not at all large - just a spoonful of porridge, for example. The mouse often helps people - carries water in the fairy tale “Fear has Big Eyes” and can even save lives (“Daughter and Stepdaughter”). This is a strong animal character, who sometimes plays a decisive role in the development of the plot of a fairy tale - he helps to pull out a turnip ("Turnip"), and does something completely impossible and beyond the strength of people - breaks the golden egg ("Hen"). Despite its small size, the role of the mouse in fairy tales turns out to be very significant.

In the animal world of fairy tales, there is a special type of hero - a rogue and a deceiver, of course this
Fox. This is a stable image in which cunning, a tendency to deception and tricks dominate. The fox will do anything to get what she wants - she will pretend to be weak and helpless, and use all her charm and eloquence.
In Russian fairy tales, this type is always contrasted with a simpleton character. It could be a wolf, whom the fox successfully fools, a rooster (“Cat, Rooster and Fox”), or a weak hare, whom she drives out of her hut (“The Fox and the Hare”). The fox is often punished for his misdeeds, especially when he attacks weak, helpless heroes. For example, the Fox in the fairy tale “The Fox with a Rock” runs away and hides in a hole.
In Russian fairy tales, positive animal characters are represented very widely. They always win thanks to their intelligence and resourcefulness.
Progress:
The basis is that all animals are prepared in the same way.1. Take a sheet of copier paper in A-4 format

2. Fold so that the top part is approximately 1 - 1.5 cm


3. Spread a thin strip with glue

4. Glue

5. Fold the workpiece like an accordion (into 4 parts)


The blank is ready, you can decorate it and start creating the image
DIY paper pig for children. Master class with photos
Pink paper blank

We cut out all the necessary details for decoration from colored paper.

Collecting eyes, Piglet

Ears


Glue the ears to the top

Eyes

For the nose, cut out a strip and roll it up


Glue it


Add legs to the bottom of the workpiece and, of course, don’t forget about the tail

Cut out cheeks and top from orange paper


Let's make a bouquet of daisies for him

The piglet is ready!
If you make two more, you can play the fairy tale "The Three Little Pigs"

DIY paper hare for children. Master class with photos
We make a toy blank from a white sheet.

We cut out all the necessary details for decoration from colored paper.

Glue it


On the top of the workpiece, carefully glue the ears and muzzle


Glue the paws and tail to the bottom of the workpiece


Making carrots for the bunny

Our bunny is ready!

Proverbs and sayings about the hare
There won't be anything faster than a hare, and even that one gets caught.
The hare's legs are worn.
As cowardly as a hare, as lascivious as a cat.
You can't catch a hare without a dog.
The hare is a coward - and he loves to hunt.
They follow the hare's trail to the bear.
The hare's feet feed.
It meanders like a hare.
The hare runs from the fox, the frog runs from the hare.
The hare is afraid of himself.
You can't lure a hare onto a drum.
The hare cannot escape the dog.
DIY paper fox for children. Master class with photos
We make a basic blank from an orange sheet.
Cut out all the necessary details for decoration from colored paper

Let's start assembly


Our fox is ready!
Proverbs about the fox
There is no animal more cunning than a fox.
Every fox praises its tail.
They care for a fox, they coax a cat.
They appointed a fox as a governor in the forest: there are many feathers, but no birds.
The fox will cover everything with its tail.
The old fox doesn't let himself be caught twice.
The fox lives better than the wolf.
If the fox had not arrived in time, the sheep would have eaten the wolf.
Every fox takes care of its own tail.
The forests sleep, and in their sleep they pluck chickens.
A fox went to steal chickens and got caught in his mouth.
A fox even has ears on the top of its head in a dream.
That's why they beat the fox so that it doesn't go to the chicken coop.
The fox is a cheat, the fox is a flatterer.
You can't teach an old fox tricks.
Where the fox passes, the chickens do not lay eggs.
Cunning like a fox, cowardly like a hare.
A fox leaf: it will fit in one ear and come out of the other.
The old fox digs with its snout and covers its tracks with its tail.
Lisa Patrikeevna has ears on top of her head.
You can already play with the fox. She knows how to open her mouth and talk.
The secret is that on the back there are two pockets where you need to insert your hand and control the toy


DIY paper cat for children. Master class with photos
Basic blank form made of yellow paper
Cut out all other details from colored paper

We decorate


We make a bow out of green paper, like the eyes of a cat

Glue on the bow and our cat is ready!


Proverbs and sayings about cats
The mouse and the cat are a beast.
A well-fed cat plays with a mouse.
The cat knows whose meat it ate.
At night all cats are gray.
Why is the cat smooth: he ate and turned on his side.
It's not all Maslenitsa - there will be Lent.
Cat - toys. Tears for the mouse.
The cat sleeps, and even catches mice in its sleep.
If a cat doesn’t catch mice, then what’s the point of a cat?
The cat is a fish hunter, but he is afraid of water.
You can't buy a pig in a poke.
A cat's paw is soft, and its claw is sharp.
The cat is on the stove, the dog is on the porch.
The cat is on the threshold, and the mouse is in the corner.
Don't pet a cat against its grain.
The cats are from the yard, and the mice are on the tables.
Many parents don’t know what to do with their children, but you can have fun together and you don’t have to invent something supernatural for this. Try inviting your child to make a paper zoo using the origami technique. The baby will certainly be delighted with this idea, and you will have a great time with your little one doing this activity. Well, we’ll show you how to make paper animals for such a zoo.
Origami for children
If you look at historical facts, then how to make a figurine out of paper using the origami technique was invented many centuries ago in Ancient China, where, by the way, the first type of paper was invented. For quite a long time, only nobles and people of “blue blood” were engaged in this activity, and the crafts themselves were used in ritual and religious rites. Over time, the art of origami fell to the lower classes of the population of the Middle Kingdom, and today it has become a popular hobby for many people. Now this technique has captivated not only adults, but also children of all ages.
What is needed to make a paper zoo? Necessary details
If you are going to make paper crafts for the zoo with the participation of children, then you definitely need to prepare the “equipment” that is necessary for the work.
1. Initially, you need to decide what the paper zoo will look like. Options you can consider:
- a lid from a large box in which you can make enclosures for animals;
- a large Whatman paper, which you can paint in different colors to make a territory for the zoo out of paper;
- a table on which to make fences from dominoes or other improvised means.
2. Paper. You can take any:
- colored, it is a priority, since there will be no need to paint ready-made animal figurines;
- plain;
- napkins;
- sheets from notebooks;
- A4 format for printing and photocopying.
3. Scissors. For children, they should be special, so as not to get hurt, with rounded edges.
4. Glue. If you plan to make not only paper animals, but also voluminous decorations for the territory, then you can’t do without it. A glue stick is best; it is less easily stained by children's hands.
5. You may need a stapler or a stationery knife, but only adults should work with them.
How to make an entertaining toy in the form of a zoo out of paper?
Initially, it is necessary to prepare the basis that will serve as the territory of the zoo, as we have already described above. Include your imagination in the process and try to make an original paper base for your future zoo. Discuss with your child who you will place there and only after preparing all the props, start working.
Agree, the option of entertaining children in this way is truly unusual. Crafts in the form of animals will be a joy for every little one, since the theme of animals is relevant for this age. Of course, a very small child will not be able to create such a masterpiece, but you can ask him to try folding paper for you or an older brother/sister. By the way, the problems of raising children of the same age are interestingly written in the article: This way you will involve all family members in the process.
How to make paper animals for the zoo with your children? Step-by-step master classes
Now let's get down to the most important part of creating a zoo, namely the question of how to make paper animals for a zoo using the origami technique. The master classes below will help you easily populate the territory of the zoo.
How to make a crane out of paper? Step-by-step master class

Take a square sheet; the dimensions of the future figurine depend on its size.
1.Fold it twice diagonally.
2.Then make bends in the shape of a plus.
3.Fold the workpiece along the folds, as in the photo.
4.Fold the upper side edges to the bend in the middle.
5. Wrap the top of them with a triangle, as in the photo.
6.Now straighten the top and flatten the bent parts lengthwise.
7.Do the same with the reverse side. It should look like this.
8. Turn the workpiece sideways and fold the edges again towards the central fold.

9.Fold the top corner and straighten it out. Perform the same actions on the reverse side.
10.Fold the corners for the neck and tail as in the photo.
11. Turn it sideways and press through all the bends.
12.Stretch out the tail and bend the beak.
13.Fold the wings.
14. The crane is ready.

You can populate it in a paper zoo.
Video master class on how to make an elephant from a square sheet
How to make a fox out of paper? Step-by-step master class
To make a fox you need to prepare an orange square sheet. The master class is shown using an example from a 15X15 sheet.

1.Fold the sheet twice diagonally to crease the folds.
2.Fold into a triangle, fold in the bottom edges as shown in the photo.
3. Turn the resulting square over and fold it in half.
4.Unfold the workpiece as in the photo.
5. Bend at an angle along the dotted line.
6.In one direction and the other.
7.Unfold the folded part as in the photo.
8. Bend the protruding triangle downwards, like a muzzle, and make ears along the edges.
9. You should get a fox like this.

All that remains is for her to spread her leaf-like legs for stability and make eyes.
Video master class on how to make a bunny from a square sheet
How to make a cow out of paper? Step-by-step master class
To make a cow, you need a 15X15 square sheet.
1.Fold it in half twice in a + shape and twice diagonally. You will get a sheet like this to work with.
2.Fold as in the photo.
3.To get such a blank.
4.Fold the top corner.

5.Unfold the resulting workpiece and carry out the actions as indicated in the photographs.

6. It should turn out like this.
7.Fold the workpiece in half. The result is the body of a cow.

Now we need to make the head.
1.To do this, take a piece of paper identical to the first one and fold it in half. Then fold the resulting halves to the center fold line.
2. Bend the workpiece again with the connection inward. Afterwards, bend the edge of the resulting rectangle as shown in the photo.
3.Flatten each part of the folded edge (see photo).
4. It should look like this.
5.Make a nose by bending the tip inward. Ears, folding the corners, as in the photo.
6.Bend your neck.
7.Fold the edges inward so that the cow’s neck is not too long.

Glue the body to the neck.

Color the resulting cow and you can place it in a paper zoo.

Video master class on how to make a mouse from a square sheet
Schemes for creating animals from sheets using the origami technique
And a few more options for patterns that will help you create pets from square sheets of paper.
Kitty.

Dog.

Bunny.

Bulldog.

Frog.

Turtle.

24 ideas in photographs on how to create a menagerie at home
Using available materials, you can create a magnificent menagerie at home. This craft will be an excellent toy for a child of any age. A fun pastime when making animals is guaranteed to all participants in the process, and you can find out what else you can do with your children from the articles:
- if you have a little princess: ;
- if you have a little boy:

