Star news


How to make quick release nail polish. How to make a polish that keeps your nails healthy? Interesting ideas for manicure with regular polish
To make a manicure with regular varnish at home, you need to master the correct technique for applying the material and familiarize yourself with some important life hacks that will help you create a neat manicure.
What you need for a home manicure
You can create a simple and beautiful manicure with regular varnish if you have a number of tools and materials:
- nail polish remover;
- brushes;
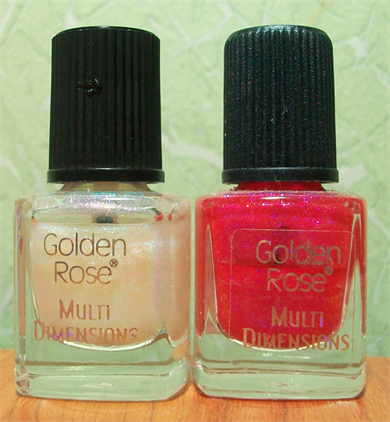
- one or more varnishes;
- greasy hand cream, oil or wax;
- cotton pads.
Every girl can create a beautiful manicure with her own hands; for this there is no need to resort to the services of salon specialists.
Preparatory stage
To do even the simplest manicure, you need to prepare your nails for painting:
Tip for beginners: apply a base first. This step is optional, but it helps to level the plate and prevent it from yellowing and preventing paint pigment from penetrating into it. Also, in order for the polish to always lie flat on the plate, it is necessary to moisten it regularly using wax, oils and special moisturizing nail pencils.
Step-by-step instruction
Before you begin the process of applying varnish, you should consider that the girl has 40 minutes of free time, eliminate or minimize distractions, and also think through the design. In addition, you need to check the shape of the brush; it should not be narrow and dense. Instructions for creating the perfect manicure:
- Apply wax or oil to the periungual area without touching the plate. This will help you subsequently easily remove excess material from the cuticle and rollers.
- It is recommended to apply a coat of base to facilitate subsequent application of colored varnish.

- Take a brush of colored varnish and wipe it on the edge of the bottle so that very little varnish remains on it, literally on the tip. This way it won't bleed onto the skin.

- We paint our nails with regular polish, starting with the little finger. You should place a drop in the center of the plate, then carefully “adjust” the varnish with a brush to the base.

- Then, with slow movements, holding the brush confidently, you need to apply the varnish to the side surfaces of the plate. Thus, the varnish does not flow onto the cuticle.

- You need to complete the manipulations with a brush at the end of the nail. Thanks to this, the varnish will last longer.

- Apply another coat of varnish to deepen the color.
- When performing movements, the elbow should rest on the table and the hand on which we are applying the varnish should also lie on the table; you should not apply the varnish while holding your hand suspended.
- Apply a quick-drying top coat. This item is optional, but it will extend the wear time of the coating and make the manicure perfectly glossy.

On the left is a top coat applied to the nail, on the right is a nail without a top coat.

Ready-made manicure with regular polish
What to do if varnish gets on the cuticle
It often happens that varnish gets on the cuticle and ruins the entire manicure, but don’t be upset, now we will show you how to fix such a manicure.

To do this we need a lint-free cloth, a flat brush and nail polish remover or acetone.
We wet the brush in nail polish remover and move it over the area where the nail polish needs to be removed. We wiped off the polish, wiped the brush on a napkin, soaked the brush in nail polish remover, repeated, and so on until it was clean.


Result of work: before the varnish flows and after
Tips to help you paint your nails perfectly
The following tips on how to paint your nails correctly and beautifully will help you achieve a flawless manicure:
- Before you start applying colored varnish, you can practice using transparent varnish. Daily coating of the plates with treatment bases will help you get used to proper brush work.
- To ensure a dense and beautiful coating, the varnish should be applied in two layers.
- If the coating is damaged during drying, you can smooth it out with a damp fingertip. It is necessary to smooth the coating carefully in a circular motion.
- It is better to apply “loose” varnish on a layer of white. Thanks to this, the coating will be more saturated.
- To ensure a perfectly even coating, the varnish should be applied to the base.
- To make a hole on the plate, you can use strips cut from regular tape.
- If you only have clear varnish left at home, you can make it colored by adding blush particles and two beads that will help the materials mix.
- PVA glue will help prevent the area around the plate from getting varnished; it should first be applied with a cotton swab to the rollers and skin at the base of the nail, without touching the plate itself. When the glue dries and the nails are already painted, the film must be removed.
- If the product does not dry for a long time, you can resort to using ice water and dipping your hands in it; the coating will dry much faster.
- To remove the polish from one nail and not ruin the manicure on other nails, take a cotton pad soaked in acetone, you can use the following life hack: you need to place the sponge in a glass jar, pour acetone into it and immerse one finger in it. Thus, the manicure on other nails will remain the same. The jar should be tightly closed.
- A thick layer of cream will help prevent streaks in the area around the plate after erasing the varnish.
- If you bring your nails painted with glossy varnish to a pan of boiling water, the coating will become matte.
Nail care after coloring
Caring for your nails after painting involves following several important rules:
- Wear rubber gloves when working with household chemicals.
- Apply moisturizer to your hands twice a day.
- In the cold season, wear gloves made from natural materials.
- Renew your manicure at the first sign of chipping.
Interesting ideas for manicure with regular polish
Newspaper manicure
 When performing such a manicure, first you need to apply a transparent varnish to the plates, then white, after which you can also distribute holographic varnish, it will add shine to the nails. When the layers have dried, apply small newspaper clippings soaked in alcohol (10 seconds) to the nail. The paper must be pressed tightly, and then apply a transparent varnish or topcoat to the nail.
Lace manicure
 For this you will need an orange stick, a brush, nail polish remover and varnishes. Apply two layers of the product to the plates and wait 7-10 minutes. Then use an orange stick to create drawings; this is especially easy to do with glitter. You need to draw designs on glossy varnish with a regular brush dipped in nail polish remover and an orange stick. Then the nails are covered with top. This way you get a beautiful nail design with regular polish.
Manicure with a pattern
 For it you will need a thin needle and varnishes of different colors.
The first option: you need to apply three red vertical stripes on a layer of white varnish, after which you need to make a pattern with a needle using gentle movements, moving it from one side roller to the other, gradually moving towards the free edge of the nail.
Second option: on a nail covered with dark varnish, you need to apply three white drops so that they are located on the same line, then draw a needle along this line from the edge of the plate to the base.
Third option: place a few drops of pink on a white polish, and a smaller drop of white on them, then use a needle to connect the circles in a chaotic manner.
Volume manicure
 Manicure for short nails can be voluminous. After waiting for the varnish layer to dry completely, you can begin creating a knitted manicure. It is necessary to mix white varnish and the one that was already used to cover the plate, and use a brush to create a pattern as in the image.
Manicure with dots
 To create an unusual manicure you will need a toothpick and two polishes. After waiting for the layer of one varnish to dry, you should use a toothpick to create several dots on the nail, moving from the free edge of the nail to the base, there should be fewer and fewer of them.
Ombre
 To create it you will need a sponge and three varnishes. You need to apply white varnish to the plate, and a strip of white, blue, for example, and blue to the sponge. Then you should cover the area around the nail with PVA glue. Then, using patting movements, transfer the material from the sponge to the nail, cover it with topcoat and remove the glue film.
Thus, to create the perfect manicure at home, you will need a little time and skill.
It’s easier to buy a ready-made varnish, but if you need a varnish of a rare shade, or want to use a varnish that does not contain chemical impurities and will make your nails healthier, then you need to try making it yourself. The article contains tips on how to make nail polish, how to avoid common mistakes when making nail polish and achieve the best result.

Where to begin?
You need to prepare in advance:
- Clear nail polish;
- Dyes - eye shadow, ink, leftover colored varnishes, maybe blush;
- A paper funnel for pouring dye into a bottle of varnish;
- A toothpick for mixing, you can use a match, but a toothpick is more reliable;
- A sharp object for scraping shadows;
- Napkin for cleanliness on the table.
Advice! All procedures with varnish must be done in the absence of children, because some of the items and substances listed above should not fall into their hands.
Varnish making process
We pour a little liquid out of the bottle with clear varnish to make room for the dye. If you have chosen eye shadow, then scrape it onto the paper with a sharp object. Pour into a funnel and carefully pour bottles of clear varnish into the neck. We help with a toothpick or a knitting needle so that the shadows do not get stuck in the hole of the funnel.
Then mix with a toothpick, or better yet, shake with your own hands, pat, roll between your palms until the shadows are evenly dissolved.
If you like the shade of the varnish, you can use it. If desired, you can make the color darker by adding a little more shadow.


Fast and economical
At home, you can make a matte manicure or polish. The manicure becomes matte if you hold your nails over a saucepan of boiling water without waiting for the polish to dry. The steam from it will make your manicure matte. A manicure made from water is quick, simple and economical.
To make the varnish matte, you need to add corn or potato starch. The quality of matte varnish will be higher if starch is added to the one varnish. Now you can do your favorite manicure whenever you need it, because varnish with starch can be stored and used more than once.


The varnish can be made matte using powder. Add it to a bottle of varnish, stir and use.

Video on how to turn a glossy manicure into a matte one.
"Neon" manicure
A homemade way to make a glowing manicure. You need to take acrylic fluorescent paint and paint your nails over clear or white polish. If the varnish is colored, then the acrylic paint should be the same color. A clear varnish can be applied over the top for protection.
You can use gel pens with the same effect.


Manicure with glitter
Some fashionistas love manicures with glitter. The varnish for this manicure is easy to make at home. The glitter is poured into a bottle of polish, shaken and applied to the nails. It can be even simpler: sprinkle glitter on fresh polish or just on the tips of your nails. The manicure becomes colorful and shiny.
Attention! The glitter gradually sinks to the bottom, each time before applying the varnish, you need to shake it well.


New varnish from two old ones
Pour the varnish from two bottles into one and mix. To make the old varnish liquid, add acetone. The color of the “new” varnish may surprise you. The colors will mix and be brighter or darker, or a different color altogether. To make it lighter, you can’t do without clear varnish.
By adding varnish or paint, you can achieve a transition from dark to light, or vice versa. This varnish is used for gradient manicure. Make a manicure pink, turning into dark pink or cherry. The transition from paint to paint should be blurred and smooth. The photo shows examples of gradient manicure.


Advice! A gradient manicure is difficult to do at home, so you can practice with old polishes. It won't be a shame to wash them and start again until you get the hang of it.
Watch a video on how to make varnish yourself. It will be clearer if you can not only read, but also watch this process.
Making your own varnish is simple, quick and economical. And most importantly, you can always achieve the desired shade and perform any manicure.
We've collected 30 tricks and tips for girls who love to take care of their nails on their own. How to dry your manicure quickly? How to make varnish? How to carefully draw a French jacket? About this and more - in our article.
1. Wash off the varnish carefully
To prevent the skin around your nails from looking like you killed someone or were poking around somewhere after removing red or other bright polish, apply a rich cream to your hands before the procedure.
2. Remove any remaining varnish from the skin

If you did not use the previous advice and the skin around your nails is stained, tape will help remove stains. Adhesive tape is great for collecting polish residue, especially silver.
3. We erase the varnish quickly

In the manicure departments of cosmetic stores they sell various products for quickly removing nail polish. They are bubbles with a sponge soaked in cleaning liquids. You don't need to run the cotton wool over your nails: just dip your nail into the bottle and wait a little.
You can make this product yourself. Take a small glass jar, place a sponge cut to size in it and soak it in nail polish remover. The principle of operation is the same.
4. Remove glitter polish

Soak cotton pads in nail polish remover, apply them to your nails, and wrap each finger in foil. After 10 minutes, the polish will come off easily, despite the glitter.
5. Whiten your nails

Sometimes colored polish is absorbed into the nail plate, leaving behind an unsightly yellow discoloration. You can get rid of it with whitening toothpaste. Take an old brush and brush your nails with it.
But to prevent such incidents from happening at all, do not forget to use a base coat before applying the main varnish.
6. Saving a broken nail
You will need a tea bag and clear nail polish. Apply the latter to the damaged nail, and then place a patch cut from a tea bag over the crack. Re-coat the nail with clear polish.
7. We store varnishes conveniently

If you store your polishes in an opaque box, label the caps with the appropriate shades. This way you don't have to take out all the vials to find what you need.
8. We make our own varnishes
If you have few varnishes or cannot find the desired shade in the store, you can make what you want yourself. You will need clear varnish and mineral shadows. They dissolve perfectly in varnish, and you can adjust the color saturation.
You can also add various glitters to your homemade varnish.
9. Open a bottle of nail polish easily

If the varnish cap is glossy, tightly screwed and does not give way, rubber bands will help to cope with the problem. By wrapping them around the lid, you will get the desired grip and easily open the varnish.
10. Extending the life of manicure

If you want the varnish to last longer, before applying it and applying the base, the nail plate must be thoroughly degreased. To do this, wipe your nails with a cotton swab dipped in white wine vinegar.
11. Paint your nails correctly

12. Create an even coating

One thick layer will never lie as smoothly and neatly as several thin layers. Just be patient: let each layer dry.
13. Making a matte finish

Matte varnishes have been very popular lately. But if you don't have one, then just mix light loose powder with a clear polish. In this case, you should mix as shown in tip No. 8.
14. Making the polish brighter

Many girls know that if you apply shadows to the base, they go on more evenly and the color turns out more saturated. It's the same with varnishes.
If your colored nail polish looks faded, use a white matte polish as a base. You will get a bright manicure and will be able to avoid multi-layer application.
15. Apply glitter correctly
This video shows how to apply polish with large glitter so that it adheres well to the nail and does not bulge.
16. Protect your skin

Applying stamping or gradient to your nails can seriously stain the skin around you. We have already written that in this case, a special latex varnish will save you. But if you don’t have one, use PVA glue: it also forms an easily removable film.
17. Eliminate defects in manicure

Painting your nails without staining the skin around them, especially on your right hand, is quite difficult. But it doesn't matter if this happened.
Take a thin brush, soak it in nail polish remover and erase the blemishes. Unlike a cotton swab, the brush does not cling to the polish and does not leave lint.
18. Draw patterns on your nails

If your eyeliner has dried out or simply doesn't suit you, don't rush to throw it away. Her excellent elastic brush - as a rule, this is exactly what is there - can be used in nail design to draw fine lines.
Some girls even use ordinary stationery markers for nail art.
19. Create an animal print on your nails

If you cut the eraser on a pencil like this, you get a homemade stamp: dip it in black polish and make leopard print designs on your nails.
20. Making blanks for nail art
Apply silver polish to the clear backing and let it dry. From the resulting film you can cut blanks for nail design.
21. Making sliders for design
The principle is the same as in the previous case. Only here you need to make a film of transparent varnish and apply drawings on it. For example, using dots.
22. Replace dots

A dot is a stick with a tip in the form of a metal ball. With it you can create various designs on your nails.
If you don't have a dots, use available tools. For example, safety pins, toothpicks, empty ballpoint pens, and so on.
23. Doing a French manicure
French manicure looks feminine and suits almost any occasion and outfit. But not everyone can draw a smile line for a French jacket. The video shows several ways to do this carefully.
In addition, you can highlight the tips of your nails using a regular rubber band.

Just pull it around your finger and apply white polish. This is a budget alternative to special vinyl stencils.
24. Masking the unevenness of the jacket

If, despite all the tricks, you cannot get even stripes, you can use a trick. Draw a line under the white part with glitter varnish. Glitter will hide flaws, and you will get an original design.
25. Making stencils from electrical tape
This irreplaceable item in the household can also be used in nail art. For example, for the same drawing of a French jacket.
Insulating tape also makes excellent stencils, which, unlike adhesive tape, do not stick tightly and do not peel off dried varnish.
26. Dry your nails quickly

If you don't have a special drying product and you're in a hurry, soak your fingers in cold water for a few minutes. This way the varnish will set much faster.
27. Protect wet varnish

To protect freshly painted nails from small lint and dust, add a drop of cuticle oil on top.
28. Saving a manicure

If you have smeared the manicure you just did, do not rush to wash everything off. Just wet your finger with water and gently rub the damaged area. The varnish has not yet hardened and will easily return to the desired position.
29. Shake the varnish correctly

What do you do before opening a bottle of nail polish? Do you shake it well to make it less chewy? Great! Just do it right: place the bottle between your palms and roll it around.
If you shake and turn the varnish over, it may bubble up when applied.
30. Saving thickened varnish

Has your favorite polish started to thicken and doesn’t fit well on your nails? Place it in the refrigerator for 10-15 minutes and then shake well.
If you are not satisfied with the shade of varnish you have, add ink of any color to it.
Nancy Wave live/youtube.com
They can be specially purchased at a stationery store, but ink from a gel or regular ballpoint pen will also work. The main thing is not to overdo it and be careful.
2. Matte varnish
Using starch
Cornstarch can not only transform an ordinary glossy varnish into an elegant matte finish, but also make it lighter. Mix 4-5 drops of varnish with a small amount of starch. Apply this mixture on your nails. After drying, the varnish will become matte.
Using powder or matte eyeshadow
You can make the polish matte by adding loose powder or matte eyeshadow to the bottle. To make sure you don’t spill anything, roll up a small funnel out of paper. Along with powder or eye shadow, add a couple of small steel balls to the bottle to better mix the contents.
Mix light loose powder with clear polish to create a white matte polish.
3. Sparkling or pearlescent varnish
If you want it, add glitter to the polish or sprinkle it on your nails that are not yet dry. To add originality to your manicure, sprinkle glitter only on the tips of your nails.
 thegluegungirl.blogspot.ru
 You can achieve a pearlescent effect on your nails using ordinary eye shadow. Grind the shadows first. Crush them in any container with a hard object and turn them into powder. This will ensure an even coating. Then carefully add directly to the polish.
 3.bp.blogspot.com
 To get the exact color of the eyeshadow, mix it with a clear polish. If you apply the same shadow on your eyelids, you will get the perfect color combination.
 herbsofgrace.com
 If you hate to crush the shadows, apply them with an applicator to slightly damp nails. The same can be done with loose mineral shadows. Then simply blow off the excess and cover your nails with sealer or clear polish.
 www.thebeautycontext.com
 4. New varnish from several old ones
Choose two or more matching polishes and pour them into one bottle, adding a little nail polish remover if necessary. You can also place one bottle on top of another and go about your business while the contents flow. Shake the resulting mixture thoroughly. The new varnish is ready.
 wikihow.com
 By the way, if you gradually darken the resulting mixture, you can get an ombre effect - smooth transitions of colors into each other.
5. Glowing polish
Using acrylic paint
If you mix polish and fluorescent acrylic paint, your nails will glow in the dark. Fluorescent ink from gel pens is also suitable for this purpose. All this can be found in art stores and in regular stationery stores.
 picmia.com
 A clear varnish base gives the best shine. If desired, it can be applied over colored varnish. With white varnish, also feel free to use fluorescent paint of any color.
Using glow sticks
For this method you will need a half-empty bottle of nail polish and one glow-in-the-dark stick. If you are using colored polish, make sure the shade matches the color of the stick.
Knead the glow stick well, especially if it is in the form of a thin bracelet or necklace. Using sharp scissors, cut one end of the stick. Dip the cut tip into the bottle and carefully squeeze out the glowing liquid. Cap the full bottle and shake well. After this, apply nail polish.
 wikihow.com
 Remember that when using sticks, the glow effect will only last a few hours. Don't forget to seal your masterpiece with clear varnish to make it last longer.

