Star news


Photo frames from scrap materials. DIY photo frames from scrap materials: cozy decor
Each thing in the house, made independently, brings a special mood and flavor to the design of the rooms.
Therefore, if you want to create a unique interior, do not be lazy and create original masterpieces to decorate your home.
This kind of thing includes do-it-yourself photo frames, which today can be made from the simplest materials.
Someone will say, why make frames with your own hands if you can buy almost the same thing in a store.
We, of course, cannot disagree with you, but we still remind you that by making cute crafts for the home with the whole family, you put a special aura into them, which will always emit positivity and wonderful memories.
The Ideal Style team will offer you amazing ideas on what kind of frames you can make for photos with your own hands, surprising you with unexpected solutions.
The presented photo frames will not only enrich your interior, but will also preserve the most valuable thing - the memories associated with a particular photograph.
After reading our review, you will see 50 examples of photo frames, representing different ways to design this item.
Original and unusual do-it-yourself photo frames 2019-2020: ideas, design, current decor trends
In order to make frames with your own hands, you will need a base, auxiliary materials in the form of tools, glue, etc., and of course, materials with which you will decorate the photo frames.
Human imagination is limitless, which gives us the greatest opportunities in any business.
When making photo frames with your own hands, you can use cardboard, colored paper, fabric, vinyl records, matches, ceiling plinths, tree branches and dried plants, window frames and much more.
It all depends on your idea and desire to create a unique thing for a unique interior.
Let's take a closer look at the great ideas on how to decorate your own photo frames, and which DIY frames will successfully complement your captured memories.
DIY frames: photo frames made from shells - ideas and finishing options
 For many, going to the sea is a dream that may never come true. Some people, on the contrary, go on vacation to the sea every year, bringing amazing shells of different shapes, sizes, and types from the resort.
If you don’t have shells collected from the sea, but you really like this decor, you can easily purchase shells at a decor store, creating wonderful frames with your own hands from shells in different interpretations.
In order to make frames with your own hands from shells, you will need a base (cardboard, wood, plastic) and shells.
You can also make frames with your own hands, using not only shells, but also other decor that harmoniously combines with seafood, for example, rope, pebbles, twigs, etc.
It is noteworthy that the more chaotically you lay out and stick the shells, decorating the frames with your own hands, the more interesting your product will be.
Making a DIY photo frame with embroidery or beads
 Truly masterpiece examples include do-it-yourself frames decorated with hand embroidery or beads.
Beautiful photo frames of this type can be made using special stencils, which determine what kind of thread or bead embroidery will decorate your creative frame.
DIY frames with embroidery can be bright and multi-colored, or they can be made in a single color, laconically complementing the shades of your interior palette.
You can improve embroidered photo frames with your own hands by adding buttons, old jewelry, pearls, etc. to the craft.
If you choose beads for decoration, you can not only embroider with them, but also stick them in the shape of a photo frame.
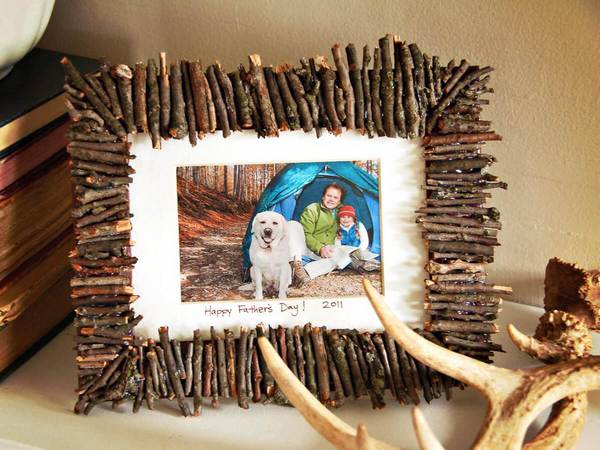
Original do-it-yourself frames made of wood, twigs, dried flowers
 Each interior has its own characteristics, so DIY frames can be completely different, and sometimes very unexpected.
Wood products are one of the elements of many types of interior, so if you make frames with your own hands from rough and uneven pieces of wood, old boards, dry branches, tied together with a thick rope, or carefully glued and varnished, you will get something incredibly interesting .
Also, a do-it-yourself frame for a frame is often made from vine branches using a special weaving technique.
DIY frames look no less creative when dried branches are glued to the base of the photo frame in combination with pebbles, ropes, burlap, etc.
DIY frames look tender and sensual when you glue dried flowers or leaves onto the finished base.
Beautiful do-it-yourself frames made of fabric, thread, burlap
 We have already named many interesting ways to decorate a frame with your own hands. But that, of course, is not all.
The next unique ideas for decorating your interior will be DIY photo frames made using different pieces of fabric, burlap, coarse threads, and yarn.
Our collection shows do-it-yourself photo frames made of denim, photo frames made of fabric flowers, exclusive do-it-yourself frames made of several types of fabric.
Of course, to make such a frame you will need a little patience and time, but the result is worth it.
Also, do-it-yourself frames made of thread, burlap and other types of fabric can be supplemented with pebbles, twigs, shells, and unexpected objects found somewhere in a box of trinkets.
Super fashionable DIY frames using decoupage, quilling, origami techniques
 Using colored paper and paints, ribbons, etc., you can create truly unique frames with your own hands that will remain relevant after a long time.
These include photo frames made using the decoupage technique, which involves painting the surface of the frame in a certain style.
Using the decoupage technique, you can create frames with your own hands in a vintage style, draw flowers and pictures on the frame, and cover the frame with special decoupage paper.
Frames made in the style of origami and quilling are not far behind in originality. Both techniques involve the creation of certain details from paper, with which photo frames will be decorated, or rather pasted over.
Cute curls, delicate flowers and leaves, strict figures and unusual shapes - these are exactly the kind of frames you will get with your own hands by using these techniques.
Unusual DIY frames made from coffee, cereals, pasta
 When you need to create cool frames with your own hands for a gift to a friend, but you don’t have any special materials in the house, pay attention to coffee, cereals, pasta, which incredibly interestingly transform from cooking products into material for a photo frame.
In our review you will see beautiful DIY coffee frames. See how unusually you can arrange coffee beans and what you can combine them with.
Play with buckwheat, peas, pasta, rice, etc. You can create unique frames with your own hands.
In addition, these materials can also be combined with other types of finishes. Let us note that pasta, due to its variety of shapes, is a godsend for those who want to surprise everyone with their product.
How to make frames with your own hands: extraordinary photo frame ideas
 You can only create something unique if you approach this process in the same way.
You can make your own photo frames unconventional if you cover the base with keys from a calculator or an old keyboard, take colorful pencils for decoration, and use parts of an uncorrected watch mechanism as material.
Professionals also suggest gluing multi-colored skeins of thread, old newspaper, corks from wine bottles, buttons and old keys onto the base for the frame, or creating frames with your own hands in completely unusual shapes.
But that is not all. How do you like DIY frames made from jewelry? As they say - expensive and angry.
50 DIY photo frame ideas
As you can see, each idea is unique. If you bring at least a few ideas to life, you may end up with a unique collage that will decorate and transform your room with pleasant memories.
Dare, because everything impossible is possible!


In times of digital technology, the value of paper image media has dropped significantly. But in vain, photography is primarily a memory from the past. People are accustomed to keeping things dear to their hearts close to them. But storing photos in digital media is not always convenient, and the presence of an attractive frame with a favorite image on the table automatically attracts the eye and, accordingly, brings back pleasant memories. You can make a photo frame with your own hands from available materials, using natural materials for decoration.
You can make a photo frame with your own hands using available materials
You will need:
- 2 sheets of thick paper measuring 30 by 35 cm;
- Old glossy magazine;
- PVA glue, a piece of cardboard;
- Multi-colored threads, colorless nail polish;
- Stationery knife.

This photo frame will be quite affordable.
How to do:
- Stepping back from the edges of the sheet, measure 5 cm. Draw lines along the marked points. Cut the resulting rectangle from the middle of the paper sheet. The result is the base of a photo frame.
- Roll one magazine page tightly into a tube and secure the edges with glue.
- Wrap thread around the curled page, securing the ends of the threads at the bottom.
- Make several of these tubes.
- Glue each piece to the base starting from the inner corners of the product. To give the effect of a volumetric bend, bend the tube at the corners.
- Glue three sides of the second sheet of paper to the inside of the frame. The fourth side is necessary for placing photographs into the product.
- We form the frame leg from a piece of cardboard.
After drying, the craft can be carefully and easily coated with varnish.
Cool DIY photo frame in 5 minutes (video)
How to make a beautiful photo frame from cardboard
Necessary:
- Colored cardboard, colored paper;
- Stationery knife;
- Colored pencils, stickers.

A cardboard photo frame can be very simple
How to do:
- Cut out a rectangle of the given parameter with a stationery knife.
- Mark the dimensions of the photograph on the wrong side of the figure, deviate 1 cm from the markings, and place measurement points for the window. Cut out the inner rectangle.
- We cut out the inner side of the product from less dense paper.
- Glue both sides of the frame, leaving one side for inserting a photo.
- Draw the desired pattern with pencils and decorate with stickers. The edges of the photo frame can be decorated with golden chocolate wrapper.
We make the frame's stand from cardboard. Cut a thin rectangle, fold it in half, and glue it to the craft with the base.
Original design for a photo frame: master class
A very delicate and beautiful frame is obtained when decorated with artificial flowers, wallpaper, pieces of lace or braid.
Necessary:
- Wooden or plywood frame - base;
- Scissors, glue;
- Pieces of wallpaper, golden braid, lace, beads.
The photo frame can even be decorated with broken branches
How to do:
- Artificial lilac branches or other flowers with small fluffy flowers are ideal for crafts. Arrange each flower into inflorescences.
- Cover the base with wallpaper and let it dry completely.
- Place one inflorescence on a drop of glue from the top corner, bend the petal up a little and glue the second one next to it. Thus, fill the entire upper corner of the frame with flowers.
- We decorate the lower opposite edge with lace, gluing it with glue.
- We glue golden braid along the edges of the inner frame.
- Place the beads on the glue like flower cores. Glue beads of the appropriate tone to the lace ornament.
- Glue a piece of starched lace along the top of the flower corner of the craft.
How to decorate a regular photo frame
Photo frame design options:
- Worn discs. Since the material contains sharp corners when broken, it is more advisable to wrap the discs in an unnecessary towel. Break it with a hammer. Place small pieces in an interesting mosaic on the frame using glue. After drying, apply black acrylic paint under gloss to the spaces between the fragments.
- Wallpaper. Pieces of wallpaper remaining after renovation are very suitable for decorating crafts, especially if they have pictures. Cut out a wallpaper pattern or flower and glue it to the corner of the frame.
- Old buttons. Collect all unpaired buttons. Decorate the product with them, gluing them with glue from the outer corners.
- Sea pebbles and shells. They look great when paired with starfish decor made from salt dough, rope threads and a figurine of a sea anchor. Such a frame with a joint photo is a wonderful gift for a loved one.
- Satin ribbons. When gluing the ribbon as a decorative element, decorate it with the remnants of lace.
- Puzzles. Pieces of the picture, laid out randomly around the frame, will be an amazing addition to a child’s photograph. For variety, add toy figures cut out of paper to your decor.
- Decorate the frame in the New Year style with Christmas tree tinsel and shards of balls.
- Paints. To paint frame parts, it is better to use gouache or acrylic paint.
- Pieces of fabric. Here you can come up with both finishing each detail of the frame with a fabric base, and weaving decorative elements from fabric strips.
- Quilling and beads. Paper swirls will make the photo frame very interesting. And beads and beads give the decoration a fabulous look.
- Colored threads. They harmonize well as decoration when creating frames from magazine pages. Tie each page with thread and glue it to the base of the product.

The photo frame can be decorated however you like
If desired, crafts can be decorated with decorative small flowers, knitting threads, pieces of wool, dry herbarium, colored pasta or seeds.
What can you use to make a photo frame with your own hands?
If you plan to hang a framed photograph on the wall, it is better to use lightweight material for production - ceiling plinth, cardboard, paper.
- A very simple frame layout can be made from ceiling plinth. The smooth surface of the material will ensure that you do not make a mistake in size. Use a ruler to carefully measure the required measurements and cut with a utility knife. Further, according to inspiration, the product can be decorated with paints or decorated with natural materials: shells, branches and leaves of a tree. After the glued decor has completely dried, carefully cover the craft with colorless wood varnish.
- Wooden frames are more durable in construction. For the craft, take two identical strips in size. Knock down with nails or glue in the form of a rectangle, open with varnish.
- A photo frame made of cardboard and yarn is a very easy craft to make. Fold cardboard or thick paper into a rectangle or other geometric shape in several layers. Carefully spreading PVA glue, we sequentially glue the frame with multi-colored yarn and buttons.
- A frame from a glossy magazine looks unusual. Roll each page of the magazine into a tube and glue it into a geometric shape.
You can involve your child in creating a frame from dough. An exciting activity will amuse the little fidget, and the product will turn out to be unusual.
- Mix flour, non-iodized salt and water. We take salt in half the portion of flour, and half as much water as salt.
- After kneading the dough, let it rest, then mold the craft. Keep the finished frame in the oven at 80 degrees until completely dry on both sides.
- The ornament for such a product can be molded together with the frame.
After drying, paint the craft with gouache and open it with colorless nail polish.
DIY cardboard photo frame (video)
The thirst to create creative creations transcends age. Get involved in interesting paper crafts with the whole family, it will unite. Joint creativity will unite loved ones, creating a magical atmosphere of celebration and fun in the house. This type of needlework is most relevant on a limited budget. Using available materials, decorating your home is simple and easy. Even if such a craft becomes unusable, replacing it with a new, more advanced one will not be difficult.
Many needlewomen are interested in: how to make a photo frame from scrap materials? After all, this is a very necessary thing, but store frames made of plastic look exactly the same. Therefore, it will be very interesting and useful to learn how to make these things with your own hands, our today’s MK for beginners will help you with this.


DIY photo frames made from eggshells
These stylish items can be made from any old and unnecessary items. You just need to use your imagination and don’t be afraid to create.
The base for a photo frame is usually made of cardboard. In addition, you can use blanks sold in the store for this purpose.
How to decorate a cardboard base? Here you can only be limited by your imagination. We invite you to pay attention to the master class of an original product decorated with eggshells.

1) Cut out a cardboard base for a frame 4 cm wide. The inner perimeter of the frame should correspond to the size of the photo.


2) Make a stand for the photo frame. Cut out such a figure from cardboard.

3) From the rectangular uncut side, measure a two-centimeter strip and bend it.
4) Cut out a rectangle for the back wall of the frame. Let's glue the parts together.

5) Glue the leg. To do this, spread a bent two-centimeter strip with glue and glue it to the middle of the back wall of the frame.


6) We begin registration. Let's cover the frame with blue acrylic paint.


7) Boil 5 eggs, peel the shells from them in large blocks. Paint it in different shades of blue paint.

8) When the paint is dry, grind the shells.

9) Now cover the frame with eggshells in a random order, but tightly together.


10) What a successful decor it turned out to be.

Instead of eggshells, you can use broken seashells or another type of decoration.
Simple paper frame
You can very simply make a photo frame out of paper, but it must be beautiful and embossed, for example from wallpaper.

You will need:
- wallpaper;
- cardboard;
- glue;
- ruler;
- a simple pencil;
- scissors;
- breadboard knife;
- stapler

Sequencing:
1) Draw two rectangles on the back of the wallpaper. The inner perimeter should be equal to the size of the photo. The width between the inner and outer perimeter should be 3 cm.

2) Draw diagonal lines in the central rectangle and mark 1.5 cm from them.


3) Draw another inner rectangle through these points.

4) Cut the inner rectangle along diagonal lines using a breadboard knife.

5) Bend the corners inward.


6) Fold down the side of the outer rectangle.

7) Fold the outer three-centimeter strip in half.

8) There are small squares in each corner. We cut one fold.


9) Fold the frame into a box.


10) We cut it with a stapler.

11) Cut out a rectangle from cardboard and glue it to the frame. This is the back wall.


Making such a frame is easy and will be very interesting for children.
Comfort and coziness
Personally made household items are a kind of amulet, a symbol of comfort and prosperity. Because things into which a person has invested his labor and love have very strong positive energy.
Handmade gifts are especially valued all over the world. They will definitely bring peace and warmth to the homes of your friends, loved ones and relatives. Your boyfriend will certainly be delighted with your photo together in an original frame. And children will be simply delighted to receive a color photo in a bright frame as a gift.
Let's look at very simple and quick ways to make frames.
DIY photo frames from toilet paper rolls
Make a three-dimensional base and cover it with details at your discretion.


Cut the rolls into rings with a diameter of 1.5 - 2 cm, bend them into a petal. Glue the petals together with good glue, paint them in a suitable color and the frame is ready!


Cut all the same rolls, connect them together, cover them with sequins or rhinestones and the royal frame is ready!


Making frames using the appliqué method
Here you can literally use all the materials that you can get your hands on: beads, coins, shells, coffee beans, etc. It is better to glue the parts with a hot glue gun.
Many of us keep valuable photographs or memorable drawings in our home. Sometimes you want to give them more uniqueness, put them in some kind of frame. Alternatively, you can go and buy a frame to suit every taste, but if you want to add some zest to your creation, you can do it yourself. Naturally, you can use paper that is lying around the house as a basis, but a do-it-yourself paper frame will be much more effective if you use plain thick sheets. It doesn’t matter what exactly needs to be placed in the frame – a photograph or a child’s drawing. The main thing is to find out how to do it. You can use plain paper, cardboard, or complicate it and make an origami frame. All effective options with step-by-step photos and diagrams are collected in this article.
Option without glue
Even the simplest photo frames are often made using glue. However, there is a very easy framing technology without using a large pile of unnecessary materials. Let's put it this way - a frame according to a template.
To work on a homemade frame you will need:
- photo paper (thick, multi-colored);
- scissors;
- ruler;
- butter knife;
- as well as your photos that you want to frame.
So, first we need to print the provided template on colored paper.
A ready-made frame diagram will help save a lot of time. After which, step by step, without much effort, we will put everything together into one whole. Place a sheet of paper with the template printed on it in front of you. Cut the original along the outer solid lines. Place the template for the homemade frame in front of you so that the image in front of you is printed side up.

Now fold the remaining lines using a ruler and knife. Fold the paper inward along the folded marks. Of course, you can use glue here if you can't hold the sides of the frame while folding.

Next, in the same way as the short sides, fold the long sides of the template. The folded longer side of the homemade frame should now be inserted into the holes on the shorter side. Then all this needs to be repeated on the other side, and then everything looks like this:


Framing for children's drawings
Those who have small children in their families understand what it means to have walls painted with multi-colored crayons, pencils or paints. To avoid constant incidents with this kind of children's activities, as well as to save yourself from washing out walls and furniture, you can create a special frame for the child. The fact is that this will serve as a separate, let’s say, creative corner for the baby, especially since such a picture frame can be hung anywhere.
The frame will not need to be constantly removed to replace the children's painting, thereby reducing the risk of damaging the walls or wallpaper on them.

In order to create such a frame, you will need:
- a sheet of thick paper or cardboard;
- a sheet of plain paper in A4 or A3 format (depending on the desired frame size);
- ruler;
- stationery knife;
- flat screwdriver;
- pencil;
- single hole punch;
- some hard thing, a round template.

The main material will be a thick sheet or cardboard, larger in size than the sheet, on which there will be a children's drawing 25 mm on each side. Next you need to make a marking by drawing a vertical and horizontal line exactly in half. Then place a sheet of plain paper on top and make marks at the intersection of the lines.


Now you need to make the serifs with a compass, but in this case a plastic egg cup is used, since this kind of template has the right diameter. In any case, if there are children in the house, then there will probably be some kind of lid, plate or something else round in shape. Serifs will need to be made on four sides. Then step back a little from the border of the sheet marked with a pencil and push in that place with a screwdriver.


Next, you need to cut through the marked drawing with a compass on four sides. Then squeeze out the cut parts in the opposite direction. There is very little left, you need to take a hole punch and make holes for a needle so that you can hang or fix the drawing on the wall.


The frame can be left in this state, or you can decorate it with some kind of decor if desired. Such a frame can be hung with a needle or attached with buttons, horizontally or vertically, as you wish. In any case, if you hang it once, you will only have to remove your baby’s drawn drawings.

More complex technique
To complicate the work process, you can make an origami frame. This type of framing will take more time. For this craft you need two sheets of square paper. One sheet will serve as the base, and the other as decoration. It is advisable to use multi-colored paper. So, you need to cut one sheet into four equal parts, and fold the other according to the diagram:


We can go back to the small squares. From them it is necessary to form four identical parts, which will serve as decoration for the frame. Then connect the parts with the main part of the origami to create an octagonal frame.


The result will be an interesting origami frame for photos or children's drawings.

Video on the topic of the article

