Star news


DIY Christmas tree decorations at home. DIY Christmas tree decorations
Decorating a Christmas tree depends entirely on your imagination: you can make a simple New Year's tree decoration with your own hands at home, or you can make a real masterpiece, which will take a lot of time and patience. Perhaps these photos of the most beautiful DIY Christmas tree decorations will give you some inspiration:

New Year's toy "Bunny"

New Year's toys made from pine cones

Wooden Christmas toy
Materials for Christmas tree toys
Large and small original DIY Christmas tree decorations made from scrap materials can be very different:
- – Felt is most often used: easy to work, pleasant material of various colors. Toys made from it are usually not complicated and simple models can be made by younger children. Of course, complex designs require certain skills, effort, and accuracy;
- – origami Christmas tree decorations are very diverse, and they usually do not require a needle or special equipment: only patience, manual dexterity and sometimes a little glue;
- clay or plaster figurines they look very interesting on the Christmas tree, they can be creatively colored and come up with different images and shapes;
- toys and beads look not only original, but also elegant and noble - almost weightless, they do not weigh down the branches of the Christmas tree at all;
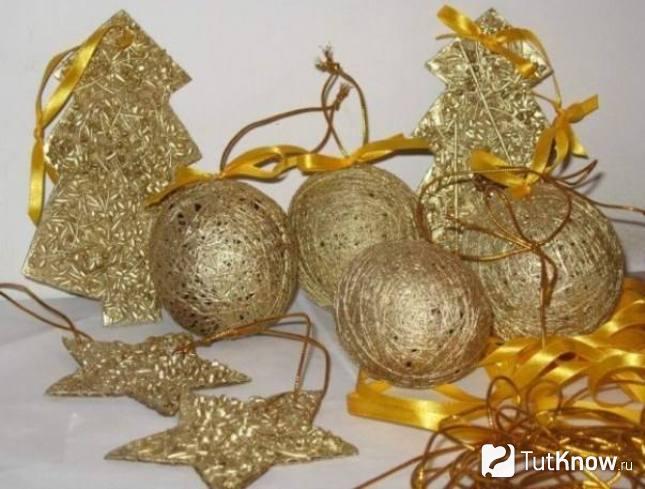
- fantasy from sewing threads will allow you to make simply huge toys: completely airy snowmen, balls, stars, etc. look magical in the interior, and creating such a large toy will take a little time.
Are you wondering what you can use to make a New Year's toy? From scrap materials: pieces of wool or champagne corks, baby socks or a small piece of satin ribbon: Don't limit your imagination!
How to make a giant toy for the New Year with your own hands
For large Christmas tree decorations, sometimes there is even one rule: they shouldn't be heavy. Most often, such wonderful jewelry is made from ordinary threads: even a small child can handle such work.
- Inflate the balloon to the desired size and tie it tightly at the base.
- Holes are pierced in a soft bottle of PVA glue and, using a needle, the thread for the craft is pulled through (you can moisten the thread with glue in any other way).
- The inflated ball is randomly wrapped with thread and glue - try not to leave completely “bald” places: the toy will look beautiful and delicate if the thread is wound evenly.
- These unusual DIY Christmas tree decorations are left to dry for 24 hours.
- After 24 hours, the ball is burst and its rubber shell, which became the basis for the craft, is removed.
- For decorative purposes, the remaining airy form of threads can be coated with silver or gold paint, decorated with beads or beads, sequins, bows, and thin satin ribbons.
These balls look very elegant when made from light and bright threads. By combining different or the same size, you can make, for example, a snowman or a caterpillar. If you use as a basis cardboard cone, using this technique it is easy to make a Christmas tree, figures of Father Frost or the Snow Maiden. Can become a magnificent giant toy Nutcracker from a large household box, designed according to a well-known image. We offer pictures of a Christmas tree with creative New Year's crafts and Christmas tree decorations - we are sure that you will certainly find something interesting for yourself.
New Year's giant toy
Master class on making vintage Christmas tree decorations with your own hands
Vintage Christmas tree decorations are good because can be anything: a beautiful pine cone with a canvas bow, a birch bark owl, a wooden spool of thread with a textile or lace ribbon, twigs decorated with beads, you can We offer master class on making a very simple vintage Christmas tree decoration, which even a child can handle.
To make this magnificent star you will need very little:
- thick wire or flexible sheet metal about a centimeter wide;
- thick woolen thread or twine;
- glue;
- ribbon for hanging.
The method for making such a toy is very simple:
- We create the desired shape from the wire (for example, stars or the outline of a Christmas tree).
- We glue the tip of the rope to the base and begin to carefully wrap the outline of our toy, trying to ensure that each next row lies next to the previous one, leaving no gaps.
- Securely fasten the remaining rope tail with glue.
- We hang the toy on a beautiful ribbon - the vintage Christmas tree decoration is ready!
We also offer photos of original Christmas tree decorations, made by hand using vintage techniques:

Christmas toy in vintage style

Vintage Christmas toys

Christmas toy using vintage technology
Do-it-yourself voluminous Christmas tree toy made of plaster
As already mentioned, homemade New Year's decorations can be made from a wide variety of materials. One of the fairly plastic, but not entirely simple, is gypsum: the figures made from it are voluminous and easy to paint, but you need to work with this rather fragile material quickly and carefully. Plaster can be replaced and you will get lightweight and beautiful New Year's toys.
This master class will help you decorate your Christmas tree with New Year's items and figurines made from plaster yourself:
How to make unusual Christmas tree toys from wire with your own hands
We have already looked at a simple example of a wire toy, so we devote this section to truly original designs, which will require a little more time. Wire figures can be very diverse - the right technique will allow you to create an amazing, truly creative decoration for the New Year.
For a wire toy you will need:
- wooden base board;
- carnations;
- a well-bending wire of suitable length - it is better to take it with a reserve: the excess can always be cut off, but if the length is just a little short, the toy will have to be completely remade;
- round nose pliers, wire cutters.
Execution process:
- On a flat wooden board, chosen as a base, nails are placed at key points - the tops of corners, straight segments, etc. If the toy is supposed to have rounded lines, ovals, smooth curves, then wooden elements of the appropriate diameter and shape will be needed.
- According to the design of the toy, the wire is passed along these key points - this is how the figure takes shape.
- Round nose pliers and other tools allow you to create perfect curls, waves, and angles.
- The finished design can be coated with special paint.
An openwork wire figurine made using this technique will look impressive not only on the branches of a Christmas tree, but also in the interior of a room or as a decoration for a holiday table or gift box.

DIY Christmas tree decorations made from plastic bottles
Indeed, Christmas tree decorations can be made from any material that is at hand. Even if it's simple plastic bottle, with some skills and imagination, it can turn into magnificent flowers, snowflakes, balls, etc. The toys turn out to be quite large, they can decorate a street Christmas tree, a children's educational institution, a country house or an entrance - completely waste material acquires a second, and even this beautiful life!
Here is a master class on how to create hollow volumetric snowflakes from plastic bottles.
For this toy we will need:
- bottoms from two identical plastic bottles;
- acrylic or enamel paints for applying rays, brush;
- satin ribbons to match the colors;
- narrow double-sided tape;
- stationery knife.
How to make a snowflake:
- For one snowflake you will need two bottoms - carefully separate them with a stationery knife.
- On the inside of each bottom, you can paint snow patterns and rays of snowflakes - use your imagination, but don’t overdo it: the snowflake should look like a snowflake, and not like a painted tray.
- The finished pieces are connected in pairs using double-sided tape. The halves can be left empty, or you can fill them with candies, multi-colored dragees, rain, tinsel, confetti, etc.
- Cover the joint (“seam”) with a satin ribbon - it should not be too narrow, otherwise the joining line will not look very neat.
- Make a loop out of the ribbon and hang your handmade decoration.
New Year's toys made from plastic bottles
New Year's origami toys
Origami paper crafts they always look original and beautiful - their undoubted advantage is that the schemes offered in different sources have different complexity. Children can easily put together something simple on their own; adults will be happy to help them with more complex models. Christmas tree toys or decorations, animal figurines, balls (including modular kusudama models) is spatial thinking and imagination, and for kids it is also the effective development of fine motor skills.
Sometimes in one origami craft you can use paper of different colors or with a gradient - this makes the decorations even more interesting and original.
It would seem that ordinary paper, precision, accuracy and dexterity - and you will get such wonderful decorations for the Christmas tree or for the interior:
“Stars” for the Christmas tree using the origami technique
Origami ball for Christmas tree
Origami technique - Christmas tree toy
Felting interesting New Year's toys from wool with your own hands
Felting wool- a not so common way of creating a New Year's toy even among needlewomen, but starting with a simple one and gradually moving to a complex one, you can achieve a truly masterpiece performance. Special wool, a needle for felting, various techniques (for example, wet felting or dry felting) - we present creative felted Christmas tree toys with photographs:
Homemade products for the New Year using the felting technique can be very diverse - it all depends only on the imagination of the author and his skills. Children will be quite able to make a small ball, icicle or snowman, and real masters create figurines of animals, elves, angels, painted balls and much, much more. If you don’t have wool on hand, you can always make one.
CDs are gradually becoming a thing of the past, making room for more modern storage media. Some people still have old and, most likely, unnecessary stacks of these shiny “blanks” - it seems like a shame to throw them away, but they won’t be useful in the household either. So make New Year's interior decorations out of them!
The good thing about disks is that their round shape is optimal both for creating a toy and for its further use: the absence of corners is perceived by the eye as a combination of harmony and tranquility. What decorations and in what techniques can be made using computer CDs as a basis?
- the disk will become a convenient basis for an impromptu New Year's card or panel– usually in these cases the decoupage technique is used, and varnish coating makes such decoration durable;
- you can make it from a disk magnificent stained glass: a little imagination, spectacular contours and details, painting with stained glass paint - and no one will ever think that just recently this stunning owl or turtle was an outdated computer disk;
- a few beads, ribbons, a skein of colored wool, a twig - and now a CD has turned into in a cute New Year's wreath;
- braiding with threads will allow you to create a snowflake, sun or star with rays. Such a toy can be decorated with eyes and a mouth - if there is a child in the family, he will be incredibly happy about such a miracle.
New Year's toy made from disks
DIY ideas for Christmas toys made of polymer clay
Polymer clay– a material that recently appeared on the handicraft market is very flexible and has virtually no boundaries for realizing your imagination. Of course, the technique of working with polymer clay has its own nuances and not everything may turn out perfect the first time, but with certain skills, New Year's trinkets and toys from this material turn out to be very beautiful, original and durable.
So, we make New Year toys from polymer clay:
- The material itself is simple, like plasticine, but after firing it hardens to the state of ceramics. When working with it, you can take your time, but you won’t be able to stretch out the work over several days.
- One of the simplest options for toys made from polymer clay is considered decoupage: the picture you like from a napkin is applied with the help of perfume or strong alcohol onto a rolled out layer of clay of the corresponding color. The remains of the clay base are trimmed along the contour. If desired, the toy can be covered with craquelure, which will “age” it, make it look vintage and so stylish. After firing, the decoration will become hard as stone.
- Millefiore technique (multicolor) also does not represent anything particularly complicated: the clay is rolled out into laces, which are applied to each other in a certain way, forming a sausage. The sausage can be additionally wrapped in a thin layer of clay, which will become the casing. We cut the formed sausage crosswise into thin circles or squares - depending on the size of the cut, such blanks can already become independent decorations, it is only important not to forget to make a hole in them. Or you can combine these squares into a large canvas and cut into stencils Christmas trees, animal figures, hearts, stars - whatever inspiration dictates!
- The most understandable way to work with polymer clay is ordinary modeling, just like from plasticine. Even the smallest ones can cope with this task! Painted houses, snowflakes, owls, penguins - the kid can make whatever he wants, even a whole fairy tale!
If you create Christmas tree decorations from polymer clay, do not forget to make a hole in them at the modeling stage for thread or ribbon: this will no longer be possible in a fired product.
Usually toys are made from polymer clay small in size- this is necessary for uniform firing, which should complete the creative process. The variety of colors allows you to make bright, realistic Christmas tree decorations, but single-color toys can also be very good - for example, in this photo of a Christmas tree with homemade white Christmas tree decorations, the fluffy beauty seems to be covered with magical frosty patterns:
Christmas tree with white Christmas decorations
How to make Christmas tree decorations from light bulbs
And in conclusion, we offer one more interesting master class, which shows how even from the most ordinary light bulb you can make a surprisingly positive, funny toy:
Remembering the New Year's bustle, start preparing for the New Year in advance: there is still time to sort through your home deposits of materials quite suitable for crafts and create something truly original, cute, very warm and cozy.
December 7, 2017, 01:33New Year and the beautiful green Christmas tree are inseparable concepts. It's time to review and update your toy inventory. We suggest not running to the store, but engaging in the exciting process of creating Christmas tree decorations and decorations with your own hands. The material can be found in every home - these are old glossy magazines, newspapers, unclaimed strings of beads, scraps of fabric, fur and felt. You can also use what you can collect on a walk - acorns, pine cones, beautiful twigs and even bird feathers. Armed with glue, scissors and your own imagination, you can make unique things in the handmade style, please your family, surprise your relatives and friends.


New life for old Christmas balls
In the box where Christmas tree decorations are stored, there will probably be balls that have lost their former attractiveness or are simply tired of them. Spend a few evenings doing some nice handicrafts and decorate them in a new way. The proposed ideas are not a strict New Year’s master class, where you need to strictly perform certain actions, but only tips for generating your own creative abilities.

Take old tatty balls, foam blanks, any round objects, burnt out light bulbs and get started. Possible options:
- wrap with scraps of fabric,
- cover with beads or shiny cord,
- paint with acrylic paints,
- draw abstract patterns with a gold or silver marker,
- fill transparent balls with buttons or other small objects,
- wrap with multi-colored threads.

Using bright yarn, you can make funny pom-poms, a New Year's star or a small Christmas tree.

Just stuff small nails along the desired contour, soak the thread in starch or glue, wind it and let it dry - the decoration is ready.

Christmas trees, garlands, pine cones and New Year's cookies
Christmas trees can be made from cardboard, felt, buttons of different sizes, or from colored paper rolled into a tube. An ordinary garland will take the form of Chinese lanterns if you place each element in a box, which is assembled according to the instructions given.


A selection of photos will indicate the main direction, and new ideas will appear on their own. Just don’t put everything off until the last minute, but bring the New Year’s fairy tale into life right now.
The New Year's atmosphere of an amazing, family holiday and upcoming miracles lifts your spirits and helps you tune in to a creative wave when you want to decorate the fragrant Christmas tree and every room in the house in an original and unusual way. Expensive decorations can be purchased in stores, but even from simple improvised materials, using your imagination and studying the proposed photos of Christmas tree decorations, you can make your own decoration for the Christmas tree that will look presentable.
It’s very easy to create a unique and warm atmosphere for the upcoming holiday in your own home; you just need to prepare the necessary materials and allocate time. You can make toys with your children; this activity is perfect for family time.

Beautiful and original toys for decorating a Christmas tree can be used to decorate your home or, having come up with bright packaging, you can give them to friends and family, presenting a piece of your soul and a good mood.


Materials for making Christmas tree toys
Any master class on making Christmas tree decorations with your own hands necessarily involves the preparation of consumables necessary for the creative process, starting with the development of an idea and its implementation in finished accessories.

At the preparatory stages, no special or lengthy preparation is required; it is enough to collect what you need and decide on the appearance of future Christmas tree decorations; real masterpieces can be made from:
- colored and white paper, cardboard of different densities;
- various plastic bottles and caps;
- soft felt, scraps of fabric and satin ribbons;
- salt dough, natural clay and porcelain;
- multi-colored woolen threads, remnants of yarn and cotton wool;
- small and large beads, glass beads and sequins;
- spruce and pine cones, nuts and dried leaves;
- sweets, holiday tinsel and small children's toys.


To create original decorations, you need to follow step-by-step instructions on how to make Christmas tree decorations, involving children of any age in the process to make real family heirlooms and inherited values.

Combining different materials and techniques allows you to develop creative abilities in children and have a great time with your family, preparing interesting decorative accessories for the New Year holidays and giving a great mood.


Ideas for Christmas tree decorations
Having collected on one surface all the consumables and tools, thread and needle, scissors, glue and paints, colored markers and pencils, you can try to bring simple ideas to life on your own:
Christmas tree decorations made from old incandescent lamps. Burnt-out light bulbs of various shapes are perfect for Christmas tree decorations; they can be painted and, after complete drying, applied to any design using a stencil.

The decoupage technique will help you create voluminous toys with a distinct style that will look great on a fluffy Christmas tree and delight adults and children.

Balls and stars from old newspapers or paper. You can make such Christmas tree decorations with your own hands using papier-mâché technology; this will require the original shape, PVA glue and finely torn newspapers.

Old balls that have lost some of their paint or have a worn-out design can simply be covered with newspaper strips, breathing new life into them and creating a whole series of decorations in a retro style.

Wicker toys made of beads and large beads. Weaving with beads is a rather painstaking work that requires special perseverance; for children of different ages, you can select patterns according to the level of difficulty.


For weaving, you can prepare a sketch and soft wire in advance; large glass beads will help you create original garlands that shimmer in the soft light.

Volumetric Christmas tree toys made of fabric and felt. Cute small figurines in the shape of animals and birds known to children can be complemented with Christmas trees and snowmen, hearts and stars, and Christmas bells.

Stuffed toys are sewn from soft fabric or craft felt, according to pre-selected patterns, and small parts, ribbons and eyes can be glued using a glue gun.


Volumetric toys made of yarn and woolen threads. Ready-made examples of such Christmas tree decorations look original; to create them, you can use new yarn or leftover threads of different colors and shades.

A simple balloon, pre-inflated, can be wrapped with threads dipped in glue, and after the base has completely dried, the amazing ball can be painted.

A rich variety of materials and ideas allows you, without spending a lot of time, to make amazing decorations that will match the theme of the winter holiday and complement the interior composition of any room.

Photos of DIY Christmas tree decorations


See how to make New Year's tree decorations from plastic bottles, yarn, felt and even toilet paper rolls, as well as the symbol of 2018 - a dog.
Christmas toys made from yarn

You can quickly create such openwork decorations from scrap materials. You will need:
- yarn;
- plastic tray;
- Bowl;
- pins;
- PVA glue;
- marker;
- paper.

Now lay the yarn so that you get symmetrical curls or use a pattern that you come up with yourself.

Set aside the work, let the product dry completely, after which it’s time to hang it on the Christmas tree. In the same way, you can make a smaller copy of this tree. Don't forget to make a loop for hanging it on the tree.
Yarn is a very pliable material, so it can be used to create toys of almost any shape.

To make such a ball for the Christmas tree, take:
- white threads;
- Balloon;
- glitter;
- PVA glue;
- a bowl.

Now take the ball out of the bowl and let the glue drip off. Then cover the piece with glitter and hang it up to dry. When a day has passed, pierce the ball with a needle and remove it through the hole. Such a product can not only become a decoration for the Christmas tree, but will also decorate the room after the New Year.

Not only white threads, but also colored yarn will quickly turn into Christmas tree decorations. You will start 2018 with your own hands by contemplating a decorated Christmas tree, the items for which you will make yourself or with the involvement of other family members.

Very soon you will have such sparkling balls. To make them, you need to take:
- yarn;
- air balloons;
- bowl;
- glue;
- scissors;
- a needle.

As in the previous case, saturate the ball with PVA glue diluted with water. Hang the workpiece to dry, then pierce the ball to remove it. If you want, don't pierce it, just untie it and let the air out. Then you can remove the whole ball and use it.

If you want, make a backlight for each product by attaching Christmas tree garlands or an LED inside the element.
For such creativity, you can use almost any thread, even jute cord. See how decorating such products with satin ribbons gives them additional charm.

If you wish, cover the finished balls with gold paint, it will turn out very beautiful.
The next DIY Christmas tree decoration can then be taken to school or kindergarten.

Similar decorations are also made from yarn. First, pompoms are created from it, then they turn into an animal or bird. To make such a Christmas tree toy, take:
- yarn of the desired color;
- PVA glue;
- colored cardboard.

By the way, you can use this base to create other Christmas tree decorations. It can be round, heart-shaped, drop-shaped or Christmas tree-shaped.

You will need to wrap the cut-out cardboard blank with threads, secure the ends with glue, then decorate the toys at your discretion.
How to make Christmas tree decorations from felt?
This material is very beneficial; even beginners can use it to create decorations for the New Year’s holiday. At the same time, you do not need to have a sewing machine, since the presented Christmas tree toys made of felt are sewn by hand.

If you want to create such a Christmas tree, then take:
- cookie cutter;
- green felt;
- scissors;
- light green threads;
- a needle;
- multi-colored beads.
Decorate the Christmas tree with beads; you can also use round buttons on the stem.
If you have red and white felt, combining these colors will create incredibly beautiful Christmas tree decorations.

If you don’t know what to give your friend, mother, or grandmother for the New Year, you can sew oven mitts from felt that match the mood of this holiday and give them to them.
To make the following felt Christmas tree decorations, you don't need any patterns. But if you are not sure that you can immediately cut out the star correctly, then first draw it on a cardboard template, cut it out, and then attach it to the felt. Draw with chalk and cut out two parts for each toy.
Such blanks are placed one above the other, a padding polyester is placed inside and swept along the edge with a basting. Sew on the beads, attach a loop on top and you can hang the decorations on the New Year's tree.

Even small scraps of felt will be useful. Cut out snowflakes of various shapes from them, sew them to each loop so that you can hang these products on the Christmas tree.

To make the next decoration, you need to cut a strip of felt 5 cm wide, and if you need a Christmas tree decoration for a large Christmas tree, then make it 10-15 cm wide. Cut one of the long edges of this strip of fabric in a straight line, making cuts at the same distance.
Roll this cut ribbon into a tight log. Sew a braid on top to secure the workpiece in this position. Sew on the loop, after which the work can be considered completed.

Decorate the Christmas tree with felt pine cones. To do this, take light and dark colored material.
On cardboard, draw patterns of flowers of different sizes, consisting of 4-8 petals. Thread a strong thread into a needle, string these blanks onto it in the following sequence: first put on it a small brown circle with a tail made of the same fabric, then put on a small light flower, and on it a brown one of the same size. Next comes a pair of slightly larger blanks.
Using this technology, assemble the cone so that the largest pieces are in the center. String further smaller ones, the smallest flower last.

If you are crafting with your child, have him draw a Christmas tree on paper, cut it out and use this template to create a felt tree. It is decorated with white circles that represent snowflakes.

Under the strict guidance of adults, a child will be able to make a snowman out of felt.

For such a toy, you need to cut a blank out of white fabric, consisting of two circles of different sizes. You will need 2 parts for each character. They are not completely sewn along the edges, then the padding polyester is put inside, and only then the remaining slot is swept away. All that remains is to decorate the figurine with a scarf, a hat, and sew on facial features from leftover fabric.
If you want to make a New Year's wreath, you can also use felt or other thick fabric. For the base, you need to cut two rings from such a fabric and one from padding polyester or holofiber. This soft filler is placed inside, the edges are swept away.

Now you need to decorate the wreath with gingerbread characters. Look, they are given in the next pattern.

For each, you also need to cut out two parts, seal them with filler, and decorate the blanks, following the photo hint.
DIY Christmas tree toy in the shape of a dog
Since 2018 is the year of the dog, don’t forget to hang a toy made in the shape of this animal on your Christmas tree.

If you want the New Year’s dog toy for the Christmas tree to be as voluminous as in the photo, then you need to cut out two outer parts of the body from fabric, as well as two inner lower ones. Small blanks are sewn together and also ground together with large ones. The head will be more voluminous if an insert is sewn on top.
A dog Christmas tree toy can be made from almost any material. Even a toilet paper roll will do. See how this scrap material can be turned into a fun dog.

To do this, just press well on the top of the workpiece to mark the animal’s ears. Then you need to paint the sleeve and glue the parts of the dog’s muzzle, tail and paws to it.
Here's another idea for such a decoration. If you want the toy to hang on the Christmas tree, then fold the thread into a loop and glue it to it. The bushings are arranged horizontally, then to each you need to glue the muzzle and paws of an animal made of paper, paint it all in the appropriate colors.

You can make a lot of funny dogs out of these bushings. It will be enough to glue to each paw and a muzzle on which ears and facial features are drawn, and the dog’s New Year’s toy for the Christmas tree is ready.

If you need to quickly decorate trees or a room for this holiday, then inflate balloons and glue two ears to each. Using a marker, draw the features of the muzzle, you will get wonderful dogs.

Even old hats can be turned into original dogs. Cut out eyes and ears from felt, and make a nose from pompoms. Glue these elements onto the hat, after which you can admire the work done.

If you have popsicle sticks, glue them onto a cardboard base to create the animal's face and front legs. Attach eyes for toys, other facial features, as well as ears and tail.

You can also make a dog for the New Year from a plastic bottle. The following photo tip will help you create it.

By the way, you can make other decoration elements for this bright holiday from plastic containers.
New Year's toys made from plastic bottles

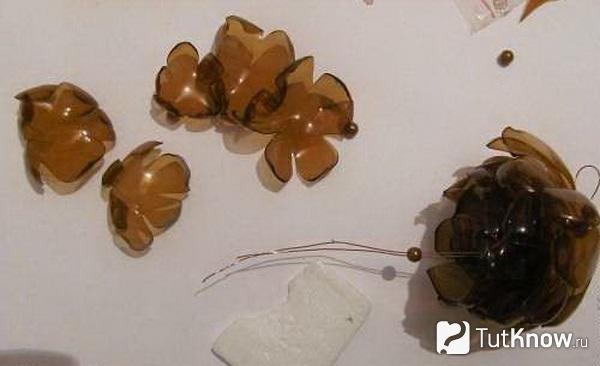
To make such a pine cone, you need to take:
- brown plastic bottles;
- scissors;
- pliers;
- awl;
- wire;
- beads.
Make a hole in the center of each with an awl. Hold these flowers over the flame of the burner, holding them with pliers. When the pieces have cooled, string them onto the wire, starting with the largest one. Secure with beads so that the elements do not move out.
To make a ball from a plastic bottle, take this container and cut out rings of the same size from it.
Now connect all of them together so that the blanks resemble a ball. Tie individual elements using rain.

Now you can decorate the balls with tinsel and sparkles by gluing these elements to the base.

What's a Christmas tree without a New Year's bell? To make such a toy, take:
- plastic bottles;
- scissors;
- glue gun;
- polystyrene foam ball;
- ribbons;
- organza;
- sandpaper;
- nylon thread;
- decorative elements;
- gold paint.
To prevent the cut from being sharp, go over it with sandpaper or burn it over a flame.
Paint the items with gold paint. Through the neck, lower the nylon thread down, to which you need to tie a polystyrene foam ball. The organza ribbon should be glued to the bottom of the bell. Attach wire to hang the bell on the tree. But first, don't forget to decorate it as you wish.

The wreath will become a decoration for the Christmas tree or room decor. To do this, you need to cut off the bottoms of plastic bottles, cut them to make these pointed flowers, and then connect them to form a wreath.
Do you like to do handicrafts? Then you will love making Christmas tree decorations with your own hands! This is a pleasant and exciting activity for the whole family, which will not leave anyone indifferent - you will spend several evenings with pleasure making Christmas tree decorations with your own hands.
What do we use for the material?
What do you need to make your own New Year's decorations? You can use almost anything you can get your hands on. If you want, you can buy special supplies (sold in craft stores), or you can use what you have in any home. So what to prepare:- plain paper (good for making patterns);
- pencils and markers;
- regular cardboard, white and colored (you can use velvet);
- sharp scissors and a breadboard knife;
- glue (PVA or glue gun with sticks);
- threads and needles;
- yarn of different shades;
- various decorative materials - these can be sparkles, sequins, confetti, multi-colored foil, stickers and much more.
Simple crafts from scrap materials
Of course, you've probably seen how New Year's balls are made from thread and glue with your own hands, but why not expand the range? We make different Christmas tree decorations with our own hands.From yarn
This is a simple and at the same time spectacular Christmas tree decoration that can decorate any Christmas tree.
For production you will need:
- yarn;
- tailor's pins;
- plate or bowl;
- porous material (for example, a disposable tray);
- cutting paper;
- marker.

The template needs to be attached with pins (or ordinary toothpicks) to the porous material, and the design you need should be laid out on top - first the outline is laid out, then the interior decor. You should not cross the threads too often; the toy should be fairly flat. Once you are finished, dry the item and remove it from the pins and tie a loop in the eye. If desired, you can decorate with sparkles or rain.

From wire
How to make New Year's toys with your own hands in just a couple of minutes? Use wire!
To make toys you will need:
- two types of wire - thick and thin (thin wire can be replaced with bright threads, for example, floss. Pure white strong threads look very beautiful);
- beads, beads;
- colored tape;
- pliers.
The ends of the thick wire need to be twisted. You need to string beads and seed beads mixed together on a thin wire, tie the end of the thin wire to the future Christmas tree decoration, and wrap it randomly.

When the toy is evenly wrapped, you need to wrap the free tail of the wire around the toy and tie a ribbon in the shape of a bow - your toy is ready.
Another original idea:

Made from ribbon and beads
Who said that making New Year's toys with your own hands must take a long time and painstakingly? Not at all. In just five minutes you can create one that will decorate both the New Year’s tree and the interior.
You will need:
- beads;
- narrow tape;
- yellow, golden or silver cardboard;
- glue "Second";
- needle and thread.

Interior decor made in this way looks very attractive.
From cardboard - in a couple of minutes
Some New Year's toys made of paper or cardboard take a lot of time to make, but not in this case - here you really only need a couple of minutes to make an elegant hand-made New Year's decoration.So, you will need:
- ordinary cardboard;
- a little twine or thick yarn;
- glue;
- paints and brushes;
- napkin or cloth;
- varied decor.

Use a loose tail of twine to wrap the tree in different directions. After some kind of thread pattern appears on the tree, you can start gluing it with a napkin. You can tear the napkin into pieces, coat the tree well with glue, and seal it tightly with the napkin. This will give a nice texture to the future toy.

After the toy has dried, you can start painting - paint the Christmas tree green.

After the paint layer has dried, shade the texture of the toy using a dry, hard brush and white paint, and then decorate it to your taste.

From bright shreds
Here you will need a sewing machine, but if you really want to, you can do it without it. This is the best way to make Christmas toys from cotton wool and fabric - just choose fabric with a Christmas ornament, or use what you have on hand.
Prepare several paper patterns - for example, deer, stars, gingerbread men, bears, letters and hearts. Cut out fabric blanks with your own hands, sew them in pairs, leaving a small gap (for stuffing), and through this small hole, tightly stuff the toys with cotton wool or padding polyester. It is most convenient to fill with a pencil.
Patterns can be downloaded here:


By the way, don’t forget - we sew on a machine from the inside, but if you decide to make toys from thick fabric with your kids, then it is better to sew them with a decorative seam over the edge - a toy with your own hands will look simply charming and will be suitable for either a home Christmas tree or a kindergarten - Usually, for kindergarten Christmas trees, children make decorations themselves.
Made from twine and cardboard
New Year's toys made of paper and cardboard will be much more interesting if you add a couple of simple materials to them. To make such a toy you will need ordinary cardboard, simple paper or natural twine, a little felt or any other fabric, as well as ordinary paper, a pencil and ruler, and a drop of glue.
The star template can be downloaded here:

First, make a pattern on plain paper, and then transfer it to cardboard. Don't forget that the star must be double. You shouldn’t make the star too thin; it’s better to make it a centimeter or more. The tail of the twine is glued to the cardboard, then you need to gradually wrap the entire workpiece.

Place the thread as tightly as possible so that there are no gaps. To decorate the star, make a couple of leaves and berries from fabric and decorate one of the rays. Your decoration is ready.

From yarn and cardboard
Do you want to make original and at the same time charming Christmas tree decorations with your own hands? Then it's time to make small gift hats with your own hands from scrap materials. This is a wonderful Christmas gift that looks cute and will keep you warm all winter long!
To make Christmas tree decorations in the form of hats, you will need:
- a couple of toilet paper rolls (you can just glue cardboard rings together);
- remnants of colored yarn;
- beads and sequins for decoration.

The threads need to be cut into pieces of approximately 20-22 centimeters. We fold each piece in half, pass the loop through the cardboard ring, and pull the free edges of the threads through the loop. It is necessary that the thread is firmly fixed to the cardboard base. This needs to be repeated until the cardboard base is hidden under the threads.

All the thread tails need to be pulled through the ring so that our hat has a “lapel”.

Now we pull the loose tails tightly with thread and cut them into a pom-pom shape - the hat is ready! All that remains is to make a loop and decorate your Christmas tree toy with sequins and sparkles.

From beads
Making a New Year's toy in a minimalist style is easy and simple - you will need wire, beads and seed beads, a ribbon and a coin (can be replaced with a small candy, but it looks much more impressive with a coin). Try to make this Christmas tree toy with your own hands, the master class is very simple.
Make a loop on the wire and string green beads mixed with large beads on it - they will play the role of New Year's balls on our Christmas tree. Once the wire is filled, give it a herringbone shape by folding it in a spiral.
Once your tree has taken shape, bend the free edge into a loop.

We cut off a piece of ribbon, form a loop from it for hanging and pull it through the Christmas tree, and decorate the free tail with a coin (the easiest way is to glue it with double-sided tape). We tie a decorative bow on the hanging loop - your decor is ready!

Christmas balls
How to make a New Year's ball from threads? It’s as simple as that, watch our master class on spectacular lace balls for the Christmas tree.Required:
- several balloons;
- cotton threads;
- PVA, water and sugar;
- scissors;
- polymer glue;
- spray paint;
- decor

First you need to inflate the balloon - not completely, but according to the size of the future decoration. Mix two tablespoons of water, two teaspoons of sugar and PVA glue (50 ml), and soak the thread in this mixture so that the thread is saturated. Then you need to wrap the ball with thread randomly. The balls need to be dried for several hours. After the glue has completely dried, you need to deflate the ball and take it out, and carefully paint the ball of thread with spray paint and decorate it with sequins and sparkles.
DIY thread Christmas balls will turn out to be very, very impressive if you make them in different tones - for example, red, silver and gold. Try to make New Year's balls with your own hands using different techniques - you can sew or knit balls, make them from cotton wool with your own hands, or, for example, sew them from felt - you can never have too many of these toys.
From paper
New Year's decorations made of paper are very popular among both big and small admirers of the New Year's miracle - try making paper Christmas tree balls with your own hands.
A DIY paper Christmas toy is made like this: 
There is no additional need to decorate such a toy; it is already expressive.

Another ball option:

Or you can make a ball like this according to the master class:


From felt
DIY felt Christmas toys look very warm and cozy, and they are very, very easy to make. To make your own charming felt Christmas tree decorations you will need:- red, white and green felt;
- red, white and green threads;
- Crystal glue;
- scissors and needles;
- cardboard;
- a little satin ribbon;
- soft filler (cotton wool, holofiber, padding polyester).

First, make sketches for your future toys. It can be anything. Once the patterns are ready, transfer them to felt and cut them out. What is good about this material is that it does not crumble, you will not need to additionally process the edge of each workpiece.
Make identical decorative elements - for example, sprigs of holly (by the way, did you know that this is a symbol of joy and Christmas reconciliation?). The berries need to be glued to the leaf using glue, and then a decorative knot should be made - this will give the berries volume.
We sew each piece together in pairs. By the way, it is best to sew it with contrasting threads; it will be fun and elegant. How to make New Year's decorations voluminous? Stuff them with holofiber before sewing them up completely! Straighten the product well, so the Christmas tree toy will be filled more evenly. You can use the back of the pencil for stuffing.
Sew on the decorative elements and your New Year's toy is ready!


Try to sew felt decorations not only for the New Year tree, but also for your home - for example, a Christmas wreath decorated with felt toys looks very stylish. Look at the selection of DIY New Year's decorations, photos of master classes - and you will understand how many interesting things can be made from ordinary felt of two or three colors.

Master class on how to make a Christmas garland with your own hands from felt:

Below you can download templates and patterns of different Christmas trees for felt crafts.

