Star news


Make a Christmas tree toy from disks with your own hands. Master class Craft product New Year Modeling design Balls and a lamp from CDs MK Computer disks
Instructions for making crafts for a street Christmas tree.
With the New Year holidays approaching, many are eager to decorate their New Year's beauty. Very often, residents of private houses do not place a New Year’s tree inside their home, but prefer only to decorate Christmas trees that are located on the street. It is worth noting that it is not practical to purchase expensive toys to decorate such a Christmas tree, so they can be made from scrap materials.
There are many options for making Christmas tree decorations for an outdoor tree. For this purpose you can use:
- Cardboard boxes
- CDs
- Plastic bottles
- Foil
- Toilet paper and towel cylinders
- A variety of waste, such as cardboard, broken old Christmas tree decorations, old books, postcards, scraps of New Year's tinsel
From all this you can build very nice Christmas tree decorations.
Street Christmas tree 
 street tree
New Year's crafts for a street tree from CDs - snowflakes, balls: manufacturing diagram, photo
One of the simplest and most affordable options for making Christmas tree decorations is the use of CDs. You can make snowflakes and balls from them. To make snowflakes you will need a CD and several cocktail straws. You will also need tinsel for decoration and some thick wire. You will need a glue gun or regular hot glue.
Instructions:
- Take a CD and thread a thick wire through the hole. Place cocktail tubes on it, forming a cute snowflake.
- You can decorate the folds and wire with New Year's tinsel.
- To prevent the disk from dangling inside the snowflake, secure it with hot glue.
Next, start making the ball. You will need some side cutters or a very sharp utility knife. You need to cut out several hexagons from the disk. After this, glue them together using hot glue. Decorate the joints with tinsel.


New Year's garlands for a street tree: stencils, photos
New Year's garlands are most often made using paper, foil or some kind of candy wrappers. Below are templates for making garlands for the New Year tree with your own hands. Most often they are made of colored paper or cardboard.


New Year's clock from a cardboard box for a street tree: templates, photos
A good option for decorating a New Year's tree, . They can be made from a cardboard box. They are made according to the principle of an old clock in the shape of a house. You will need a cardboard shoe box, some cardboard, and paper for decoration. This could be gift wrapping paper or foil, as well as glue, markers, and a few sheets of paper.
Instructions:
- You need to make a rectangular frame. Attach the roof to it by bending the cardboard into a corner. Fill the voids at the front and back using a triangle of cardboard.
- When the frame is ready, start decorating it. To do this, lubricate the surface with glue. It is enough to apply the adhesive not to the entire area, but only to the ends. That is, along the perimeter. Glue on foil or wrapping paper.
- Glue a circle in the center, it will be a dial. Apply numbers and attach arrows. They can be paper or simply drawn.

 clock from a cardboard box
 Large candies for a street Christmas tree: stencils, photos
Large candy canes for your outdoor tree can be made using paper towel cylinders or toilet paper. You need to take some nice wrapping paper and simply wrap it in a cardboard cylinder. You can tie the corners with beautiful ribbons or pieces of tinsel.

 candies for street tree
 Stencil for candy
 Christmas decorations made from plastic bottles for a street Christmas tree: diagrams, photos
A real godsend for making Christmas tree decorations are plastic bottles. With their help you can make both New Year's balls and cute compositions. There are several options for making toys from a bottle. The first option is to use only the bottom.
Instructions:
- You need to cut the bottoms and glue them together.
- Decorate with sparkles, rhinestones, ribbons or tinsel.
- You can glue it both in the shape of a ball and in the shape of a regular New Year’s circle, which is quite flat.
You can also make a composition from plastic bottles. The cylinder itself is used for this. To do this, use transparent plastic bottles made of unpainted plastic. It should be completely transparent, not green. You need to fill the insides with some nice content. It could be artificial snow. The edges at the top and bottom are closed. To do this, you can use either cardboard or cut-off lower parts from plastic bottles. Decorate the gluing areas with New Year's tinsel or cotton wool.


New Year's bells for a street tree: stencils, photos
An excellent decor option are New Year's bells. They can be made either flat from cardboard or from paper. They can also be voluminous. You can use plastic cups for this. You need to cover the cup with wrapping paper or foil. Inside you can glue the dangling part itself, which rings. It can be made from a plastic spoon, which is pre-painted with shiny paint.


 bells for a street tree
 Balls from plastic cups for a street Christmas tree: templates, photos
You can make some very cute toys from plastic cups. There are several manufacturing options.
The first one is a New Year's ball. In this case, the plastic cups are glued together like a ball. It turns out to be quite large. In order to reduce the size of the ball, you can use small glasses - shot glasses. If you want, you can make a New Year's ring. To do this, cups in the shape of a ring are glued together. You can decorate such toys using New Year's tinsel, old broken toys, and sparkles.


Volumetric Christmas tree decorations made of foam plastic for a street Christmas tree: instructions, photos
There are quite a lot of options here, since polystyrene foam is a fairly universal material. You can cut out balls and square circles from it; the simplest option is to make gift packages from polystyrene foam. You need to cut a cube out of foam and cover it with wrapping paper. Stretch a ribbon in the center of each side and tie a large bow in the center. You will get a box with a gift.


Toys made of paper, cardboard for a street Christmas tree: stencils, photos
Below are simple toys made from paper and cardboard.


Pasta balls for a street Christmas tree: instructions, photos
Christmas tree decorations made from regular pasta look very unusual and cute. You can use them to make both New Year's balls and a Christmas tree. If you are making a small Christmas tree, you need to roll a cone out of cardboard and cover it with feather pasta. After this, using spray paint, the Christmas tree is painted in the desired color. Most often, gold or silver paint is used.
You also need to make New Year's balls from pasta. To do this, the prepared base is pasted over with pasta and painted in the color you like.


Colored ice balls for a street Christmas tree: instructions, photos
An excellent decoration option is to use ice balls. They are made from ordinary balloons, which are filled with water and dye. Find more detailed information . There is a complete description and instructions for making ice balls for the New Year tree and decorating the area near the house.

Crochet balls for a street Christmas tree: diagram, description, photo
If you love crafts and know how to crochet, use your skills and make some cute Christmas tree decorations. Using threads, knit cute horses, dogs, and balls. These products look simply great. DIY Santa Claus for a street Christmas tree: description
What would New Year be without Santa Claus? For a street Christmas tree, it can be made using a plastic bottle and utensils. The body of Santa Claus itself is made from a plastic bottle, which is covered with pretty red paper. This will be an imitation of his outfit. A beard, hair, legs and arms can be made using plastic spoons. Eyes, nose and mouth can be drawn using markers or paints. Below are the simplest and most popular options for making Santa Claus for a street Christmas tree.

 DIY Santa Claus
  DIY Santa Claus
 The best designs of New Year's street trees: photos
Of course, you want the Christmas tree to look very stylish and unusual, so you need to choose beautiful and stylish toys. Try to make decorations using a decent amount of glitter and wrapping paper. Everything must be done carefully so that the toy does not look very cheap and untidy. Below are the cutest options for decorating a street Christmas tree.


Every person wants to quickly decorate the Christmas tree in their home on the eve of the New Year. But often this activity does not end with preparation for the celebration. In schools and kindergartens, children are given tasks to make decorations for the city Christmas tree. Therefore, in this article we will make Christmas tree decorations with our own hands for a street Christmas tree.
Beautiful and large Christmas tree toys
Santa Claus from a bottle.
How many crafts can you make from plastic bottles? The answer here is simple - a lot. New Year is the holiday when bottles become the basis for creativity. For the first craft you will need a 5 liter bottle. It is painted with red paint. While the paint is drying, you need to prepare the plastic spoons. Handles are cut off from them.
To make the face of Santa Claus, you should use white paint. Her facial features are outlined, and her beard is formed using spoons. They are glued to the bottle with super glue. Spoons are glued as sides. They also make mittens from them. For additional decoration use shiny tinsel.

Airplanes made from plastic containers.
It is worth noting that plastic containers for shampoos and cleaning products should not be thrown away. Having your own imagination, you can make something interesting out of it. And the airplane will become such a toy. Initially, plastic containers are covered with strips of colored paper, and then wings are attached to the toy. Now you just need to attach a string so that the toy can be hung.

Christmas tree toys made of cotton wool.
This article will tell you how to make Christmas decorations for your outdoor Christmas tree. For example, they can be made from cotton wool and now we will tell you how to do this. So:
Initially, they make a frame for the toy. It will be created from wire.
After this, take the cotton wool that you have prepared. Mittens and felt boots are made from the material.
To make the body you will need a little bit of paper. It is glued to the frame, and then cotton wool is glued to the layer of paper.
After this, they begin to create the head. Foam is used for this. They also use paints to paint it and give it color.
And the hat and braid are made from cotton wool. As a result, everything will look not only beautiful, but also impressive. Use glitter to make your toy's clothes even more beautiful.

Christmas tree decorations made of glue and thread.
An ordinary thread can turn into a real work of art. But here it’s impossible to do without imagination and the necessary materials. Use balloons of different sizes, as well as glue. If you explain the process of work, then even a child can succeed. So:
Glue is poured into the vessel, and the thread itself is lowered into this vessel. If you use a thick thread, your craft will be voluminous. Accordingly, it will take longer to dry. The ball is wrapped with this thread and then allowed to dry. The balloon is then pierced to create a beautiful piece. Now you can spray paint it and then attach the loop to it.

Volumetric ball.
Today we are making large New Year's toys for the street tree. It is worth noting that handy materials can be used for such toys. For example, such material may be ordinary disks. There are probably a lot of them in every house. So, for this craft, you will have to cut several unnecessary disks into pieces.
A foam ball is used as a base. Next, each piece is attached to the base with a glue gun. Don't forget to make a loop for hanging.

Clock-house for the Christmas tree.
If you need a large Christmas tree decoration for your street Christmas tree, then our article is ready to present you with a lot of interesting things. The next toy will be interesting because it looks three-dimensional and beautiful. Several materials are used to make this craft:
- A couple of ceiling tiles
- Scissors, pencil and ruler,
- Rectangular box
- Colored and food foil,
- Candies and small toys for decoration,
- Braid and nail polish,
- Glue moment.

Progress:
Initially, take the ceiling tiles and place the box on them. Using a pencil, draw a house on the tile. Then measure the sides and prepare blanks for the side walls. Blanks will be required for: walls, roof and floor.
All the parts are cut out and large elements are covered with food foil. For small parts, colored foil is used.
The box is glued to the back and front walls of the house. A hole is cut in the upper part and a braid is threaded through them. The ends of the braid are then sewn together. You will get a loop. It is tucked into a box.
Now all parts of the house are connected and then glued together. Yellow foil is used to cover the round watch dial. It is cut from ceiling tiles. Afterwards it can be glued to the toy in this form.
Round candies must be painted with varnish. It should dry on them. Afterwards they are glued onto the dial instead of numbers. The roof of the house is decorated with small toys. And then the product can be sent to a competition or a Christmas tree.
Candy for the Christmas tree.
Every New Year tree cannot imagine its existence without a traditional decoration - candy. Indeed, this craft is the simplest Christmas tree decoration. This requires cardboard that is rolled into a cylinder. Then the item you have obtained is wrapped in bright fabric. Beads and tinsel are used for decoration.

Toy gift.
The next simple toy is a gift toy. What is required here is a simple box, which is packed with wrapping paper. To prevent your toy from getting damaged, it is covered with cellophane. For even more decoration, a bright and large bow is glued to the box.

Big star.
Here are some ideas for Christmas decorations for your outdoor tree. They are usually made from different materials. The Christmas tree star is made from simple branches. But first you need to find suitable ones, then they are cut to the required length, and then folded in the shape of an asterisk. The structure is tied with wire, and then additionally fragile areas are coated with silicone. For decoration, the craft is sprinkled with artificial snow. Also use cones for decoration.

Snowman.
If you work hard, you will get a wonderful toy. You will need polystyrene foam, preferably dark in color. To make a beautiful figure, use a stencil. Cut out a snowman with a stationery knife. The best way to decorate a snowman is with acrylic paints. All that remains is to make a hole and the toy will be ready.

Big ball.
If you are planning a competition on the theme of a New Year's toy for a street tree, then in our article we have collected the best examples for you. To make the ball, take a foam base and attach pine cones to it using instant glue. To decorate the composition, you can also attach bright berries to the ball.

Let's sum it up
Of course, this is a small part of the crafts. But here are only the most interesting ones. They will certainly take their rightful place on the Christmas tree or at the competition.
Starting over the weekend, I was simply drawn into this exciting activity. And it all started with the fact that my child and I had to make a couple of Christmas tree decorations for a street Christmas tree, which (more precisely for 2 Christmas trees) grows in the courtyard of the kindergarten. And then it began.....I scoured the Internet looking for ideas and eventually found what you see now. Unfortunately, I didn’t find such a MK on our favorite site (if it already exists, then I apologize - I didn’t intend to plagiarize, and therefore I admit that it wasn’t me who came up with this, but I’m just embodying what I saw on other sites)
Preparing materials:
1. old and unnecessary CDs (12 discs are needed for one ball)
2. Soldering iron with a sharp tip (I think you can somehow do without it, but with this device it will work faster)
3. Glue gun
4. Wire
5. Tinsel (I used thin) - approximately 4 meters
6. Good mood and time about 40 minutes

STEP 1: cut out a template - a pentagon with sides approximately 6.5 - 7 cm. We will need it for the next step

STEP2: apply our template to the disk and, using a soldering iron, make 5 holes in the disk corresponding to the corners of the pentagon. And so with all 12 discs

Step3: cut the wire. In the future, we will use this wire to fasten our parts together.

Step4: We begin to assemble the ball. The ends of the wire look towards the underside of our future ball. Then we begin to connect the outer 5 disks to each other (see arrows)

It turns out like this (looks like a vase)

Step 6: place the second row of disks in a checkerboard pattern relative to the first row. and then we close everything with the last (12th) disk. Our ball is ready. You can decorate with tinsel.

My brother, seeing the ball, suggested putting a light bulb inside and I liked this idea. This is where my experiment began. Only instead of a light bulb, inside I placed a New Year's garland of many small light bulbs before connecting the last disk to the parts. Plugged it in and.....

VOILA!
True, my “point-and-shoot” camera, which dares to call itself a digital camera, still does not know how to photograph garlands and other lighting effects well. Therefore, the quality of the photo (even though it turned out at all) - I apologize - is not so great. BUT it's still fascinating.

For now it stands like this... without decoration. BUT I don’t know - is it worth adding tinsel to this lamp at all or leaving it like that? How do you think?
I DON’T like winter because I have to get up in the morning when it’s already dark outside. But today I’m even a little happy about it. Perhaps I will be able to wake up the child early tomorrow and surprise him with such an unusual New Year's lamp. And at the same time take a couple more photos

And this morning, on the way to Kindergarten, the child happily agreed to pose with the balloons. In the morning we gave them to the teachers. Our group is located next to the kitchen. SO - while we were walking, the cooks turned their heads, then they came running to look... And the children from the street saw us and shouted to the teacher, “Look, Vladik is carrying something beautiful.” In general, everyone is happy. And as always, we brought them on time: one of these days a commission will come to the kindergarten with an inspection. We were offered to participate in a competition with them, but I, being honest, refused. Because the child did not take part in their creation, and we have another idea in stock - especially for the competition (it is important for me that the child also works.
We had to wait a long time for snow this winter. New Year is coming soon, and winter doesn’t spoil us with snowdrifts. But this does not at all exclude the appearance of winter symbols in the form of light sparkling snowflakes in your home. Is it time to decorate your home for the New Year? With pleasure! And we will use unnecessary CDs to create snowflakes.
Everyone has CDs in one quantity or another.

The need to use them for their main purpose is less and less, but the iridescent iridescence and standard round shape generate many ideas for New Year's crafts. They are especially suitable for making snowflakes.

The iridescent side is elegant in itself. To convert a CD into a snowflake, you can use different techniques. Even if a thin outline of a snowflake is cut out of white paper and then pasted on top of the disk, the image of a winter ballerina will already appear.

In addition to simple paper snowflakes on disks, you can make scenes from appliqués; snowmen, huts and New Year trees will feel cozy in the shimmer of the disk circles.

You can cut a snowflake from a CD using a template or by cutting the disc along the edge. True, this is quite labor-intensive work.


Snowflakes on CDs drawn using acrylic contours look interesting. Acrylic contour is sold in tubes with a small spout that allows you to apply fine lines to the surface.


Use white, blue, blue, turquoise contours to draw snowflake patterns, which have an innumerable number of patterns. You can also use acrylic glitter glue or nail polish for painting.
.jpg)
For knitting enthusiasts, CDs serve as an interesting stencil that can be braided or tied with threads of yarn. Of course, yarn with Slyurex or small mompons, bouclé, grass or yarn with sequins will add an additional emphasis on festiveness and New Year's sparkle.
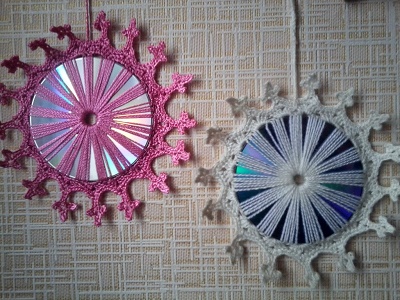

Using ribbons or braid, you can also turn an ordinary disk into a New Year's tree decoration. In addition, you can make fabric or felt applications, then the snowflakes will be soft and fluffy.

To get more shimmer and use new shapes, CDs are cut into fragments and used to paste over a snowflake template made of thick cardboard or plywood. The surface of the template is primed, then a shiny mosaic is glued on, the seams are rubbed and painted over with silver or acrylic.


You can also decorate the surface of a CD by gluing rhinestones, sequins, beads, cutting, or foil to its surface. The material for gluing is also placed, drawing the outline of the snowflake.
If you use mother-of-pearl buttons and pearls, the snowflake ornament will turn out to be very rich, dense, and the snowflake will be heavy and very beautiful. It turns out to be a very elegant object for the interior.
.jpg)
.jpg)
.jpg)
You can separately weave a snowflake from beads and beads on a wire and place it on the shiny surface of the disk.
.jpg)
.jpeg)
.jpg)
Another way to decorate a CD with a New Year's motif is to use isothread techniques, which consist of sequentially stitching a plane through the holes with straight stitches. An unexpected effect from the combination of threads and the iridescent side of the disc.

.jpg)
Using all these methods, you can make your home festive and elegant just by using stocks of old unnecessary CDs. And each copy can become an exclusive item.
Hi all. Yesterday in kindergarten I was given the task of preparing some kind of toy for the city street Christmas tree. I have only seen one of these toys - a candy toy, and one mother made it for 2 years in a row. But this year, such candy toys are not suitable for them (the district administration) and they told them to come up with something new.
Among the options proposed by teachers were:
1. Color the flower pot and make it in the shape of a bell.
2. Wrap the children's ball in foil so that it turns out to be a New Year's ball for the Christmas tree.
To be honest, my head is occupied with something completely different, so we’ll look for what other craftswomen and sites offer. I’ll share the most interesting ones.
DIY toys for a street Christmas tree - a selection of ideas and master classes.

Insert an aluminum wire into the first tube (I got it from a “noodle” electrical wire) so that it does not break under the weight of the disk.
Place the disk on a reinforced tube and secure it with silicone glue (hot gun) so that it does not dangle.
To prevent hot silicone from flowing out of a sufficiently wide hole in the center of the disk, cut out 2 “washers” from cardboard. String a “washer” onto a tube, apply hot silicone onto it and glue the disk to the washer and, at the same time, to the center of the tube. Glue the second “washer” with the other side. This way the disk is securely attached to the center of the straw.
Thread a straw with a disk and 2 more straws onto a strong thread. Close them into a triangle.
The joints of the tubes and cardboard “washers” can be decorated with tinsel.
An interesting toy for decorating a street Christmas tree is ready!
The description may seem incomprehensible, but in fact this toy is very simple to make.
From V E N E R A.

Mini mk.
1) 2 identical packages of semi-finished products - glued together (only with glue for ceiling tiles)
2) paint with silver (diluted with water-based varnish)
3) decoupage... for a festive touch I covered the edges with glitter and outlined the contours)))
4) I wrapped a ribbon around the joints. also with titanium glue...and I made a loop for it too
You can do the same with plastic plates...

I received an assignment from school to make a toy for a street Christmas tree, I thought about it and decided to make a ball. I took cut up bags, crumpled them up, rolled them into a ball, periodically dripped PVA glue, cake strings and sequins + gold paint. Diameter 20-22 cm.
Made from plastic bags, secured with masking tape, painted with gold spray paint and decorated, as they say, with whatever it was :), in this case, tinsel, bows, a garland of flat snowflakes
New Year's toy for the street tree House clock, author Olga Gulemina.
For work you needed:
two ceiling tiles;
ruler, pencil, scissors;
small rectangular box;
food foil;
colored foil;
small toys for decoration;
12 M&M`S candies;
clear nail polish;
braid 60 cm;
2 tubes of instant glue.
To begin, take a ceiling tile, place a box on it and draw a house using a pencil and ruler. Then measure the sides and prepare blanks for the side walls, roof and floor of the house. Then cut out all the parts. Cover large parts with food foil, and small parts with colored foil.
Glue the box to the front and back walls of the house. Cut two holes in the top of the box and thread the ribbon through them. Sew the ends of the ribbon to make a loop and tuck them into the box so that they remain inside the house.
Connect and glue all parts of the house. Cover the pre-cut circle for the dial with yellow foil. Glue it to the house.
Cover the M&M`S candies with two layers of nail polish, dry and glue them onto the dial instead of numbers. Cut arrows from colored foil and glue.
Decorate the roof of the house with small toys. To do this, simply glue them on with glue. The little house is ready.
Such a lamp will look good in a nursery, as children love bright and unusual things. The following polyhedra can be made from disks: cube (four faces), icosahedron (20 faces in the form of triangles), dodecahedron (12 faces in the form of pentagons - shown in the photo), tetrahedron or pyramid - 3 faces.
Each face is one disk. First, you need to make a template from paper according to the shape of the edge required for the figure. For example, for a cube it is a square, for a dodecahedron it is a pentagon, and so on. Using this template we mark the cuts on CDs. The cut itself is made on half the side of the template, and for all sides of this craft made from disks, this part of the side (the place of the cut) should be the same - for all parts it is left or for all parts it is right. The cuts can be made with a hacksaw, a hot awl, or even a grinder. In this case, the melted edges of the disks are cut off using a stationery knife. When assembling, one element is inserted into the cut of the next and so on the entire lamp. It is necessary to carefully assemble the elements, as if the disks are bent, they may break.

New Year's ball made of 12 computer disks. Economical, environmentally friendly and long lasting. It is especially good for outdoor Christmas trees, as it does not deteriorate. Connection with tape. Still a little unfinished.
I mark the pentagon with a protractor at 72 degrees, the distance between the edges is 8 cm. I cut it with scissors, I didn’t think they could cut it so well.
New Year's balls from CDs on a street tree, author I am Oksana.

Preparing materials:
1. old and unnecessary CDs (12 discs are needed for one ball)
2. Soldering iron with a sharp tip (I think you can somehow do without it, but with this device it will work faster)
3. Glue gun
4. Wire
5. Tinsel (I used thin) - approximately 4 meters
6. Good mood and time about 40 minutes.
STEP 1: cut out a template - a pentagon with sides approximately 6.5 - 7 cm. We will need it for the next step
STEP2: apply our template to the disk and, using a soldering iron, make 5 holes in the disk corresponding to the corners of the pentagon. And so with all 12 discs
Step3: cut the wire. In the future, we will use this wire to fasten our parts together.
Step4: We begin to assemble the ball. The ends of the wire look towards the underside of our future ball. Then we begin to connect the outer 5 disks to each other (see arrows)
It looks like a vase.
Step 6: place the second row of disks in a checkerboard pattern relative to the first row. and then we close everything with the last (12th) disk. Our ball is ready. You can decorate with tinsel.

In general, I found a ball made of plastic cups, just what I needed. It turned out to be very simple to make, and the money was only 28 UAH (200 cups - 16 UAH, a pack of paper clips - 2 UAH and 5 sprinkles - 10 UAH). I bought 300 cups. - that’s what it was written everywhere, but the ball took 190 pieces.
I want to tell you how I did it, otherwise I couldn’t find step-by-step instructions on the Internet. In general, there were two options on the net: 1) first make a circle of cups, and then build rows on top, reducing the number of cups in each, 2) first fasten 3 cups together, and then attach hexagon “flowers”, there were no steps, so I decided do it your own way, focusing on a soccer ball, which contains both hexagons and pentagons.
I stapled the cups at the bottom and at the top, but that was at first, then mostly only at the bottom, in general it depended on the situation, some couldn’t be stapled on all sides
And so, here we go:
1) fasten the cups into a “flower” (1 piece for now)
2) fasten the cups into a “flower without a petal” (3 pcs.)
3) and also fasten “a flower with three petals” (1 pc.)
4) lay it out like this. It turns out that the “flowers” have 2 common petals
5) now we fasten these parts + 1 cup so that in the middle we get a “donut”-pentahedron (from 5 machines)
6) do the same for the “bottom” of the ball
7) make “taxi checkers” (10 pcs.)
8) attach 5 “checkers” to the “top” and “bottom” of the ball like this:
9) make “flowers” (10 pcs)
10) attach 5 “flowers” to the already created “top” and “bottom”. Attention!!! This is where difficulties begin - the ball begins to round, the cups begin to bend and even break a little, but this is not critical. So, when you attach the “flower”, then between the base and the “flower” you should get a “donut”
11) now you need to put the two halves together like a puzzle. When folded, you get “flowers” without a center, into which you need to insert one more cup, there will be 10 such center cups. For now we are inserting 9 of them.
12) what do we do with the 10th middle glass? For strength, we insert another cup into it, pierce a hole with an awl, place metal washers in the cup and under the cup (for strength), stretch a synthetic cord of the required size in the form of a loop, tie several knots under the cup, and tie a knot in the cup too. The result is a loop on which we will hang our ball. Then we also insert this middle glass with a loop into the ball.

