Star news


Christmas tree made of sticks and twine. How to make a tinsel tree with your own hands: interesting ideas for New Year's decor
A Christmas tree was born in the forest, it grew in the forest... And let it continue to grow. In order to celebrate the New Year, it is not at all necessary to cut down a living tree. It is much wiser to create a symbol of the New Year yourself from available materials. Moreover, for the Christmas tree you need to free up a separate corner in the room, and constantly sweep away the crumbling thorns. For a wall model, all this is not required. Just a little imagination, available tools and desire.

In the first case, the tree is simply painted with oil paint on a pallet. A few nails, toys, a star on the top, and an unpainted wooden lattice turns into a symbol of the New Year.

Nails will also come in handy here. You need to drive them directly into the wall in the shape of a Christmas tree, and then pull the knitting threads onto the resulting metal frame. Then you can decorate with toys to your taste or give the impromptu Christmas tree to the children. Let them hang Kinder toys and candy wrappers on it.

A few wooden slats, nails, a luminous garland, and a quite nice Christmas tree appears on the wall.

For those who don’t have time to tinker with wall decoration, you can arrange books in the shape of a Christmas tree in the closet.

And again a ball of thread. This time it is taped to the wall and decorated with New Year's cards and paper figures.

If children's toys are lying around the house, you can attach them to the wall in the shape of the same Christmas tree.

Every housewife will probably have paper cupcake tins. But a Christmas tree made from these molds is not found in every home.

The same tree, only made from cash register tapes. It looks truly impressive. It costs a penny.

Very often in garages or closets you can find broken wooden rulers.
If you nail them to the door in the shape of a Christmas tree, you can get a nice New Year's decoration.

The shelf in the shape of a Christmas tree looks quite original. You can put it together (as well as decorate it) yourself.

In a children's room, you can glue decorative paper balls in the shape of a Christmas tree to the wall. And there is no need to decorate. The wall applique will look bright anyway.

This is probably what a wall tree looks like for the most patient people. After all, in order to cut out so many fragments from paper, desire alone is not enough. You still need a lot of time, effort and patience.

It is much easier to draw the outline of a Christmas tree on the wall and glue a paper garland to it. Moreover, this design looks no worse than the previous one.

What could be more original than a Christmas tree made from rulers? Only a tree made of wooden clothespins, on which you can hang New Year's gifts and glass balls.

Or you can simply lay out a Christmas tree on the wall from a glowing garland. Both bright and beautiful.

There are New Year's traditions that we cannot help but observe, because without them the holiday will not be truly New Year's. Such traditions can safely include - the clinking of glasses with champagne, under the New Year's beauty and, of course, the New Year's tree.
 In this article, the News Portal "site" has prepared for you several unusual, but very original ways to implement one of the most important traditions - installing a New Year tree in an apartment, office, country house and other premises. In our case, the New Year tree will not be simple, but a wall one. Yes, yes, the New Year tree will be placed in all its glory on the wall.
This method of placing a Christmas tree will be appropriate in small apartments, rooms, office spaces, shops, or where everything unusual and original is appreciated and loved.
Christmas tree made of pompoms
 This Christmas tree solution will bring warmth and comfort to your home. Give preference to multi-colored pom-poms, which are best made from yarn, but you can also try using decorative corrugated paper.
Attach the made pompoms to a strong thread or fishing line and attach them to the wall in the form of a Christmas tree silhouette.
Christmas tree made of clothespins
 Who would have thought that ordinary wooden clothespins could be an excellent decoration for the New Year's interior.
Use decorative ribbon or elastic or pre-decorated clothespins to create a holiday calendar-style Christmas tree on the wall.
Clothespins are great for attaching small gifts and greeting cards.
Christmas tree made of paper
 To create such a fluffy paper Christmas tree, use fringe made from decorative paper. Attach the fringe to the wall in the shape of a Christmas tree using double-sided tape. The finished Christmas tree can be decorated with an electric or paper garland.
Christmas tree poster
 One of the simplest options is to use a poster with a picture of a Christmas tree. Attach the poster to the wall with tape, and then decorate it with Christmas tree decorations, beads and an electric garland.
Christmas tree made of wrapping paper
 Each of us is often presented with souvenirs and gifts in beautifully wrapped wrapping paper. If you still have such paper and are collecting dust lying in the closet, then now it can get its second life.
Cut out individual parts of the future wall Christmas tree from wrapping paper. Attach the finished parts to the wall with double-sided tape and decorate with decorative ribbons, bows and small Christmas tree decorations.
Christmas tree made of paper garland
 Cut out circles of equal size from colored paper and glue them onto a strong thread, thereby creating different colors.
From the finished garland, place the silhouette of a New Year tree on the wall.
Christmas tree shelf
 In this design, the New Year tree can become a real piece of furniture that will not only decorate, but also carry the useful function of a bookshelf. Place New Year's souvenirs, Christmas tree decorations and, of course, gifts on the “branches” of the Christmas tree-shelves.
Christmas tree made of small souvenirs
 If you have a large number of interesting things at home, such as magnets, pictures, mugs, keychains, unusual figures and figurines, then it’s time to use them to create a real designer Christmas wall tree.
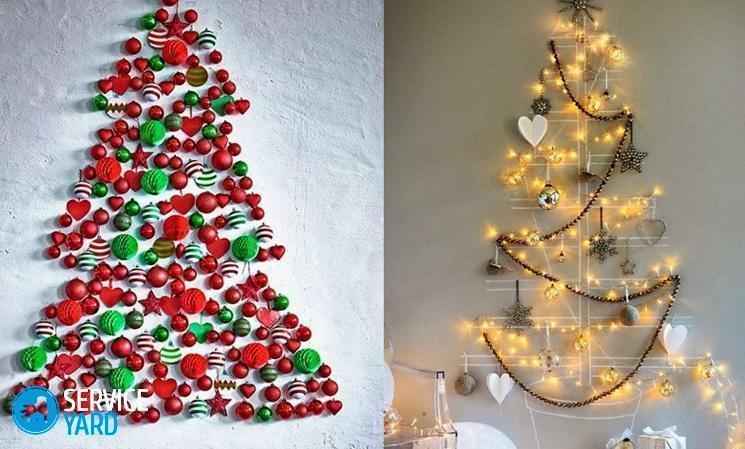
Christmas tree made of electric garland
 This option will appeal to those who appreciate shine and light. To create such a New Year tree, use ordinary Christmas tree electric garlands, which you attach to the wall with tape in the shape of a Christmas tree.
Decorate the finished glowing New Year tree with small Christmas tree decorations, snowflakes and beads.
Christmas tree drawn with chalk
 A great option for decorating a classroom.
Draw a New Year's beauty with chalk on a blackboard, and then use tape to attach Christmas tree decorations to it.
Christmas tree made of wood
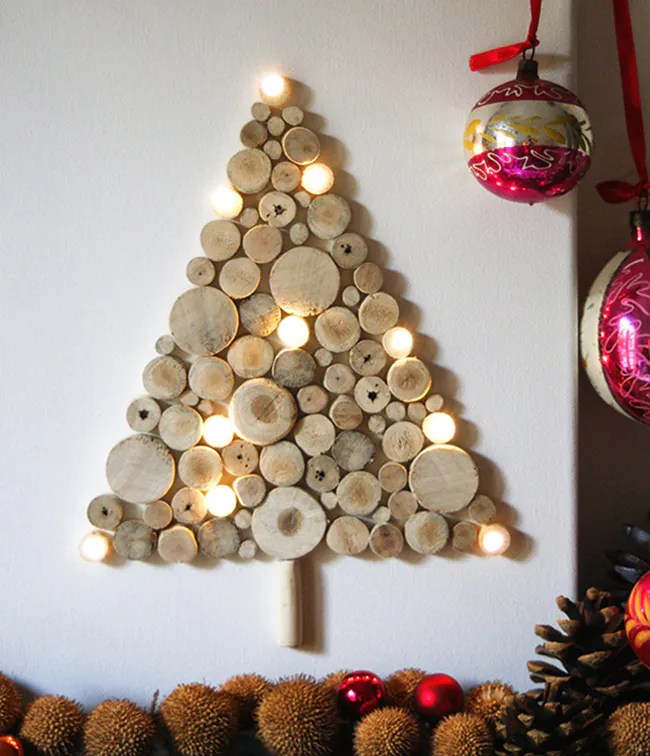 This version of the New Year tree will be very useful in a country house or in the country. Attach cut pieces of logs to the wall to create the silhouette of a Christmas tree.
 You can come up with your own unique New Year wall tree, because you can make it from anything - photographs, candies, fabrics, New Year's tinsel, decorative ribbons and strands...
We all love holidays, especially New Year. When the whole family takes New Year's toys, garlands, and tinsel out of the boxes to decorate an indispensable attribute of the holiday - the New Year tree. Many people cannot afford a living tree. Some people don’t have enough space in their apartment, others don’t like the prospect of constantly cleaning up falling needles. For this case, there is an excellent alternative to a festive tree. Designers have long been offering several dozen options for creating holiday decor - a Christmas tree made of balls on the wall, from garlands, and even from paper. Interesting and unusual solutions for the main holiday of the year are in our review today.
Creative Christmas trees
This trend is already quite common in many countries and even got its name - “Hand-made Christmas tree”. In the list of various options, a creative Christmas tree on the wall is rightfully in the lead. It has only one drawback - the lack of aroma that real wood gives. Otherwise, there are only advantages:
- The original Christmas trees on the wall are very compact. You don’t need to allocate a lot of space for them, think about how to secure the tree trunk, or how to camouflage it later.
- Caring for such a decoration is not a hassle. There is no need to remove needles that end up in various corners of your apartment, and you do not need to use various folk tricks to prevent the Christmas tree from falling off longer.
- Small children or pets can never pass by the sparkling living beauty indifferently. In this case, there will be no problem with the tree falling at all.
- Creating such a decoration will not require much time and effort from you. You just need to turn on your imagination 100 percent.
- By correctly applying the advice of designers, you can create such a beautiful interior decoration that you will set a new fashion in New Year's decoration - your friends who come to visit will follow your example.
Another big plus of a creative Christmas tree on the wall is its versatility. This decoration can be hung in any room:
- in a children's room, such a Christmas tree can be decorated from your favorite cartoon characters, dolls or cars;
- in the kitchen place a tree in the traditional Russian style or hand-made;
- in the living room create a composition in Vintage or European style;
- Minimalism is perfect for the bedroom.
Whatever room you place such a composition, made with your own hands and with soul, it will create a special festive atmosphere.
Important! In addition to a Christmas tree made of balls, you can come up with many different decorations. If your imagination is not enough for you, use our other ideas:
Handmade Christmas tree
As we have already said, original Christmas trees on the wall can be made from any materials and using various techniques. We suggest considering the most popular options.
Christmas tree made of garland
A garland in the shape of a Christmas tree on the wall is perhaps the most spectacular option. Such decor will sparkle and shimmer with lights, creating and maintaining a solemn mood. In order to make it, you will need 15-20 minutes of free time and very simple materials:
- tinsel for the Christmas tree of different colors;
- garland;
- buttons or other fasteners;
- tape or self-adhesive.
Important! To make the decoration resemble a real forest beauty as much as possible, you can use green tinsel. It will be very interesting to look at decor that uses not only tinsel, but also “rain”, and in different colors.
There are several more nuances in creating such decoration:
- In order for the structure to be durable and not afraid of any impacts, you need to choose the appropriate fasteners. The main points are the weight of the decoration itself and the material from which the walls in your room are made.
- Wooden and plaster surfaces are an excellent option for creating a Christmas tree on the wall from various materials. In this case, the base of the structure can be secured using ordinary buttons or small nails.
- It happens that the fasteners cannot withstand even the small weight of the decor. In this case, you will have to prepare the surface of the wall. For example, make small holes for self-tapping screws that thoroughly fix any structure.
- If you do not plan to hang tinsel or “rain” on the garland, then the wires can be attached using regular tape or double-sided tape. If there will be additional load on the garland, then just adhesive tape will not do.
Work on a New Year's decoration from a garland in the form of a Christmas tree on the wall is done very quickly, in just a few steps:
- To make the decor even and symmetrical, make markings on the wall. Use a pencil and ruler for this.
- Lay out the garland along the contours drawn at the previous stage of work. You can wrap it with tinsel in advance so that the composition immediately takes on a finished look.
- When marking the contours of the future decoration with a garland, do not forget to check that the wires are securely fastened to the wall. It’s better to do this right away, rather than deal with eliminating shortcomings just before the holiday.
Important! If there is a child in your family, then you should immediately think about his safety and the safety of the unusual decor. In this case, it is better to place the Christmas tree closer to the ceiling.
- If you first installed only one garland, then it is worth knowing that tinsel can be arranged in different ways. You can only outline the outline of the tree with it, or, on the contrary, you can completely fill the entire space of the decor with it. The blinking lights of the garland will only be slightly visible from under the tinsel, which looks very beautiful and mysterious.
Important! Don’t forget that the New Year is a magical holiday, which means you need to worry about surprises for your loved ones to make this day memorable. We are offering to you .
When all the elements of the Christmas tree made of lights on the wall are in place, the composition is ready. You can turn on the garland and admire the results of your work.
Important! A huge advantage of this decor is not only the ease of creation, but also the fact that after the holidays it can also be quickly removed from the wall.
A garland in the form of a Christmas tree on the wall can be decorated not only with tinsel and “rain”, it can also be done in a different way. Here you can implement several original ideas:
- Those who love nature can make a stencil of a Christmas tree on the wall from beautiful living branches, or lay out a composition from processed wooden blocks and place a garland on them, like on shelves.
- Decor made from soft toys, especially in a children's room, would also be appropriate. They are fixed on the wall in the shape of a cone and complemented with flickering lights.
- The outline of the tree can be created using shelves of different widths. To do this, they need to be arranged in a certain order: the widest is at the bottom, the narrowest is at the top. In everyday life, such a design will serve as a place for storing books and magazines, and before the New Year, you can put garland, tinsel, Christmas tree decorations and gifts on the shelves.
- In order to make an original Christmas tree, you can even use ordinary knitting threads. This decor looks not only impressive in the interior, but also very cozy. First, you need to make a stencil on the wall in the shape of a tree or the same cone, and by stretching threads from one side to the other, fill the space inside the composition. Decorate the outline with a garland.
Important! If you don’t have time or suitable materials, but still want to add a New Year’s flair to your interior, you can use a garland to create the outline of a Christmas tree on the wall without using any additional decor. In the evening, with the lights off, such a tree can lift anyone’s spirits and feel the holiday.

Christmas tree made of balls
A Christmas tree made of balls on the wall is the easiest way to decorate any room for the holidays. In order to make it, in addition to free time and desire, you will need:
- sets of Christmas balls;
- wire or cord;
- tinsel;
- decor in the form of toys or bows.
There can be a huge variety of options for how to make a Christmas tree out of balls on the wall. But before you start decorating, you should do the following:
- Mark the outlines of your future composition on the wall. The silhouette of a Christmas tree is usually used as a stencil for a wall.
- If you do this with a pencil, then the strokes should be barely noticeable, so that after dismantling the structure you do not have to think about how to wash the wallpaper.
- Place rows of balls on the wall in the form of a tree or a regular cone. The outline can be supplemented with a garland or the base can be fir branches attached directly to the wall, and decorations are already placed on them.
Important! This simple composition can be created in just half an hour, even on New Year’s Eve itself before the feast.
Children will certainly love the idea of decorating a creative Christmas tree on the wall, the outline of which is pre-marked with green tinsel or a decorative cord made of wire:
- If you choose the wire option, then the structure from it must be prepared in advance. Only the finished version of the base can be fixed on the wall.
- To create such a base, use thick wire to create an overall outline. Thinner material is perfect for attaching balls to each tier.
Floating tree
Both simple and complex at the same time, this Christmas tree project produces a stunning effect. When done correctly, the structure appears to simply float in the air. This idea of decorating a New Year’s interior has gained great popularity recently, and making such an original Christmas tree on the wall or even in the middle of the room is not at all difficult.
To work you will need the following:
- a platform on which the balls will be suspended;
Important! In this option, we suggest taking as a basis something that is found in almost every home - a stand for a steamer or a regular metal stand for hot dishes.
- metal chain;
- small carabiner;
- 200 hooks for fastenings - even office staples are suitable for these purposes;
- 100 New Year's balls - it is better to take different shapes, so the composition will look more original;
- a very thin fishing line, which gives the effect of airiness to the composition;
- 200 crimp beads or tubes.
- Using additional pieces of wire, we create “ears” on the lattice to hang the future original Christmas tree on the wall.
- We take the chain, cut it into 4 identical pieces of 10-15 centimeters each, and use hooks to attach them to the base by the “ears”.
Important! The attachment points should be symmetrical to each other, closer to the edges of the grille.
- We connect the free ends of the chains to each other in the center and assemble them onto a carabiner. With it, the base can be hung anywhere.
- Now let's do the decor. For it you will need a fishing line, which we cut into sections of different lengths - we’ll tell you which ones a little later. Make a loop at one end of each segment.
- To ensure that the loops are neat and securely hold the load, you can use jewelry crimp tubes.
- We attach a hook to the other end of the fishing line and use it to hang the pieces to the base, thus creating a floating original Christmas tree on the wall.
In order for the composition to turn out beautiful and neat, you need a hanging diagram. To obtain an ideal cone, first of all, you need to determine in which places the balls will be located.
We propose a scheme using balls with a diameter of 5 cm, with distances between the lines of the rings of 2-2.5 cm:
- In the center of the composition there will be 1 ball, then in increasing order - 7, 11, 15, 19, 23, 27.
- For each element of the future floating tree, the fishing line should be of different lengths.
Hang the ball, which will be in the center, on a fishing line 14 cm long. Next, proceed in a ring pattern from the center:
- The first ring holds one 18 cm line, the second 22.5 cm, two balls on a 27 cm line, three balls on a 31 cm line.
- On the second ring there are two balls on a 35.5 cm fishing line, two more on a 40 cm fishing line, hang three balls on a 44 cm long mount, four balls on a 48.5 cm fishing line.
- The third ring consists of three balls on a line 53 cm long, three - 57.5 cm, four - 62 cm, five on a line 66 cm.
- Ring 4: four - 70.5 cm, four - 75 cm, five - 79 cm, six - 83.5 cm.
- Ring 5: five - 88 cm, five - 92.5 cm, six - 96.5 cm, seven - 101 cm.
- Ring 6: six - 105.5 cm, six - 110 cm, seven - 114 cm, eight - 119 cm.
Important! You can choose simpler options for hanging balls. In a ready-made creative tree for the wall, they can be twisted into a spiral or each row can be located at the same level.

Christmas tree made of wood
Surely, many are already asking the question: why not make a Christmas tree out of wood for the wall? Easily! For this option, you only need tree cuts of different diameters. Secure them with a furniture stapler or glue - the composition should have the shape of a cone. The decoration can be various ribbons, braid and even lace attached to the cuts.
For the second option of a wooden Christmas tree on the wall you will need:
- twigs of suitable length and size, completely cleared of bark;
- white paint for covering the branches - it is better to choose the option in the form of an aerosol;
- shapagat;
- fishing line;
- a large starfish and several small ones;
- lace and Christmas tree toys.
Before you start work, treat the branches with paint - preferably twice, let them dry thoroughly. Then follow the following instructions:
- Arrange the branches in a descending order so that the shortest is at the top and the longest is at the bottom.
- Fasten them together with twine. It is better to start doing this from the bottom up, leaving a distance of 10 cm between the fastened branches for decoration.
- When you have tied the last top branch, tie the free ends of the ropes so that you get a loop with which you can hang the tree on the wall.
- Now it’s worth seeing how the Christmas tree will look. Hang it in place and see if the structure is even. If necessary, while there is no decor yet, you can tweak something else.
- If everything is satisfactory, trim off the excess twine from the bottom.
- To decorate the top of the Christmas tree, take a starfish - an original replacement for traditional decor. Attach with glue to the top of the composition.
- Hang Christmas tree decorations using regular fishing line. Thread one end into the ball mount and tie the fishing line on a branch in the place where you consider it necessary.
- Lace ribbons can be made on every second branch. Fasten its ends along the edges of the branches so that the middle of the lace ribbon sags a little in the middle.
Important! As decoration and in order to support the marine theme, to decorate such an original Christmas tree on the wall, you can use small starfish, which are attached with glue in different places directly to the branches.
Video material
made from paper, glasses, cups and even bread baskets. The main thing in this matter is to give free rein to your imagination, and there will always be available materials.Hello!
Today, on the eve of the New Year, I would like to offer you another wonderful craft that we will make from paper. This is a voluminous Christmas tree that you can easily make with your own hands right now. Because you will have everything you need, these are diagrams and the necessary templates. The forest beauty will turn out lush and fluffy.
Well, if you want to do a more complicated job, you can take a look, there we created products from various available materials, and even made a stomp.
Don't forget to decorate your apartment with others.
Well, let's start looking at and choosing the works we like and roll up our sleeves to create and surprise everyone. I wish everyone good luck and patience.
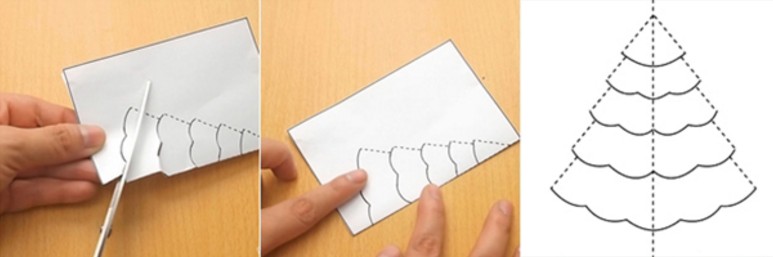
You always want to make this kind of decoration yourself, because it will look original and at the same time beautiful. All you need is a piece of paper from which you can easily create a stunning Christmas tree craft.
In addition, such work can captivate your child and he will be happy to sit and bother. Well, take a white sheet or perhaps a green one, but then double-sided. Bend it in half with its short side. And draw a Christmas tree symbol. Here are examples of templates that you can use.

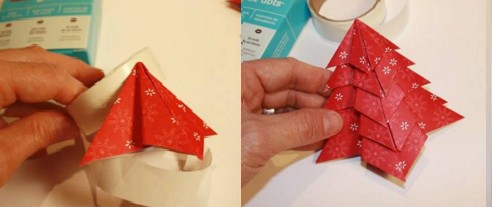
Then start cutting along the lines, and then make cuts and fold them as shown in these pictures. You need to make the blank in triplicate, and then glue them together. It will come out stylish and very delicate, but also, of course, voluminous, which will undoubtedly please everyone.

The next option is no less interesting and charming in its simplicity. Take these stencils and print them on a printer, and then you will receive the work in the form of a PO.


Where you see the main outline, take it and cut it out with scissors, but in the recesses, make only notches so that you can then turn it out, as shown in the photo. Two blanks of the same shape are then glued to each other.

And if you want to really surprise or amaze everyone, then make a whole composition, that is, a forest beauty, and not just one, but with a fawn.


And one more version of a 3D craft, which I propose to cut out on a simple landscape or office sheet, and then paint with gouache paints to make a real masterpiece.
You can use a can of glow-in-the-dark spray paint to create a shimmering effect.

Look with what zeal and desire the child does such work.

And this is what we have in the end. The beauty is indescribable.

The next option is also quite interesting, the Christmas tree is made from green paper in the form of loops, read these instructions and create with me. This year we made such a charm with my son. It turned out great.


Well, if you still have any questions, then I will be happy to share with you this video, which shows this master class.
Christmas tree using origami technique (simple diagram for children with description)
I think that in childhood everyone was fond of such an activity as origami. All because, it would seem, from an ordinary sheet of paper, an amazing result emerges. Preparing for this article, I didn’t even suspect that such a decoration as a Christmas tree can also be made using this technique. Imagine, this is what I was lucky enough to find.

Any old book without thick binding or a notebook will do. And the sequence of folding actions will be like this. Fold all the pages of the book from the left corner to the middle.

And then make a bag, that is, another fold.

Cut off all excess, do it carefully and efficiently, take your time.

Then unfold the product on the table and sprinkle with tinsel or glitter.

If you decide to make the work a little more complicated, for example, if your children are already going to school, then you can invite them to create such a forest beauty.


The following work is done during labor lessons in elementary school or classes are held in kindergarten. The description and all folding steps are presented in this illustration. Let's get down to business.

If you love modular origami and are proficient in this technique, then make a souvenir like this.


How to make a three-dimensional Christmas tree from corrugated paper for the New Year 2020

We will need:
- cardboard or thick paper
- green corrugated paper
- any glue
- scissors;
- bows, red paper, beads
Stages:
1. Make a cone from ordinary cardboard, then cover it with corrugated paper.

2. Now all that remains is to build twigs, like needles, for the future product. To do this, cut the corrugated paper into strips, cut the edges to make a fringe and twist each onto a wooden stick into a bobbin. The result will be something resembling a flower.

3. And glue the blanks to the cone using the trimming method. For a spruce tree 15 cm high, you will need 120 small blanks in the form of lush flowers. You can take a ready-made bow for decoration, or make it yourself from the same corrugated paper. Also use cotton wool with glitter, this will give the tree a chic and elegant look.

The next option is no less intriguing, as if the Christmas tree was made in a spiral, also based on an ordinary paper cone.

Make a base for the tree to create the following. Use glue, scissors and thick paper or cardboard.

2. Take corrugated paper 18 cm wide, but the length should be about 2 m. Fold the strip in half with the long side. Apply glue from the edge, leaving a gap of 1 cm.

3. And start pulling it a little to make a skirt.

4. Wrap the product with such a prepared strip, drip glue here and there so that everything sticks tightly.
Wind it only in a spiral to make the work voluminous.

Here's another wonderful option.

Forest beauty made of colored paper and cardboard
The next beauty will be made of colored cardboard, but make the decorations from colored paper. The Christmas tree is folded using such a simple technique that in a couple of minutes you will create this magnificent gift or souvenir that can be stored on the shelf for a long time.

You will need three blanks in the form of semicircles of different diameters, on which you can make a fringe like this. Then roll and glue each sample to form a cone. Then put a little less on top of the largest cone and then smaller ones.


There is another option, which is made from one paper cone and pasted over with circles. He looks wonderful, you can’t take your eyes off him.

By the way, I found a similar work in this story, who needs it, go for it. There the author came up with the idea of making mugs using one little thing, in general, see for yourself.
In addition, you can still fold the Christmas tree in this way, using circles as a base, and use wooden caps instead of a stand.


If you have wrapping paper lying around, roll it into a ball, trim the edges so that they become round at the base and decorate.

Moreover, you can make a huge craft in this way by gluing together several sheets of cardboard.

Then decorate the cone with packaging and glue the edges to the base.

Trim off everything you don't need and decorate with stars or balls.

Now let's do the craft using cardboard, which we will fold.

To create such a product, print out this stencil.

Then place it on cardboard, trace the stencil, and cut it out. And fold the workpiece in half. Make 8 of these products.

Go through the edges of each Christmas tree with a hole punch, and then, where the middle is, go along the fold line that you made before with double-sided tape.

Now all that remains is to sew the edges where the holes are.


Apply glitter or artificial snow from an aerosol and attach a star to the top.

Next job, take a cardboard base and stick a stick into it and secure it with glue. And then cut out circles of different sizes from old postcards and stick them on a stick.

Something similar can also be made from candy wrappers or just newspaper or magazine sheets.

Or you can create a souvenir from children's palms. It also looks good, especially since schoolchildren or preschoolers are always happy to do such work.

By the way, here is another idea from a newspaper or magazine.


Can you make a green tree out of an accordion? Fold a salad-colored office leaf into an accordion shape and use a hole punch to pierce the center. Insert a stick into the resulting hole.


Among other things, I saw such a lovely composition on the Internet.

Whoever is good at anything, there are so many ideas, take them and do them, friends.

A simple toy can even be made from ordinary ribbons, which you cut, then fold into a snake and connect.

Here are a couple more ideas, write your suggestions or corrections on how and what else you make such cute Christmas trees from.


Even from notes for writing, they managed to create a real masterpiece.

For kindergarten children, this kind of work is suitable: take thick cardboard and cut it in the shape of a triangle. A base will come out, onto which you ask the child to stick stripes.

Well, in conclusion to this chapter, here is another invention, this is a quilling-style Christmas tree.

Master class on making a New Year tree from napkins
It turns out that you can also quickly build a Christmas tree from ordinary napkins, and if you get creative with the colors, it will turn out absolutely unique.

Such a masterpiece is made in this way: circles are drawn on a napkin, and then the middle of each figure is connected with a stapler. Then cut along the contours of the workpiece.

And right towards the middle, start crumpling the edges, lifting them up. To make a flower. And then glue it to the conical base, which you made in advance. You can even arrange it in the form of a topiary. Now decide for yourself.

In more detail, if you are interested in this work, you can also use these step-by-step instructions in pictures:


Christmas tree stencils for cutting and printing
For those who love masterpieces in the style of vytynanka, they will take these stencils as a basis. Using a regular stationery knife, cut out the Christmas tree, or you can take a special tool that the masters of this craft have.

Cut two blanks at once, cut a strip on top of one, and cut a strip on the bottom of the other.


Here are a couple more ideas about what beauty can appear, see for yourself. Delicate and white forest beauties that are so attractive.

Take a leaf and crumple it in half, draw patterns and the outline of the spruce. Cut out all the parts with a cutter.

Take your time, this work does not require fuss.

You can print the template without folding it and draw the tree yourself. Don't forget to also leave gaps of paper at the bottom so that you can roll and glue them later.

That's what I mean. As soon as you make these two blanks, connect them together.


I suggest you download the stencils right now from my blog:


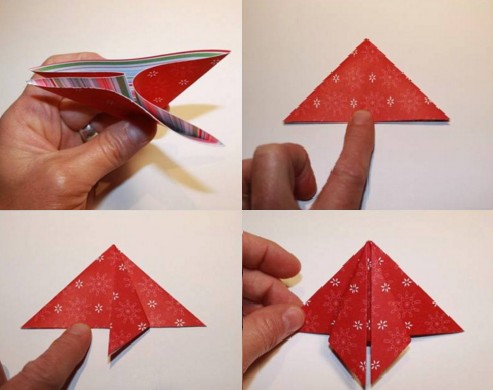
 . I propose that you also design them unexpectedly, namely, use the origami technique. This can be done using ordinary triangles, which are obtained by folding ordinary squares.

The next work, to complete it you will need two sheets. On one, you print out a Christmas tree and make cuts along the dotted lines, and then glue this blank to the background.


Anyone who doesn’t understand the stages of work in this photo can easily use the video hint.
Another masterpiece, using the same origami technique you will get a cool little thing that you can give to your mother or loved one. Watch the instructions and repeat step by step.


These are the work ideas you can use as a basis.


Paper Christmas tree on the wall
For a long time I couldn’t find a suitable option, but then I finally came across these ideas. It turns out there is nothing difficult in creating such a huge and huge Christmas tree. See it all for yourself and be amazed, because it’s so great when you and your family are together.

Besides everything, I also found an awesome paper beauty that can be glued to any wall.
This decor can be used to decorate any children's room or kindergarten. I was blown away by this idea and am sharing it with you. You need to download the templates (you can request them from me, I send them free of charge by email). And voila, let your imagination run wild and color with your children. The file will contain 22 stencils that need to be printed on a large A4 sheet and then decorated.

This is what can happen, go for it. By the way, there are other options for New Year coloring pages for children, go ahead and take note.


That's all, the article has come to an end. I enjoyed sharing everything I found. I hope you were completely delighted after scrolling through this page.
Have a good day and sunny mood everyone. Bye!
Best regards, Ekaterina
New Year 2019 is approaching, it's time to start decorating the house and decorating the Christmas tree. But it often happens that in small apartments there is absolutely no room for a forest beauty. In such cases, there is an excellent solution - a wall-mounted tree made of tinsel and garland. A beautiful alternative Christmas tree can hang on the wall behind the door or on the door itself. This method of creating a New Year's mood is suitable if the room is covered with non-woven wallpaper, and subsequently, after removing the needles from the wall, there will be no traces left. Well, or such traces don’t frighten you. 🙂 A step-by-step master class with photos will allow you to make an important attribute of the New Year with your own hands very quickly.
To work you will need:
- green tinsel;
- tailor's needles;
- electric garland
How to make a Christmas tree from tinsel and garland with your own hands
Choose a suitable place on the wall to create a New Year's composition. Often this place is behind the door, empty and idle. Secure the tinsel with safety pins on top and a little below 10-15 cm, forming the top of the tree.

Attach the garland, also, starting from the top and ending at the bottom. To ensure that the lights are clearly visible and not lost in the shine and volume of the tinsel, attach it a little further than you attached the rain.

Decorate your artificial tree with plastic Christmas balls and decorations by simply hanging them on the existing safety pins or adding more needles in the center.

A simple and beautiful DIY wall tree made of tinsel and garland is ready.

Turn on the garland... aaand... you can celebrate the New Year!

Underneath you can put gifts, figurines of Santa Claus and Snow Maiden, and plant soft toys symbols of the year. The year of the dog is approaching, so I give preference to a dog figurine.

This is how you can very quickly and easily create a New Year’s mood in your home; a festive mood and comfort will enter your home. WITH !

