Star news


Amigurumi. Crochet dog toys in amigurumi style with patterns and descriptions for beginners
Cute knitted toys that can fit in the palm of your hand came to us from Japan. Amigurumi means “knitted-wrapped” in Japanese. Every year, amigurumi knitting attracts more and more new supporters.
What is the difference between amigurumi and ordinary toys?
The main features of knitted amigurumi toys:
- They must be small. As a rule, the size of the toy does not exceed 7-10 cm, although there are also large figures.
- They should be cute: animals and dolls have arms and legs, eyes and a mouth are required on a pretty face, it is possible to tint the face to make it more attractive.
- Toys often have a disproportionate figure: a large head in relation to the body with low-set eyes and a high-set nose and mouth, the face expresses some kind of emotion: sadness or joy, surprise or admiration.
- Amigurumi are knitted with a very dense knitting, through which gaps are not visible, then the parts are stuffed and connected using threads or hinges.


All parts for the toy are made separately, so crocheting amigurumi for beginners may seem difficult, because the knitting must be tight, and given the miniature size of the toy, it is not so easy to do. Therefore, it is recommended to start with simpler toys and then increase the complexity of the work.

Materials for work
You can knit miniature toys with crochet or knitting. Yarn should be selected based on the size of the desired toy:
- “Iris” is suitable for the smallest toys;
- cotton is the best option for amigurumi, but such yarn requires knitting skills, since it must be dense;
- you can take wool if you want to get a voluminous, fluffy animal - after finishing work, the toy can be additionally combed;
- “grass” allows you to get shaggy funny animals. Knitting with this yarn is easy and fun; the “grass” can be combined with other yarn: for example, use it for the body, and knit the remaining parts from regular yarn.

For knitting you will need a hook or knitting needles. Amigurumi toys are knitted in the round, so the hook is more convenient to work with, but you need to choose it with a smaller diameter than for regular knitting: this way the fabric will be denser.


Master class for beginners
Start knitting with a ring. The amigurumi ring is knitted in one of two ways:
- Leaving the end of the thread, make 2-3 turns of the thread around your finger, tie the resulting ring with half-columns. Having reached the end, tighten the ring and knit the next rows in a spiral.
- Make a loop around the hook and pull the thread out. Tie the resulting ring as indicated above.

The first method is the traditional Japanese one, which is considered stronger.

Having mastered simple techniques, you can knit any toy: photos of amigurumi and descriptions are presented on various websites of needlewomen.

We suggest first knitting a small bear. We knit amigurumi, starting from the head:
- We make a ring of 6 single crochet stitches, knit two over each stitch, for a total of 12 loops.
- In the third row, add 1 loop through 2 loops of the previous row.
- We knit rows 4-5 without additives.
- In the 6th row you need to add 6 columns evenly, the 7th row - without additives.
- In the 8th, 9th and 10th rows we add 6 columns evenly.
- From rows 11 to 16 we knit without additives (42 stitches in total).
- From the 17th row we make decreases - in each circle there are 6 loops evenly, at the end we tighten the thread.
- About 18-19 rows you need to fill the bear’s head with stuffing.

Bear body
The body of the bear is knitted according to the same principle: additions must be made in rows 3, 4, 5, 6 and 7, then knit until the 16th row without changes, from the 17th row make decreases (6 in each row), do not forget stuff the body before pulling off the last stitches.


When the principle of circular knitting is clear, it is not difficult to make arms and legs: starting with an amigurumi ring, add 3 stitches in rows 3, 4, 5, then knit rows 6 to 8 without changes.

Knit rows 9-11 like this: 4 tbsp. double yarn over, 4 tbsp. double crochet From rows 12 to 15, decrease 3 stitches in each row. Stuff the handles and pull the thread.

Teddy bear legs
- We collect 5 air loops and knit: 3 tbsp. double yarn over, 3 out of 1 chain stitch;
- 2nd row: 2 tbsp. double yarn over, 3 out of 1 chain stitch, 2 tbsp. used yarn over;
- 3-4 rows without additives, you should have 16 columns;
- 5th row: 5 tbsp. double yarn over, 3 decreases with 1 yarn over, 5 tbsp. used yarn over;
- 3, 6, 8, 10,11, 12 rows - no changes;
- Row 7: 5 tbsp. double yarn over, additive, 5 tbsp. used yarn over;
- Row 9: 6 tbsp. double yarn over, additive, 6 tbsp. used yarn over;
- Row 13: 2 tbsp. double yarn over, 4 decreases;
- Row 14: 1 tbsp. double yarn over, 1 decrease. Fill the tabs and tighten them.

Ears
The ears are knitted from 2 air loops: pull 4 tbsp from them. double crochet, in the second row double the number of columns, in the 3rd row add 4 more columns.

Carefully sew all the parts together, making sure they are symmetrical, glue or sew on the eyes and nose. Teddy bear is ready.


Photo amigurumi for beginners


Modern needlewomen have long no longer limited their hobbies to knitting napkins and sewing oven mitts, but are learning more and more new types of craftsmanship. Among them, amigurumi is gaining increasing popularity - the art of crocheting or knitting, which came to us from Japan.
Amigurumi - what is it?
Crochet is most often used in this technique. Traditional amigurumi toys are various little animals that have human characteristics, for example, elements of clothing, accessories, standing or sitting on two legs.

The head, which is significantly larger than the body, and small limbs give amigurumi toys a completely charming, cartoonish look. And if you add suitable eyes and decorations, it will be very difficult not to be moved by the resulting miracle.
Amigurumi toys are knitted in the round and very tightly, since even during the knitting process they are filled with filler. It could be padding polyester, padding polyester or something similar. As a rule, amigurumi animals are knitted in separate parts and then sewn together.

Most often they are small, about the size of a palm, but you can create a character of any size - from tiny (5-7 cm) to huge (more than 40 cm). This depends on the size of the hook and the thickness of the thread used.
Required tools and materials

The good thing about amigurumi for beginners is that it doesn’t require any special expenses for consumables. Any needlewoman can find everything she needs in her box:
- hook;
- threads (different colors and thickness);
- beads, beads;
- eyes, buttons;
- filler;
- paint for tinting toys (to brown the cheeks, face, etc.).
In the process of creativity, each craftswoman will experimentally calculate the hook number and thread thickness that is convenient for herself, and in the future she will be able to independently develop patterns.
Amigurumi diagrams with descriptions of work for beginners
For those who are taking the very first steps in amigurumi knitting, it will be quite possible to knit a cute heart.

You will need:
- red threads;
- hook.
Designations:
Sc – single crochet
St - column
Pr - increase
Manufacturing process First, we knit two “tops”.
1. In the amigurumi ring 8 sc, close the circle with an edge loop.
2. 3 stitches, repeat in the 3rd 3(+1).
3. We knit the third round without crochet. 4. 3 stitches, increase in the 3rd stitch 3 (+1). We knit the second tip in the same way.
5. Connect the tops with six sc.
7. We adjust the size of the heart by decreasing it - skip it if necessary or decrease it. We stuff the finished product and give it to a loved one as a keychain, brooch, magnet, etc.
On a note! If desired, you can attach cute crocheted wings to the heart, as in the photo.
Step-by-step instructions for crocheting amigurumi: knitting a delicious cupcake

So, let's try to knit a sweet cupcake. You can use it as a keychain, a brooch, or make a whole plate of these delicious sweets.
Will be needed
- yarn, preferably pastel shades - 50 g;
- hook size 2.5 mm;
- filler;
- needle with a wide eye;
- black threads;
- scissors;
- eyes or matching buttons or beads;
- beads for sprinkling.
Designations
VP – air loop; sc – single crochet; dc - double crochet; ss2n – double crochet stitch; pssn – half double crochet; ss - connecting column or half single crochet; dec – decrease.
Manufacturing process
First we knit the dough, use beige yarn and a 2.5 mm hook.
- First row - make 6 sc in the amigurumi ring (6).
- Second row - add six loops (12).
- Third row - add two sc and repeat 6 times (18).
- For the fourth row, add 2 sb, repeat 6 times (24).
- Fifth row – add 3 sc, repeat 6 times (30).
- Sixth row - add 4 sc and repeat again 6 times (36).
- In the seventh row - we knit 36 sc loops behind the back wall (36).
- Eighth row – add 11 sc, repeat three times (39).
- In the ninth row - make 6 sc, (add 12 sc) repeat twice, then add 6 sc (42).
- Tenth row – knit 42 sc (42).
- Eleventh row - add 13 sc) and repeat three times (45).
- Twelfth row - knit 7 sc, then repeat 14 sc twice, add 7 sc (48).
- Thirteenth row - knit 48 sc (48).
- We finish with a connecting column. Cut the thread, leaving a long end.
We knit cream, take light pink yarn and a 2.5 mm hook.
- In the first row we knit 6 sc into an amigurumi ring (6), in the second row we add 6 loops (12), then in the third we add 1 sc and repeat 6 times (18).
- In the fourth we add 2 sc, repeating 6 times (24).
- In the fifth we add 3 sc and also repeat 6 times (30).
- The sixth (36) and seventh (42) rows need to be knitted almost in the same way, adding 4 sc and 5 sc respectively, repeating also 6 times.
- In the eighth row we add 13 sc, repeat three times (45), in the ninth row we knit 45 sc (45).
- In the tenth row we make an increase of 14 sc, repeat three times (48), from the eleventh to the thirteenth row inclusive we knit 48 sc.
- In the fourteenth we make a sc behind the front wall of the loop, skip 1 sc of the previous row and knit 5 sc from 1 loop, again skip 1 sc of the previous row and repeat this 12 times.
- We finish with a connecting column and hide the ends of the threads.
We knit the topping from chocolate-colored yarn using the same crochet hook.
- First row – make 6 sc in the amigurumi ring (6).
- Second row - add 6 loops (12).
- Third row - add 1 sc and repeat 6 times (18).
- Fourth row – add 2 sc, repeat 6 times (24).
- Fifth row - we knit 6 “smudges”.
- The first leak is sc, next to one loop we make hdc, dc, ch, next to one loop we make 3 dc2n, next to one loop we make dc, hdc, next to sc.
- Second leak - (4 loops of the previous row) - from one loop hdc, dc, next to one loop 2 dc, next to one loop dc, hdc, next to sc.
- Third leak - (3 loops of the previous row) - from one loop hdc, dc, ch, next to one loop 2 dc2n, next to one loop dc, hdc.
- The fourth drip - repeats 1 drip (5 loops of the previous row).
- Fifth drip - repeats 2 drips (4 loops of the previous row).
- Sixth leak - (3 loops of the previous row) - from one loop hdc, dc, ch, next to one loop 2 dc2n, next to one loop dc, hdc.
- Finish with a connecting post and cut the thread, leaving a long end.
Decorate the top with beads and sew them to the pink cream (the top part of the cupcake) using the watering thread. Embroider a muzzle on the dough and sew on the eyes. For stability, you can sew a cardboard circle to the bottom. Using dough thread, sew the parts behind the back walls of the cream loops, filling the toy with filler. Hide all the ends of the threads inside.
We admire it!
Step-by-step instructions for crocheting amigurumi: how to crochet a bunny toy

For the amigurumi level for beginners, a detailed master class on knitting a cute bunny is quite suitable. But you need to be patient and focus.
Will be needed
- Filler;
- Hook;
- Primary color yarn;
- Yarn of an additional color (for the muzzle);
- Clothes – blouse or dress, decide for yourself);
- Accessories for the bunny (bow, bracelet, etc.) – optional
Designations
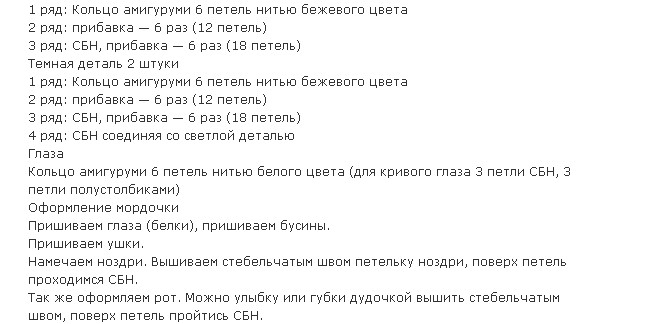
- KA - amigurumi ring ;
- VP - air loop;
- sc - single crochet.
Manufacturing process
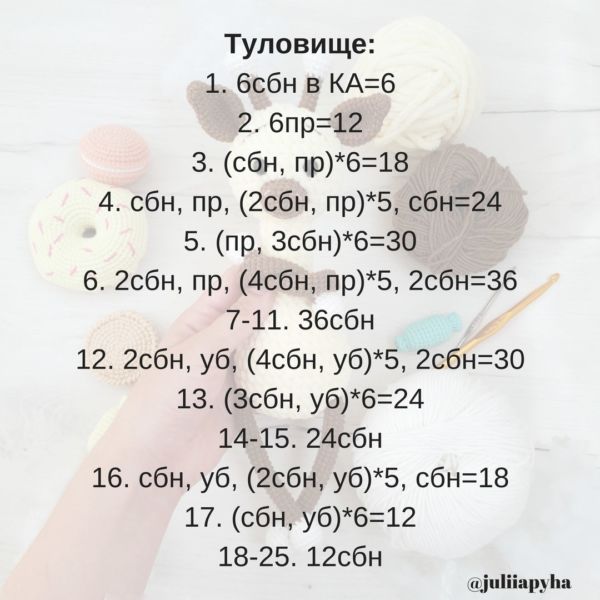
We start by knitting a head from the main color - gray, brown, etc.
- We knit 6 sc in KA
- Add 6 loops (12)
- Add 1 sbn like this 6 times (18)
- From the fourth (24) to the ninth (54) rows, inclusive, add one sc (in the 4th row - two, in the fifth - three, and so on) each time repeating 6 times (24)
- We knit the tenth row similarly to the first (54)
- Eleventh row - make 13 sc, then add 10 loops in a row, make 8 sc and again add 10 loops in a row, then make 13 sc (74)
- In the twelfth row we knit 23 sc, skip 10 sc and insert a hook into the 34th loop, knit 8 sc, again skip 10 loops and knit 23 sc to the end (54)
- From 13 to 19 rows we knit without changes (54)
- From rows 20 to 23 we decrease one sc at a time, starting from seven, i.e. in the 20th row (48) – 7, in the 21st (42) – 6, repeating each row 6 times .
Now we knit two beautiful ears.
We knit them on small circles of 10 loops, which were obtained on the 12th row of the head.

- We knit 10 sc (10)
- Add 1 sc, repeat 5 times (15)
- Same as row 1 (15)
- Add 2 sc, repeat 5 times (20)
- We knit without changes (20)
- Add 3 sc, repeat 5 times (25)
- From 10 to 19 rows - 10 rows without changes (25)
- Here you need to make 3 sc, decrease and repeat 5 times (20)
- 1 row without changes (20)
- We make 2 sc, we make a decrease and so on 5 times (15)
- 1 row without changes (15)
- Do 1 sc, decrease, repeat 5 times (10)
- Decrease 5 loops (5)
- Sew up the hole and hide the thread. We do the second ear the same way
- Next we knit the body with the main color.
- We make 6 sc in KA
- Next we add 6 loops (12)
- From rows 3 to 7 inclusive, add 1 sbn each, starting from one (i.e. in the third - 1 sbn, in the fourth - 2 sbn), repeating 6 times
- From rows 8 to 12 we knit 5 rows without changes (42)
- Do 5 sc, decreasing, repeat 6 times (36)
- From rows 14 to 17 we knit 4 rows without changes (36)
- Decrease by making 4 sc, repeat 6 times (30)
- From rows 19 to 20 we knit 2 rows without changes (30)
- Decrease 3 sc, repeat 6 times (24)
- From 22 to 23 we knit 2 rows without changes (24)
- We make 2 sc, decrease and so on 6 times (18)
- 1 row without changes (18)
We stuff the body with filler and sew it to the head.
The art of creating small amigurumi toys by crocheting or knitting originated in Japan. At first, they usually portrayed Japanese cartoon characters. Now knitted babies, having conquered the entire handicraft world, can be in the form of animals, dolls, household items and even fruits and vegetables.
Amigurumi toys can be made not only by experienced professionals, but also by beginners. You just need to choose the right easy-to-make amigurumi toy for beginners and the right pattern for it.
- In order to gain experience in amigurumi knitting, choose simple toys without small parts.
- Don't use too many different types of loops. To begin with, single crochets (SC) and connecting stitches (SS) will be enough.
- Take a hook smaller than the thickness of the yarn.
- For crocheting amigurumi, it is best to take acrylic yarn, because it has a soft texture and a rich palette of colors. For miniature products it is recommended to take iris, and for large ones - acrylic or wool. Great toys are made from cotton, but they require some experience. The grass is well suited for tying up the fur of an animal.
- In addition to the hook, for work you need to prepare in advance scissors, padding polyester, ready-made elements of the eyes and nose, as well as beads, sequins and buttons for decoration.
Amigurumi knitting technique
Knitting such a toy begins with an amigurumi ring. The ring can be made according to the Japanese pattern by winding the thread around your finger and then tying it with a sc, or pull out a loop with a crochet hook and also work with a sc.
Where to begin? Study sequential video lessons on the basics of crochet:
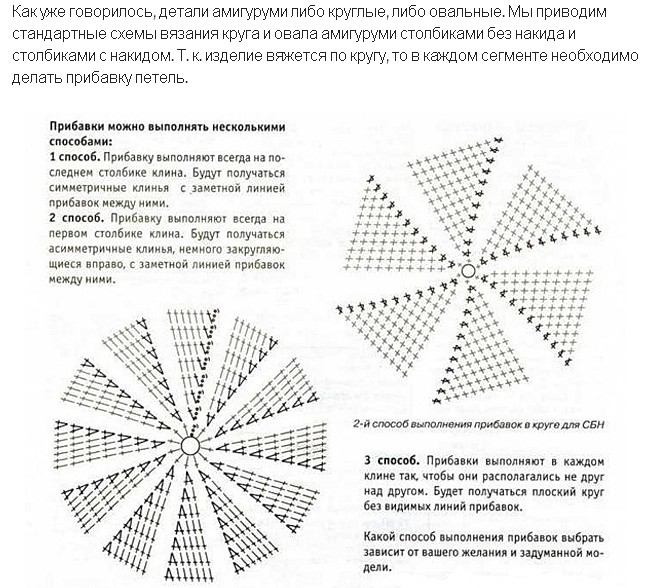
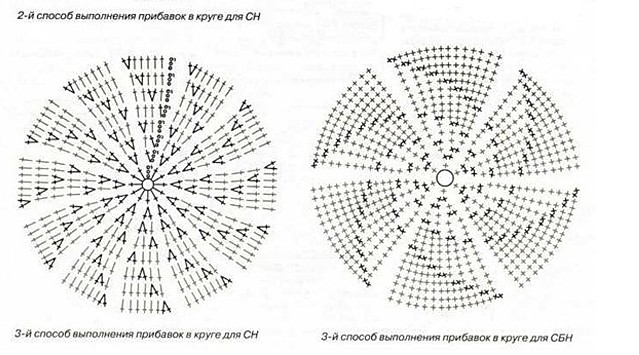
All amigurumi toys consist mainly of round or oval parts. Therefore, the circular patterns for crocheting them are typical. The circle is divided into several segments, in each of which additions and decreases are made depending on the shape of the element.


Amigurumi schemes


Knitting an amigurumi pig

A cute amigurumi pig is one of the simplest toys for beginner needlewomen, which will not be difficult to knit. The main and only pattern for creating this crumb is RLS.


Using a hook and pink threads, we assemble a Japanese amigurumi ring from 6 sc for the body and knit in a circle, according to one of the patterns suggested above, evenly adding loops in each row. In this way, we perform approximately 7 rows of RLS with additions, and then from 8 to 20 rows, without additions. Then from 21 to 25 we make symmetrical decreases, not forgetting to fill it with synthetic padding as the part narrows, and in the 26th row we pull the remaining 6 loops into one, cut off and pull out the thread.


We begin to knit the ears in the same way as the piglet’s body. In the 2nd row, we make an increase of 3 loops from the amigurumi ring and perform 2 more rows without increases. We fold the ears in half and sew them to the body.

The legs need to be knitted according to the same pattern, but knit 2 sc in the 2nd row from each loop. You need to knit 4 more rows without increments, then stuff the legs with padding poly and sew them to the body. Pull the remaining threads with a needle through the body and bring them to the place of the tail. Weave the threads into a braid, coat them with Moment glue, twist them into a spiral and leave to dry. Glue eyes and a button instead of a snout to the pig's face.

The funny pig is ready!

Amigurumi mouse
The first toy for completely inexperienced craftswomen may be this cute mouse, made from one part of the body, two ears and a tail. Knit the body according to one of the above patterns, decrease for the muzzle through the row. In this case, the mouse's muzzle will be slightly pointed. The ears must also be knitted from an amigurumi ring, in the 2nd row add 2 sc in each loop, in the 3rd row evenly 4 more loops throughout the circle. Sew the ears to the body, glue the eyes and nose, knit the tail in a circle.

Bee amigurumi
The original bee can be made using a hook and a Kinder Surprise box. According to the size of the box, the bee’s head is knitted with black threads, and the body is knitted with black and yellow threads. The eyes are cut out of cotton pads and glued to the bee's head. The pupils can be made from beads or embroidered with black thread. Make antennae from laces, insert wires into the middle of which, and sew them to the head. Place the two finished bee elements onto the box.


A turtle in the amigurumi style is made from two circles: flat and convex, which are connected by scs to each other and stuffed with padding polyester. The head is made in the form of a ball, the paws and tail are made in the form of flat semicircles. All details are sewn to the body, and the beads-eyes are sewn to the head.

A spider using the amigurumi technique is quite easy to knit, but requires a little patience and perseverance. The body of the spider consists of two oval parts, knitted according to the sc pattern and connected to each other, and the legs and antennae of the spider are made of rows knitted without additions from a Japanese amigurumi ring. Such a spider can be used not only as a toy, but also as an original decoration for any interior.


Crocheted fruit toys using the amigurumi technique are made according to the general pattern, but with the difference that for each of them, increases or decreases are made depending on the desired shape. Pull the bottom of fruits such as an apple, plum or pear upward with a thread, and then knit out a twig and a leaf.

Step by step lesson - Moose


The art of crocheting small amigurumi toys originated in distant Japan. At first these were images of famous Japanese cartoon characters, but today knitted miniatures have become popular all over the world and can be in the form of dolls, fruits, animals, and household items.
Not only professional needlewomen, but also those who are taking their first steps in this business can handle amigurumi toys. You just need to wisely choose a hook and a diagram with a description.
Where should I start?
Amigurumi is a crocheted toy. The choice of this tool depends depending on the thickness of the thread used. The hook should be thinner than the yarn, and then the knitting will be tight. When thick gaps appear during work, you should change the tool to a smaller size. Over time, craftswomen easily learn to understand what size tool is needed right away.
To start crocheting amigurumi toys, you should not choose “complex” yarn such as mohair, “grass” and velor. Choose a thick thread with any thread composition.
Amigurumi toys can vary in complexity. Classic Japanese products usually consist of:
- balls;
- sausages;
- cylinders
Having at least a little knitting experience, a craftswoman can easily make a toy of any complexity.
Basic principles of knitting
In order for the toy to turn out beautifully even for a novice needlewoman, it is necessary follow the basic principles of knitting:

Schemes, tables and symbols for knitting amigurumi
If you look at the table presented next to the diagram, you can see that the number of rows in the table is indicated downwards and 1 is the first row. Next, opposite the number indicating the row arrange numbers with symbols:
- V – increase;
- X – column;
- /\\ - decrease.
For example, if a craftswoman sees such a designation (7XV)8, it means knitting 7 single crochets, increasing and then repeating this action 8 times.
The diagram is read from the center to the edges, and then up.
- To gain the necessary experience, first try to make crocheted amigurumi toys without small parts.
- Do not use many different loops. First, using single crochets with connecting stitches is enough.
- Always use a hook smaller than the thickness of the yarn.
- Acrylic yarn is ideal for knitting amigurumi, as it has a softer texture and a rich range of colors. Miniature toys can be knitted with iris threads, and large ones can be knitted with wool and acrylic. “Weed” is used to create animal fur.
- In addition to the hook, knitted items require padding polyester, scissors, ready-made decorative eyes and nose, sequins and beads and other decorative elements.
Children always like knitted animals and they look attractive. Let us give an example of several original and simple schemes with descriptions.
Pig amigurumi
 One of the simplest toys to be crocheted by beginning needlewomen. Knitting doesn't seem difficult. The only and main pattern is considered to be single crochet.
Using a crochet hook, make a Japanese ring of 6 sc from pink thread and knit in the round, adding evenly stitches in the row. Do this for about 7 rows with increases, and then up to 20 rows without increases. From rows 21 to 25, decreases are made symmetrically, while not forgetting to fill the knitted product with padding polyester. In the 26th row, pull the remaining 6 loops into one, pull out and cut the thread.
The ears are knitted similarly to the body. In the 2nd row of the ring, an increase is made by 3 loops and 2 rows are knitted without increases. Folding the ears in half, they are sewn to the body.
The legs are performed in the same way, however, in the second row of work, 2 RLS are knitted from each loop. Without any additions, 4 more rows are knitted, and, having stuffed the legs with padding polyester, they are sewn to the body. At the end, glue on the eyes, make a cute little tail, and the knitted toy will be ready!
Cute mouse
For beginning craftswomen, a simple diagram with a description will be a small mouse. It is performed according to a convenient pattern with a decrease for the muzzle every other row. So, the face will turn out to be slightly pointed. Ears are crocheted from an amigurumi ring: in the 2nd row, add 2 sc in each loop, in the 3rd row - 4 more loops evenly around the circle. The ears are sewn to the body, the eyes are glued on and a knitted tail is made.
Bee amigurumi
Using a hook and packaging from Kinder, you get a cute knitted bee. The head of the bee is knitted with black yarn to the size of the box, and the body is knitted with black and yellow threads. The eyes are cut out of a cotton pad and glued to the head. The pupil is made from beads. Tendrils are made from laces and a wire is inserted into the middle. Both knitted elements are put on the box and you get a toy.
Amigurumi fruit
Having a hook and colorful threads on hand, you can create naturalistic fruits. They are knitted according to the general description, but taking into account the difference - for each fruit you will have to make decreases/increases in shape. The lower part of large round crocheted fruits is pulled upward with a thread, and then leaves and a twig are crocheted.
 This stylish crocheted toy is created according to a general pattern and does not require much perseverance or a lot of time. The body of the spider is made up of two oval elements, the knitting of which is done according to the description of the RLS, connected to each other. The antennae and legs are crocheted without additions from the amigurumi ring. A knitted spider is used not only as a toy. It makes an exclusive crocheted interior decoration.
Conclusion
It seems that if you take on knitting amigurumi toys, you will have to take into account too many subtleties. However, we can assure you that everything will work out. The main thing is that you don’t give up and don’t give up if, when creating your first toy, everything doesn’t work out right away. Start with simple toys and gradually progress. Test the hook, select the thread, and then the toy using Japanese technology will turn out amazingly beautiful!
Hello everyone!
I collect all the materials from different sites, and also look through a lot of information in newspapers and magazines, and then such a huge selection appears, which contains many interesting ideas.
Often, I visit contact groups on knitting and needlework, and it is from there that I get all sorts of new items. I remind all those who saw their work and do not want it to be distributed for free on this site, please let me know, I will delete it at the first request.
Today I will share with you mostly masterpieces that are popular at all times. These are wild and domestic animals and animals. Also, many of you asked to publish cartoon characters. Therefore, everything will certainly be presented here and now. Go.
Don’t forget, if you liked the note, share it on social networks, as well as with friends and relatives.
By the way, the next issues will be devoted to New Year's toys, namely symbols, so do not miss the necessary information and come visit me more often. Better yet, add my site to your browser bookmarks.
What good fellows are the needlewomen who share with us master classes and, of course, detailed instructions completely free of charge. So that even a beginner can master this business.
Knitted animals are always very popular, because our children certainly love them. Every year we make new masterpieces, and usually fill our shelves with symbols of the coming year. Do you agree? After all, it is the year that represents this or that animal. Therefore, my next note will be devoted to such a main character. So, if you are also interested in this topic, then scroll through and find the hero you need
And we’ll start with banal descriptions, in case someone saw all this for the first time and wanted to try themselves as a craftswoman. The most basic thing is, of course, the ring (or oval), without it the toys will not work, this is a kind of basics, here is its visual reproduction of the actions.

And now I propose to focus first on the simplest and most uncomplicated products. For example, make a hippopotamus or a hippopotamus.


Not a single cartoon, not a single fairy tale can do without this hero - the gray wolf. You must admit that our tough guys love them, and sometimes they’re even afraid of them.


Look, baby raccoon, his description is in PDF format. Whoever needs it, write, I’ll send it.

A very tiny and small toy can also be knitted, as shown in the example of a unicorn. You can also make a keychain.


And this toy is extremely cute and cute, such a cheerful and colorful hedgehog.


A sweet and charming dog whose dress and headband are removable (Anastasia Makeeva).


The next work is from Julia Piga. Such a funny and funny giraffe.


The most beloved and popular animal of all times is a bunny, hare... Whatever the kids call it. I propose this model, reminiscent of toys in the tilde style (Antonina Krykanova).


Here is another free master class from Ekaterina Stroikova - Milka the hare, her Instagram @igrushka_1


Or something like this. By the way, I have an excellent selection of . And not only that, there are a lot of descriptions of Easter toys, such as a cockerel, a hen and a chick.

Or make the product simpler. These are such bright, handsome boys and girls.


A funny tiny monkey (monkey) is waiting for its owner (Natalia Shumova).


I would also like to show the bear, or perhaps you will knit a huge bear.


And this teddy bear is very tender, and most importantly, it knits easily and quickly.


Funny little red fox or little fox, call him what you want.

Well, accordingly, you can’t do without the king of beasts - this is a lion.
The long-legged frog will also delight you.


You might be interested in this work, I can send you instructions by email, write me.

In addition, there is also a fish in the form of a shark with illustrations and step-by-step explanations.

This mischievous sheep will enchant you.


Or would you prefer lamb? In any case, the choice is yours.


Dedicated to all horse and pony lovers.


Or this cat, or rather the cat Marshmallow from Yulia Koroleva, will cheer everyone up, you can knit it as a gift.


Kids really love another cartoon - this is about Malyshariki or Smeshariki. I found descriptions of the Hedgehog.


But also all the other participants - Pandochka.


Well, let's start in order, Krosh will be the first.


Now I offer a diagram of the calmest hero - Barashik.


And let’s not forget about the beautiful Nyushenka.


A character from a Soviet cartoon - Cheburashka. Who needs it, write, the instructions are too long, I couldn’t post them here.

Nowadays “Three Cats” is still popular - these are Caramel, Korzhik, Sarzhik and Compote. There is also, write.
Of the Barboskins, I only came across Druzhok. Instructions in PDF format on 15 pages, did not fit here.

By the way, there is also such a selection, it also has many options. Take a look. Unfortunately, I am not able to fit everything into one article, so I have to publish something here and send something if I want. As you can see, this is Booba, the lion cub and the turtle from “I’m Lying in the Sun,” Goldie and Mimimishki.

I’ll try to find Minions (already exist) and Fixies to add to this article, perhaps I’ll publish a separate post on this topic to include everything I have.
Knitted amigurumi toys. Over 1000 free patterns
For those who don’t like to sit and painstakingly search for something on the Internet, I have prepared ready-made materials that I borrowed from Irina Korneva, she shares them on social networks and makes selections. Many thanks to her for this! There are quite a lot of unique works in her collection. There are just so many of them, you can’t count them. But before that, I’ll show you a few other examples.
This beautiful doll in the shape of an angel is also in my collection. Write to whoever needs it, I’ll send it to you.
Quite original, girls will definitely appreciate it - the little mermaid.


And this cutie will make anyone smile. This, as you might have guessed, is a dragon. A song immediately comes to mind about Tosha, the Carousel channel is playing now.


For the boys, I have an airplane in my chest.


Well, finally, I will be very glad to see all of Irina’s achievements that you can get if you leave your review or comment below.
Well, let's begin. Those who love dolls and there are many options for you.

Then a large collection of hares.

Also bears.

A collection of dogs, I repeat again.

Kittens and other representatives of the cat family.

Plus, sea creatures such as whales, turtles and even fish can soon become yours if you start creating right now.

Those who love rodents or their representatives, such as mice, rats or hamsters, are also located here.

There are also birds and insects such as bees, butterflies and even a penguin.

Of course they are predatory animals.

And also elephants, giraffes, etc.

And in conclusion, the most favorite detailed instructions from Leithygurumi, according to which you can tie any animal.


If you liked the work, please comment below and I will certainly email you the necessary diagrams and master classes.
But in general, of course, needlewomen create such masterpieces, you are often simply amazed at their fantastic skills and ingenuity, they even make baby rattles or mobiles for newborns over the crib.

In conclusion, I want to say thank you to everyone for stopping by to visit me. Patience, perseverance, creative success and of course a great mood, you can’t go anywhere without it. Write reviews, I will be glad to receive your wishes. Bye! See you.

